


Creating a successful WooCommerce music store with attractive features for customers needs time and effort. You may think that selling music as a downloadable product on WooCommerce is simpler than selling physical goods. However, without designing a charming layout for your shop page and utilizing customer-friendly features that your visitors expect to see like useful filters, multi-add to cart, music preview, etc. you are not able to transform your e-commerce store into a sustainable business.
In this step-by-step guide, we want to show you how to create and design a WooCommerce audio store with the best music store plugin for WordPress.
What do you need to create a WooCommerce audio store?
If you have decided to set up your online music store on WordPress and sell your audio files and tracks, it is necessary to get help from the following tools:
WooCommerce plugin
WooCommerce is a free and well-known WordPress plugin that allows you to convert your WordPress website into an online shop. The biggest advantage of WooCommerce is the user-friendly interface enabling all store managers to add products, activate online payments, and manage orders for selling Music on the WooCommerce store.
WooCommerce friendly theme
After installation and activation of WooCommerce, you need to ensure the WordPress theme that is already installed on your website is compatible with WooCommerce. Regarding the fact that the WordPress theme forms the basis of your online store, it’s necessary to use a professional one. We recommend you test some popular themes like Storefront before making your final choice.
WooCommerce product table plugin
If you want to surpass your competitors and earn money from your music store, you’ll need to tailor your eCommerce website to the type of product you’re selling. The configuration required for a WooCommerce audio store is different from an online clothing store in WooCommerce or an online restaurant. You’ll need a third-party plugin to help you display music tracks with their information like title, artist, album, genre, preview, price, and more in an attractive way. The wooCommerce product plugin is your ultimate solution for creating a customer-friendly WooCommerce music store by displaying the product fields in separate columns of the table and simplifying the purchasing process by adding useful features.
How to create a WooCommerce music store?
To set up a WooCommerce audio store with the WooCommerce product table plugin, follow the below steps:
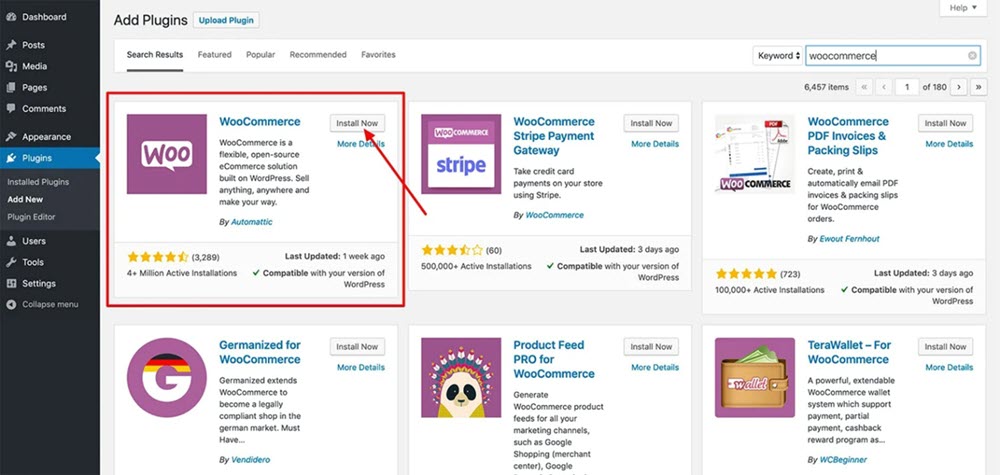
Step 1: Install WooCommerce and theme
The first step is searching and installing the WooCommerce plugin in the WordPress repository. WooCommerce has a step-by-step wizard guiding you through the installation process. It will automatically add the necessary pages required for your online store to your WordPress website.
To let WooCommerce work properly, you need to install a WordPress theme that is compatible with WooCommerce. You can easily, go to the below address:
Appearance > Themes > Add New
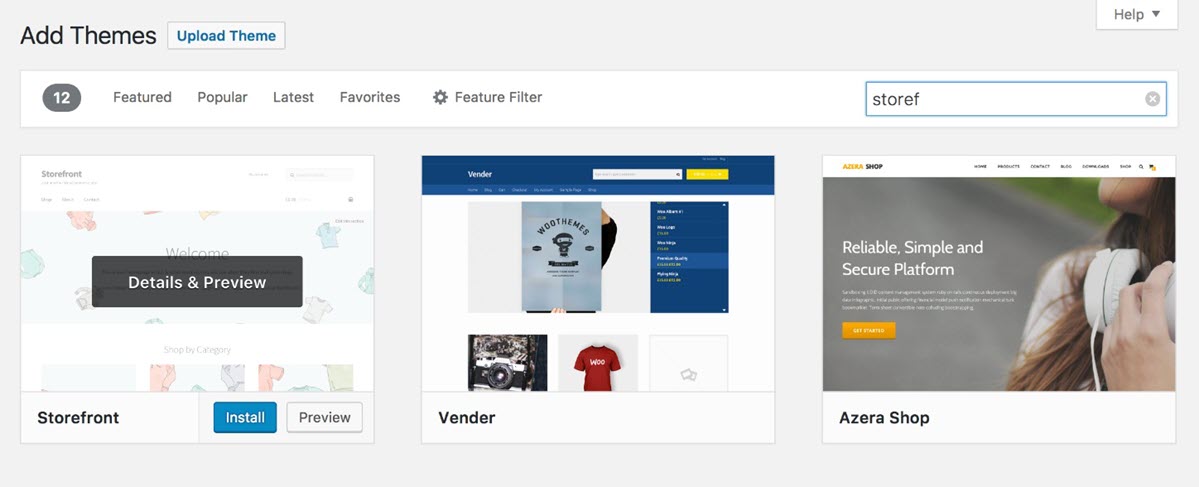
Then, search for a suitable theme like Storefront and install it on your WordPress website. After activation, you are ready to add music tracks and set other configurations to sell music on WooCommerce.
Step 2: Add audio products to WooCommerce
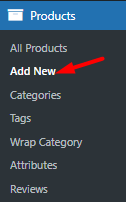
In the next step, you have to add music tracks as simple and downloadable products to your website by navigating to the below path:
WordPress >WooCommerce > Add New
On the add new product page, you can add the first music track by following the below instructions:
- Write a Product name in the first box. This is the title of music that your customers see when visiting your online store.
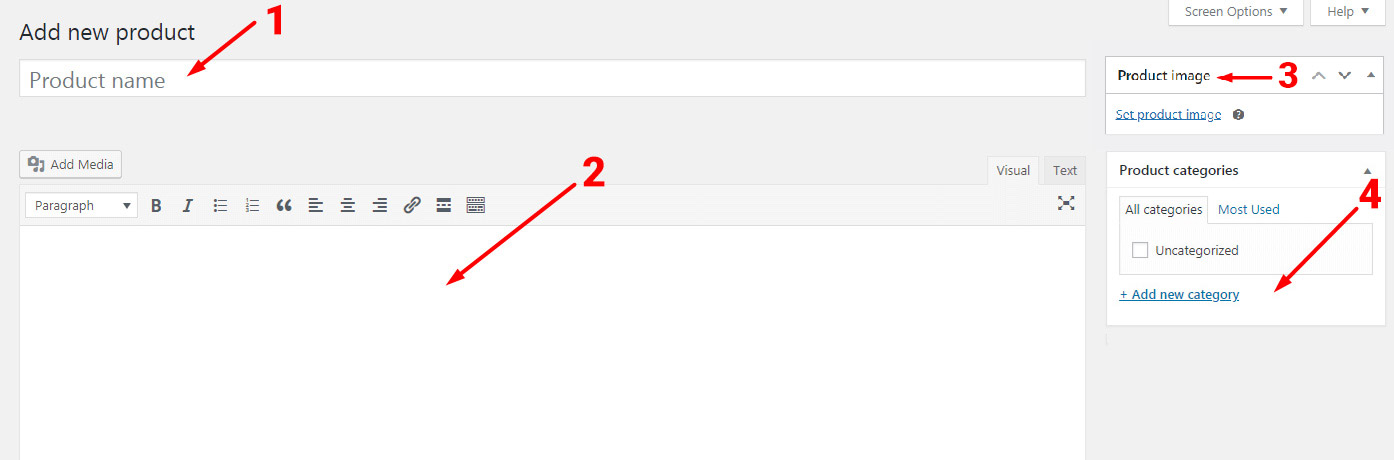
- Write a description of the music in the next text box to help your customers make a better decision when they want to buy the music track or album.
- Upload the featured image in the right-hand sidebar.
- Allocate the product to one or more categories, and add descriptive tags (if needed).
Now, you need to fill in the Product data form. By default, WooCommerce supposes that you are selling physical goods so there is no option for adding music files on the product page. To sell music in WooCommerce and let customers download the song file after payment, you need to mark Virtual and Downloadable Items in this section. As soon as marking these options, you will see extra items including Add file button in the Genral tab.
So, follow the below instructions to complete the form:
- In the General section, insert the Regular and Sale prices.
- Upload the music file by pressing the Add file.
- Set Download limit and Download expiry (optional).
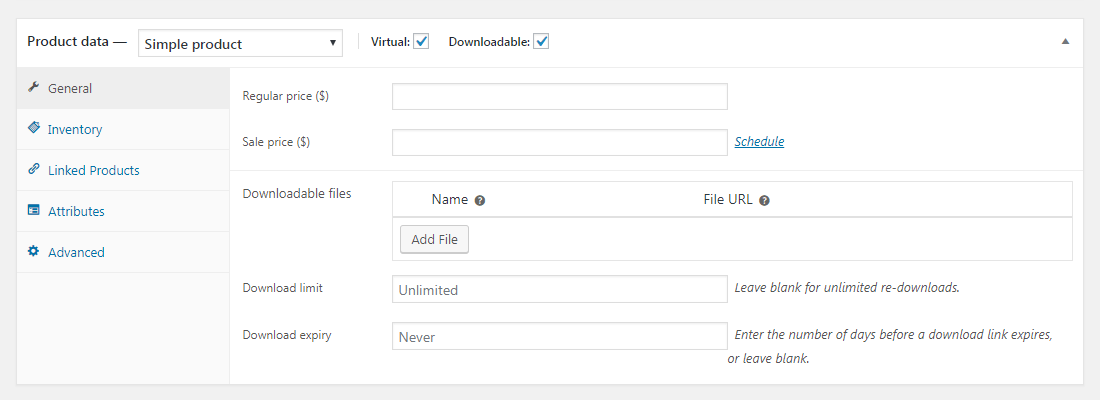
- Set other features like Inventory, Attributes, etc, if necessary
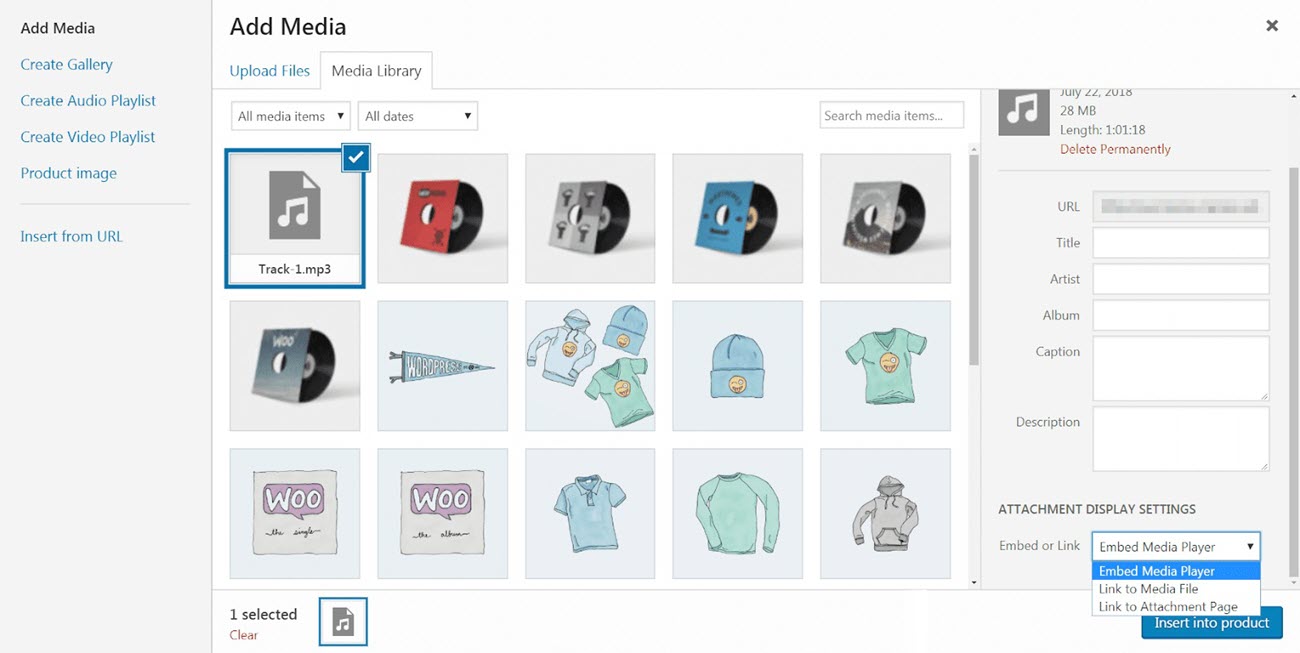
You can also integrate audio players and let customers listen to a preview of the music track by following the below steps:
- Go to the Product short description section.
- Click on the Add Media button.
- Upload the audio file from your computer.
- Complete the required fields.
- Select Embed Media Player from Embed or Link list.
The result is like below:
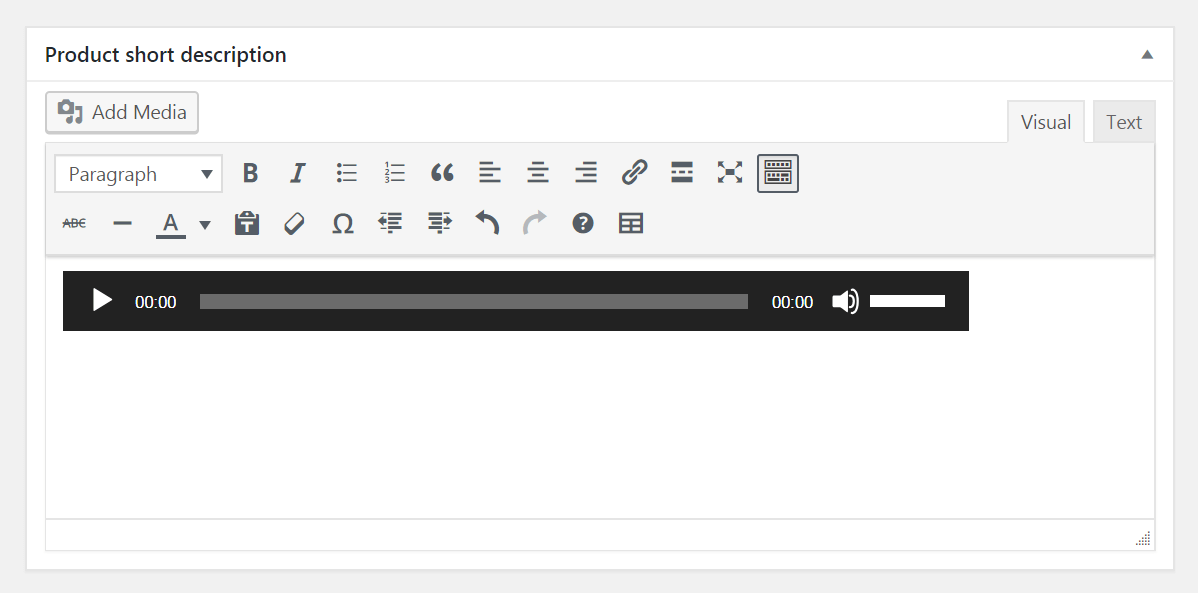
Finally, press the Publish button to successfully add the first music track to your store.
Repeat these steps until you’ve added all music tracks, albums, and other items you wish to sell on your WooCommerce music store.
Step 3: Install and activate the best music store plugin for WordPress
Creating a music store with WooCommerce without using an audio store plugin is not always ideal for selling music online. If you just rely on WooCommerce, your customers will need to visit each product page to review the details, listen to sample tracks, and place orders that are significantly time-consuming and boring for them.
To improve customer experience and make them satisfied when visiting your WordPress music store, it is a good idea to use the WooCommerce product table plugin to showcase all details in different columns of a product table on a single page.
TABLEiT – Product Table for WooCommerce
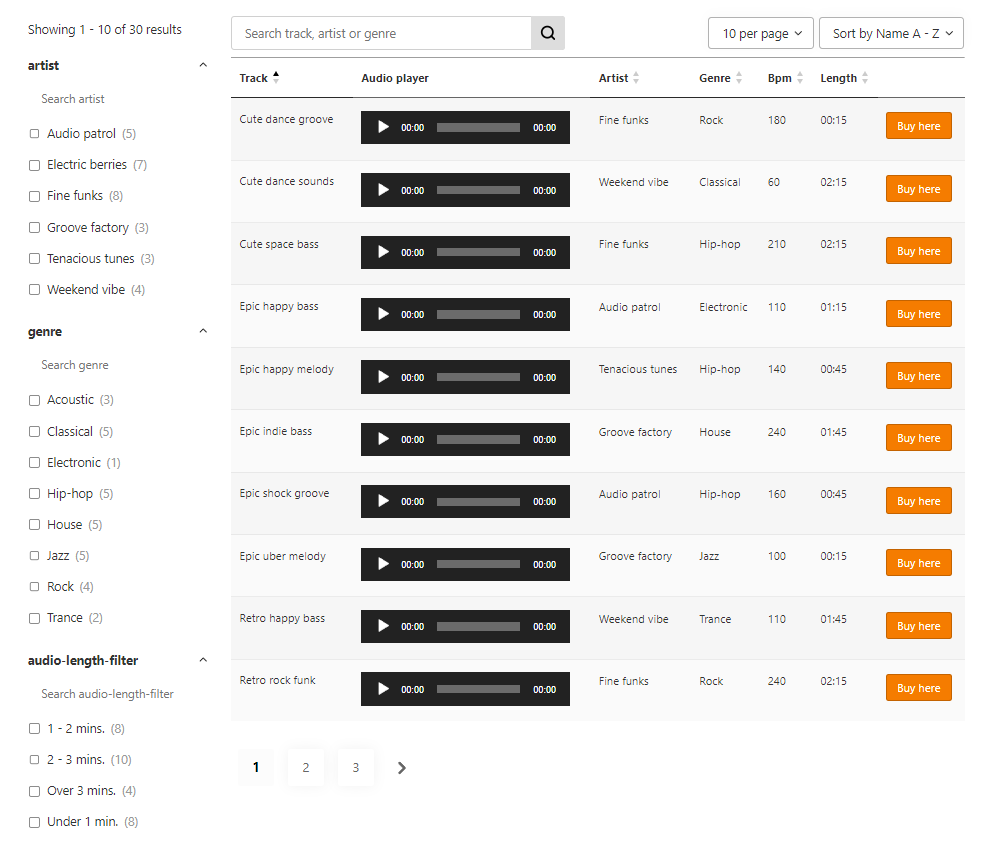
The easy way to create a WooCommerce music store
In this way, your customers can observe all they need on your shop page. In addition to reviewing all necessary information at a glance, customers can filter music tracks and then add multiple items to their cart directly from the table. You can also display sample audio players and review stars directly in the table columns to help customers make better decisions.
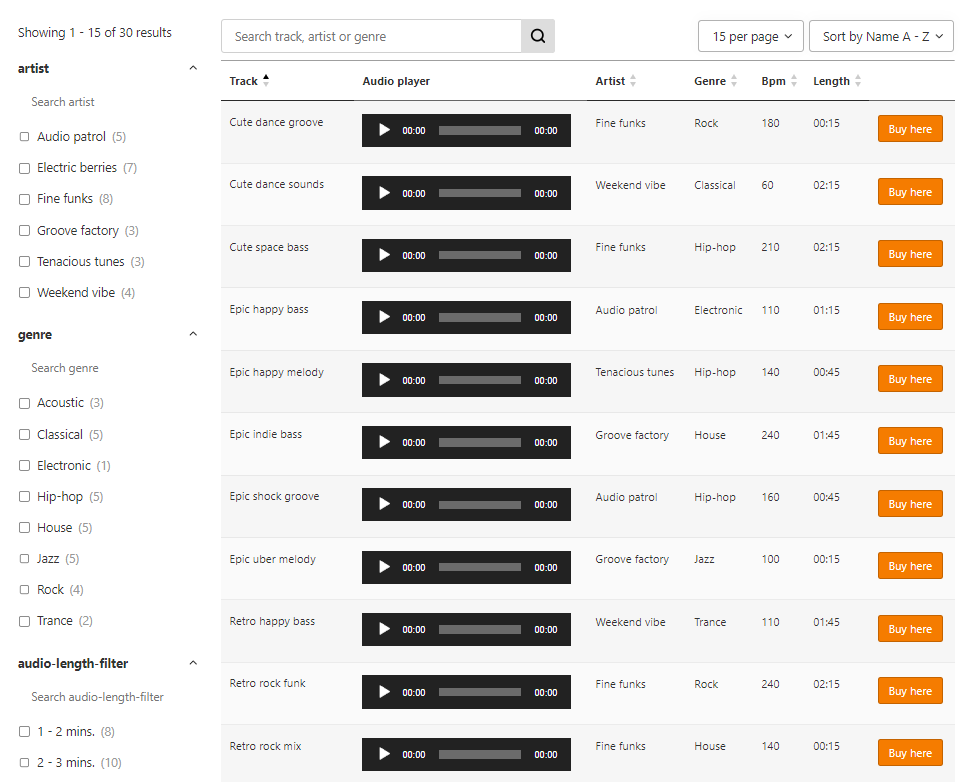
To create a WooCommerce audio store like this, you’ll need the WooCommerce product table plugin. This plugin is fully compatible with WooCommerce allowing you to completely adjust the appearance and functionality of your product table.
You can easily install the WooCommerce product table plugin by downloading the ZIP file on your WordPress store.
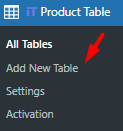
After activation, you can create a new product table by navigating to the below address:
WordPress Dashboard > IT Product Table > Add New Table
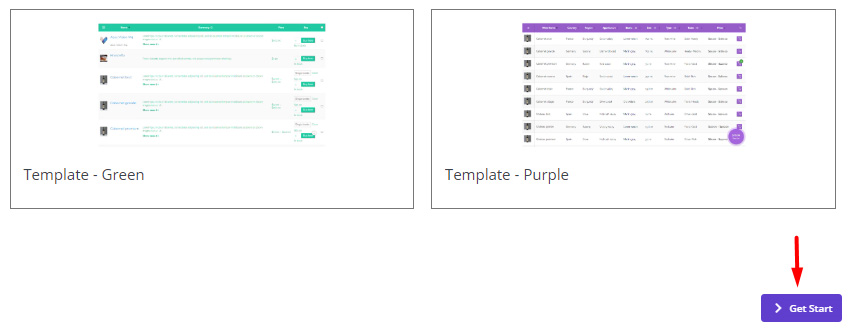
Click on the Get Start button on this page to have access to the tools and options of the WooCommerce product table plugin for designing your audio store.
Step 4: Add products to the WooCommerce audio store
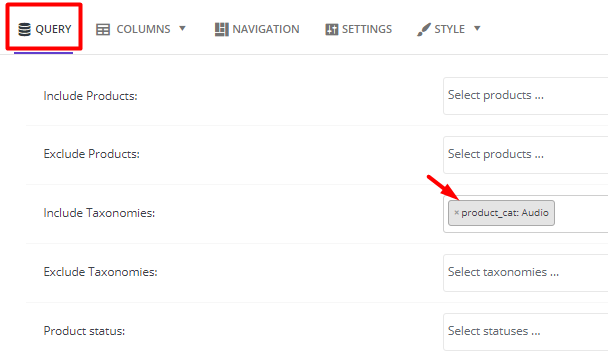
The plugin allows you to make a query from your WooCommerce products by configuring the options in the Query tab. You can use practical items to :
- Include products: Add one or more specific products to be displayed in the table.
- Exclude products: Eliminate one or more products from displaying in the product table.
- Include taxonomies: Add one or more categories, attributes, or variations to show the related products in the table.
- Exclude taxonomies: Exclude some products in specific categories, attributes, or variations from the table.
For example, if you have various product categories in your store, you can select the Audio category in the Include Taxonomies field to show the music tracks assigned to this category in the product table.
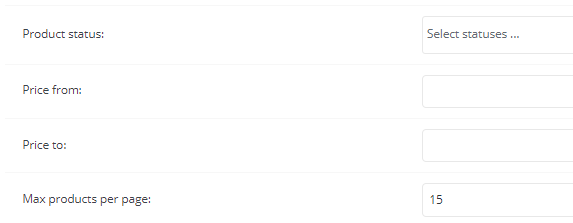
There are other useful options in the Query tab like:
- Max products per page: To limit the number of products displayed on each page of the product table .
- Price from and Price to: To display specific products in the table based on prices.
- Product status: To show products with specific statuses in the table.
- and more
After selecting the right products in the Query tab, you are ready to add different columns to the table and inform your customers about the music details in an attractive way.
Step 5: Add columns to the table of WooCommerce music store
The WooCommerce product table plugin comes with an easy-to-use interface allowing you to add as many columns as you need to your table with the drag & drop tool.
Let’s review the simple steps for adding columns to your music store:
- Got to the Columns tab.
- Press the Add a Column button to see a new column with two sections:
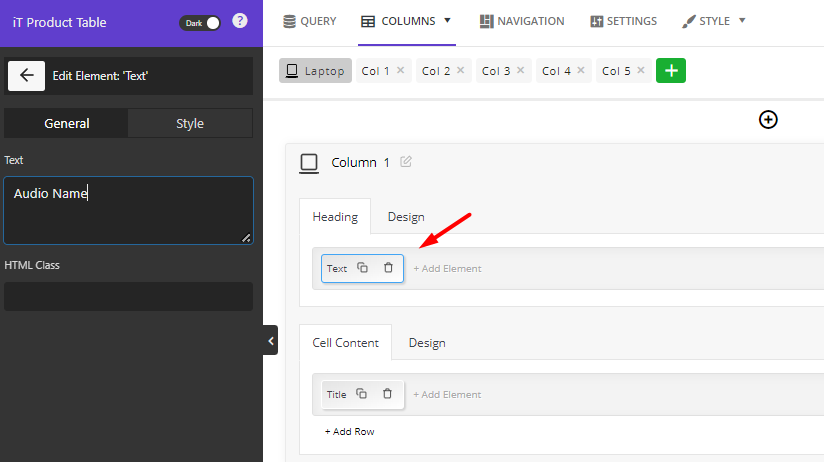
- Heading: This is the title of the column which is displayed on the first row of the table.
- Click on the Add Element option in the Heading to see the list of elements you can display in the heading of the column in the left panel.
- Select one of them like Text then customize the options in the General and Style tabs displayed in the Element Settings panel. For example, we insert Audio Name in the text box to display it as the header title of the column.
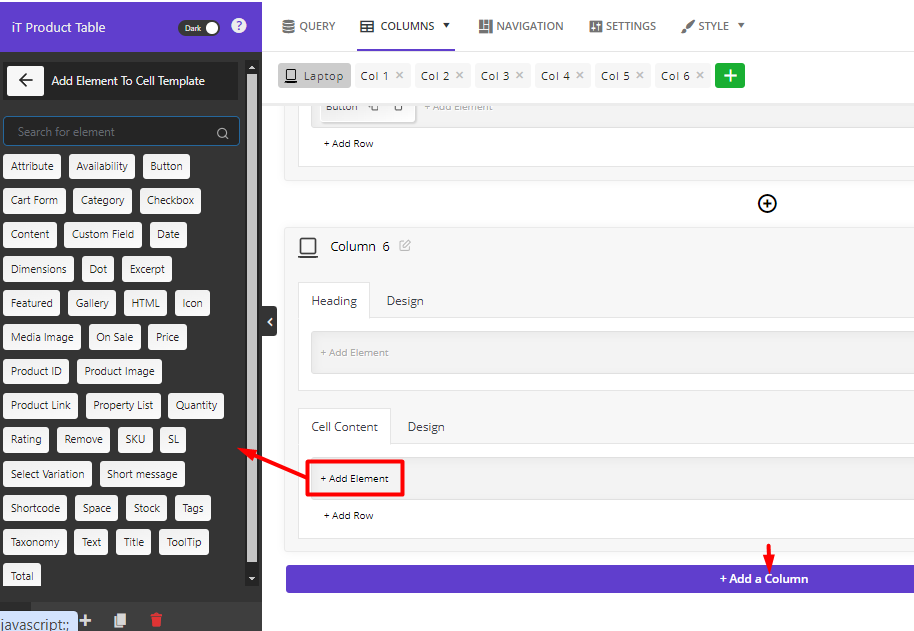
- Cell Content: This is the value that is shown in each column of the music store table.
- Press the Add Element button in the Cell content section and choose one of the Elements like Title from the left panel.
- Try to personalize the element by tweaking the items in the General and Style tab of the Element Settings panel.
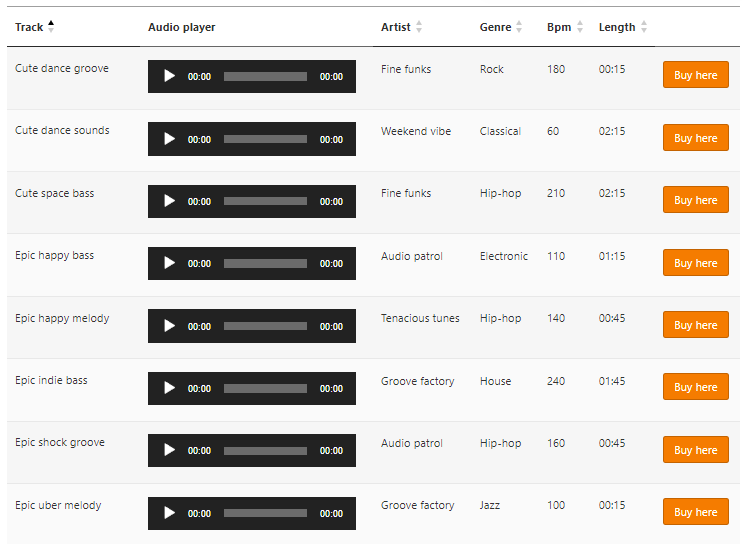
By repeating the above mentioned steps, you can add the most important columns to the music store including:
- Title: The name of the song.
- Excerpt: The short description to display the sample music.
- Price: The regular price of the song.
- Attribute: To display some attributes assigned to the products like Genre, BPM, Length, Artist.
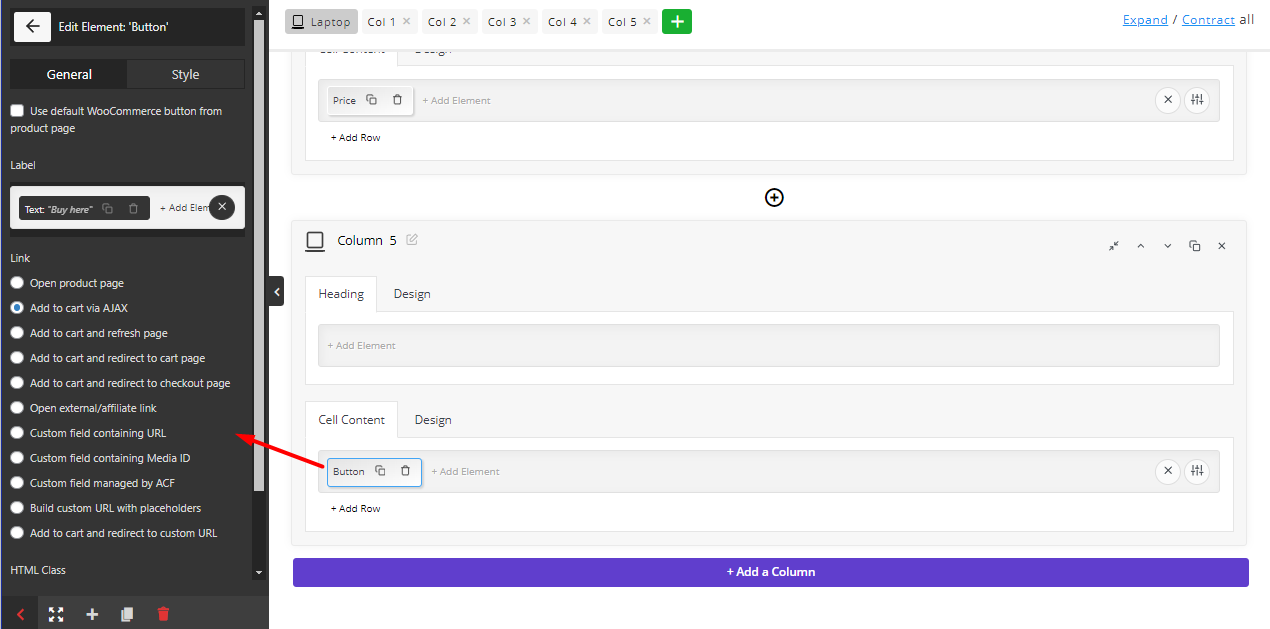
- Add to cart button: To let customers order the song directly from the table.
The result looks like below:
Step 6: Add useful widgets to the WooCommerce audio store
To improve the customer experience, you need to add extra features like filtering music, sorting, multi add to cart, mini cart, search box, etc. to the product table. These features enable customers to find their favorite music more easily and order the items faster.
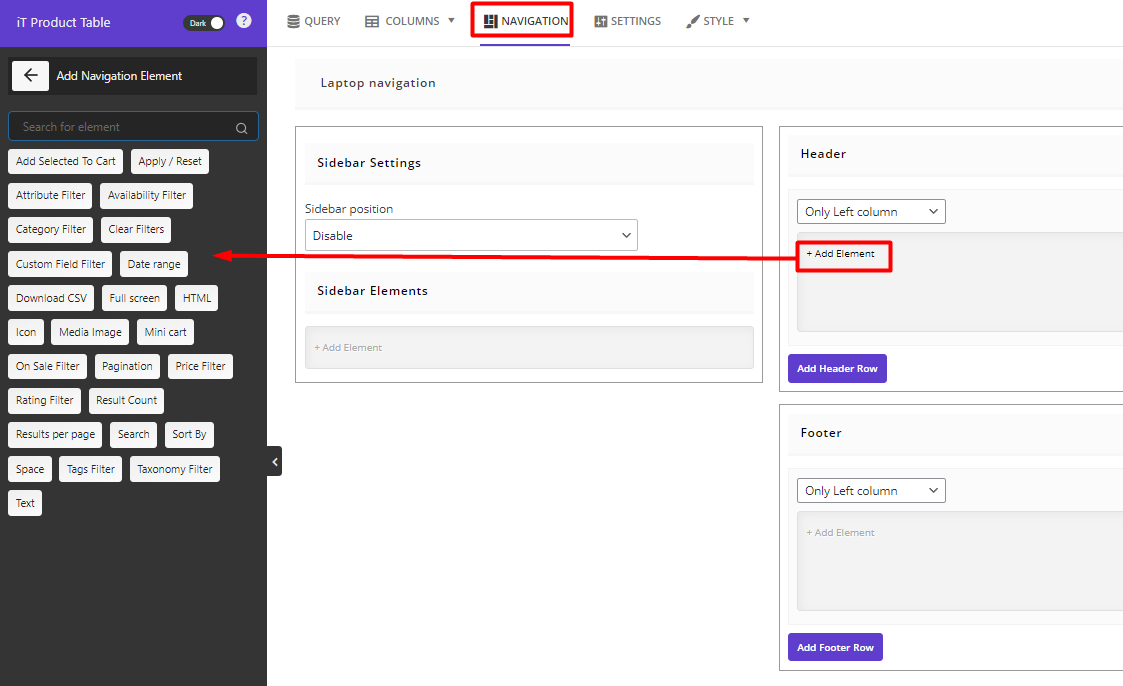
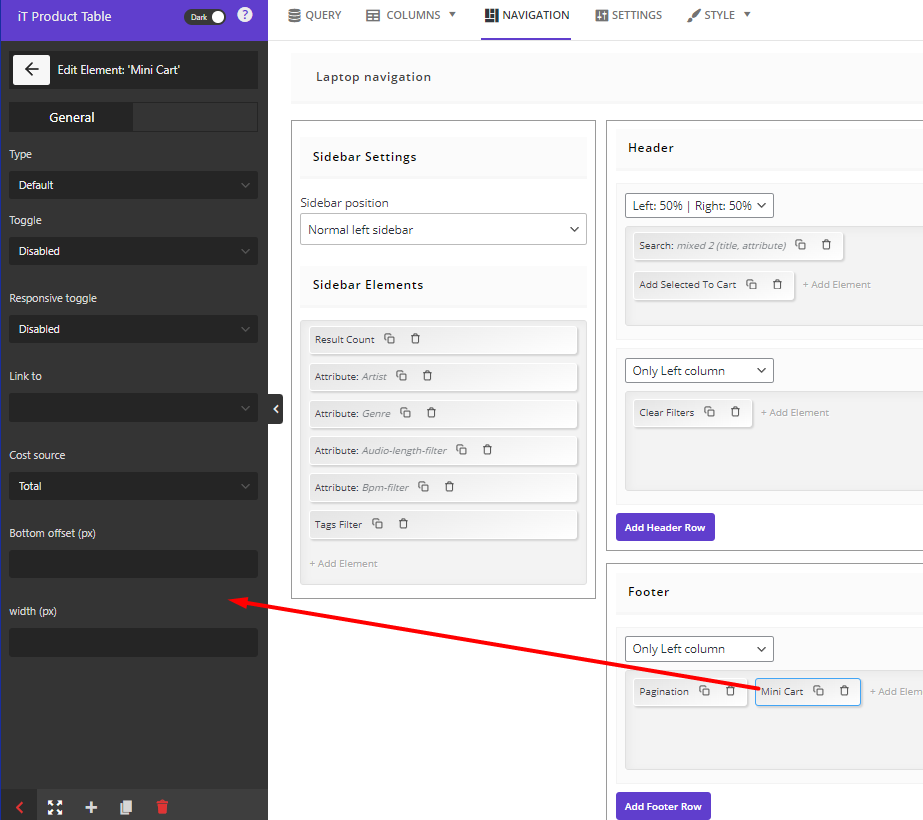
In the WooCommerce product table plugin, you can go to the Navigation tab to add different items to the navigation areas. As illustrated in the below picture, there are three Navigation bars:
- Sidebar: The navigation bar on the left or right side of the product table.
- Header: The navigation area above the product table.
- Footer: The navigation bar on the bottom of the product table.
To add elements in each area, you can press the Add Element to see the items you can add to the navigation areas such as:
- Add selected to cart: Customers can mark multiple products and add them to their cart simultaneously.
- Attribute filter: Customers can filter music tracks by one attribute like artist name, duration, and published date, etc.
- Category filter: Customers can try to filter songs by category like Pop, Classic, Jazz, etc.
- Search: Customers have access to a search box for finding their favorite songs.
- Sort by: Customers can click on the sort by item and sort the list of music files by some features like prices, duration, etc.
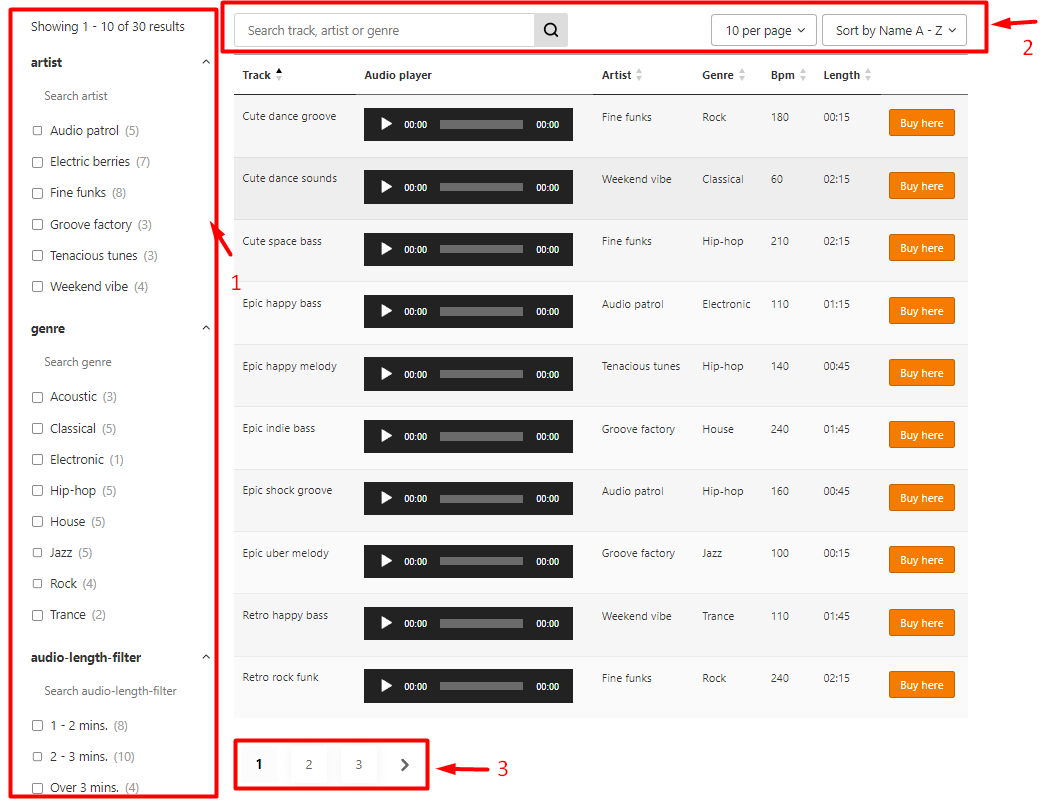
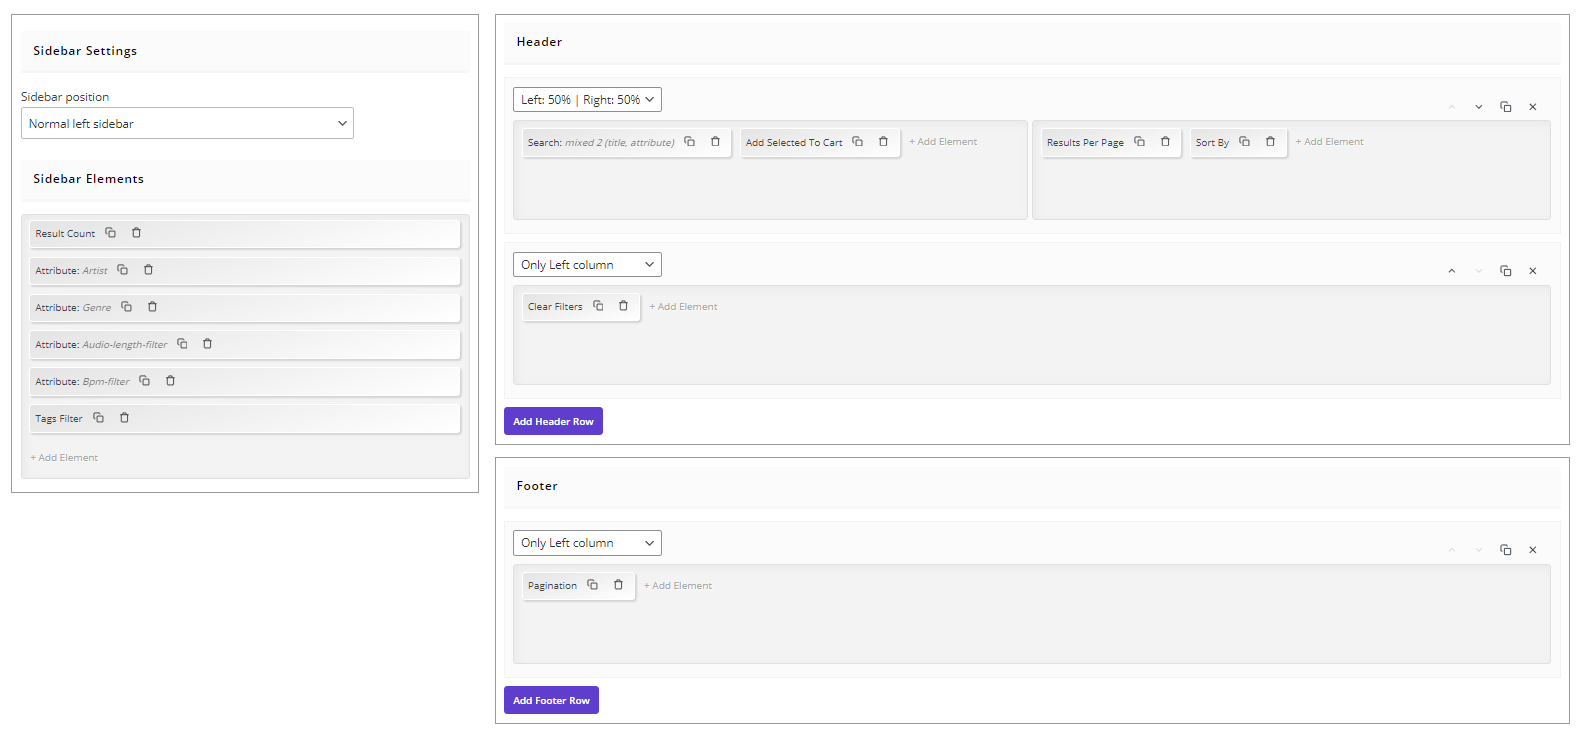
For example, we tried to add the following navigations to the header and footer:
Header area:
- Search box: To allow customers search products by title and content.
- Sort by: To enable customers sort items in the table alphabetically.
- Result per page: To let customers specify how many products displayed in each page of table.
- Clear filter: To enable customers remove applied filters.
Footer area:
- Pagination: To show the number of pages to the customers and allows them to jump to another page by clicking on the page number.
Sidebar area:
- Result count: To show the number of items displayed in the table after filtering.
- Attribute (Artist): To let customers filter songs by Artist.
- Attribute (Genre): To allow customers choose one or more Genre and filter their favorite songs.
- Attribute (Length): To enable customers filter music tracks by length.
- Attribute (BMP): To let customers filter songs by BMP.
This is how the navigation bars are displayed in the table:

Step 7: Set settings and styles to customize the WooCommerce audio store
The final step for customizing the WooCommerce music store is editing the Settings and Style of the product table.
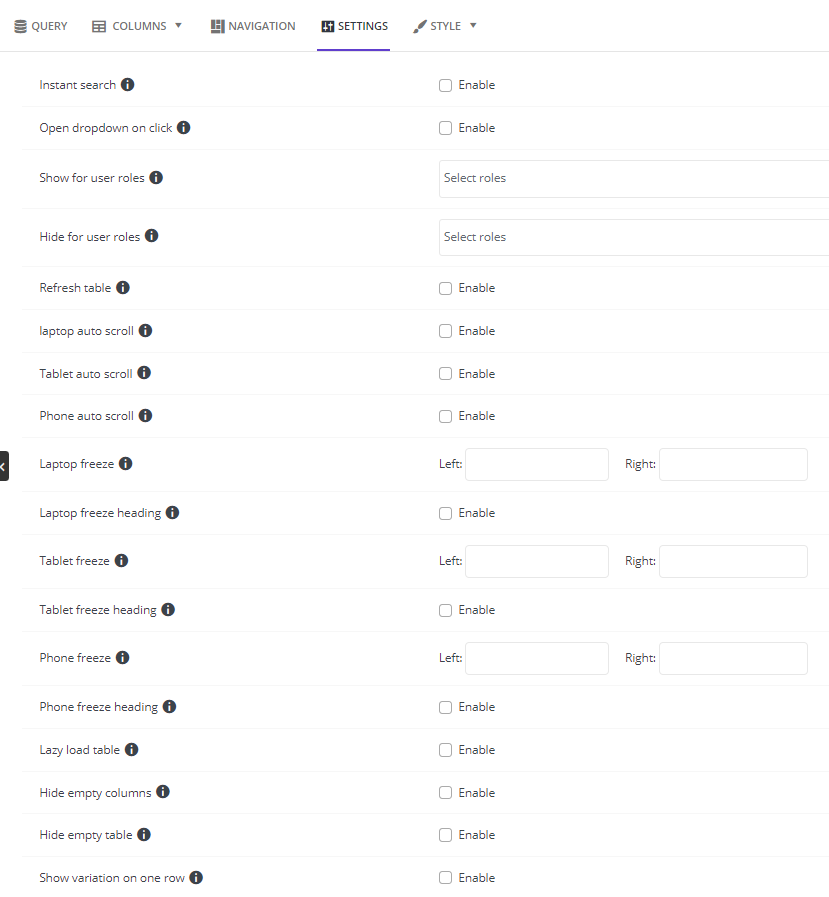
In the Settings tab, you can set some general configurations for your product table including:
- Instant Search: By enabling this item, the plugin will overrside the search navigation filters to do the client side filtering.
- Open dropdown on click: By enabling this item the dropdown filters will open when customers click on it (Not hover it).
- Refresh table: By activating this item the table will be loaded anytime the client add or remove items to/from their carts.
- Laptop/Tablet/Phone auto scroll: By enabling this item, the plugin scroll to table header automatically when customers reload the page.
- Show/hide for user role: You can add specific user roles in these fields to let them see the table or not.
- and more.
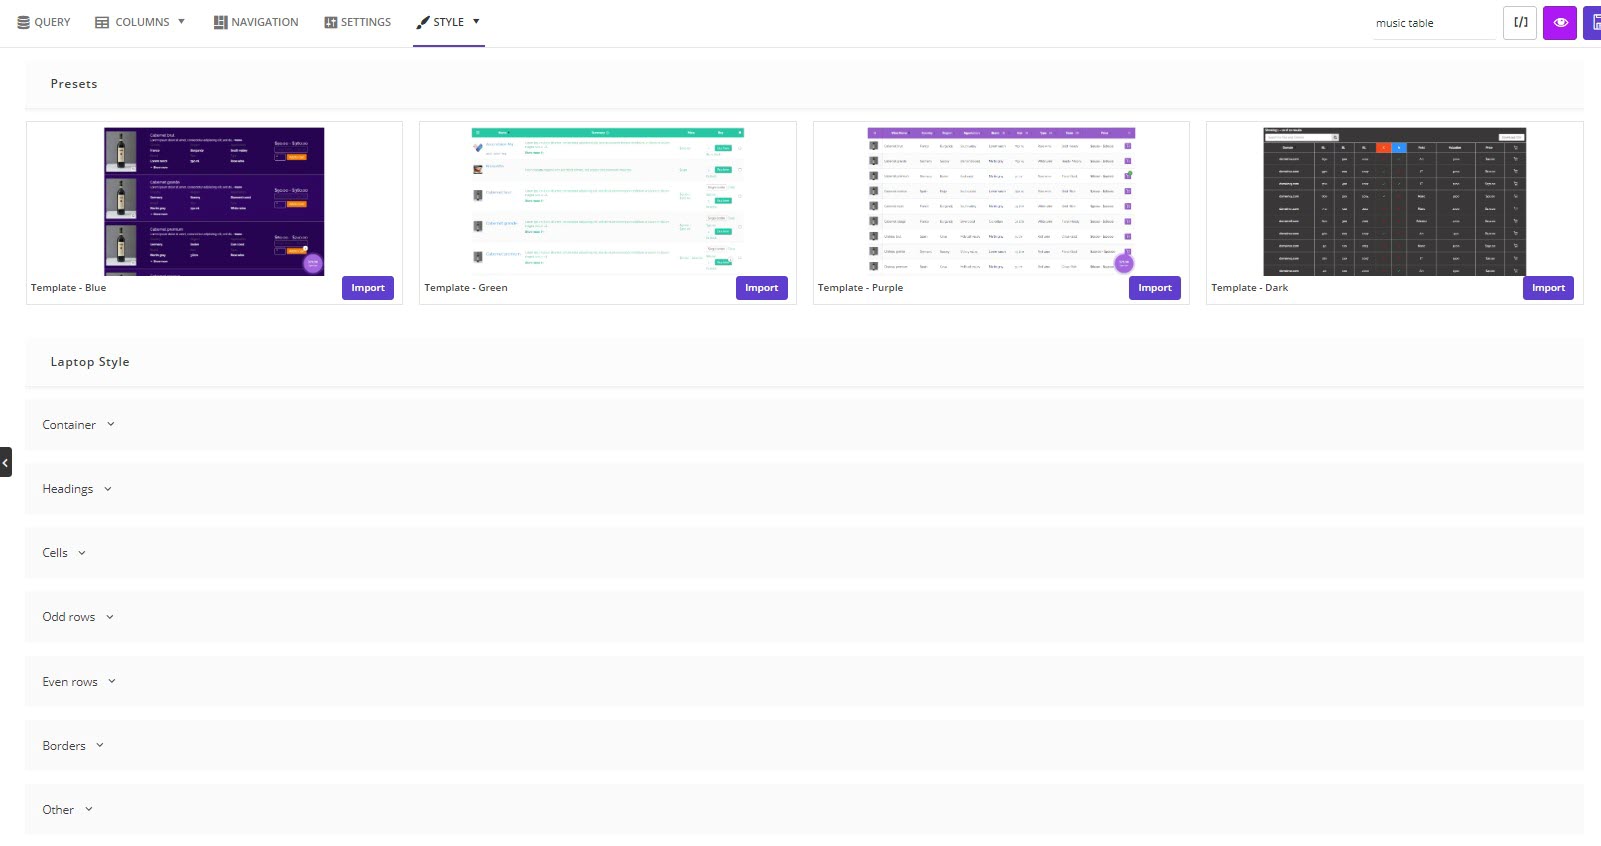
In the Style tab, you have access to some preset templates allowing you to transform the appearance of your product table with one click.
It is also possible to set your favorite configurations by customizing various items like Container, Heading, Cell, Odd/Even rows, etc. For each item, you can add size, color, font, and many more.
Note: In each step, you can click on the Preview icon at the top of the table to see what your music store looks like.
Step 7: Use Shortcode to display your product table on the WooCommerce shop page
The WooCommerce audio store you have created in the WooCommerce product table plugin has a unique Shortcode which is useful when you want to display the table on your website.
By typing a name for your table (e.g. Audio 1) and then pressing the Save icon, the plugin will automatically assign a shortcode to this table and you can copy the code by clicking on the Shortcode icon.
Now, to use this shortcode, simply open a new page on WordPress and paste the code into the content.
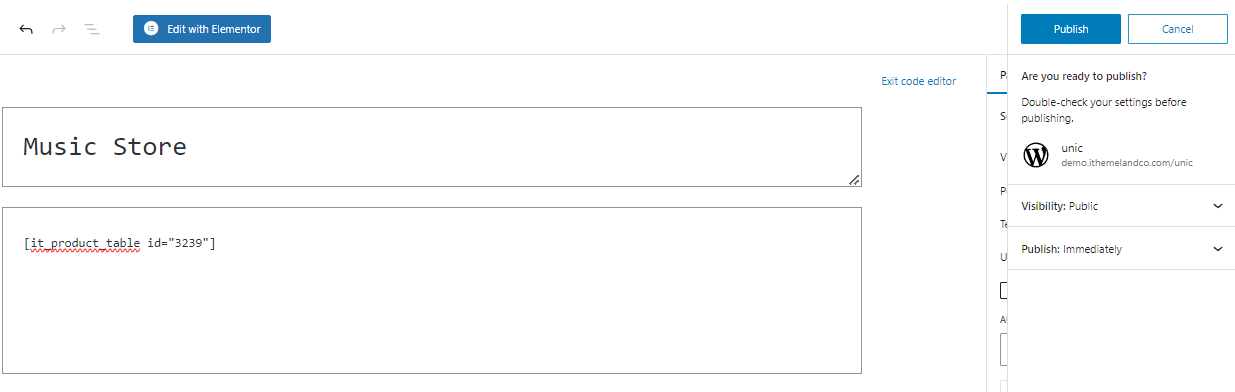
By adding a title for the page and publishing it, the audio table will be displayed on the page.
If you want to replace the WooCommerce shop page with this music table, go to WooCommerce Settings > Products.
Then, open the dropdown list of the Shop field and find the name of this new page in the list.
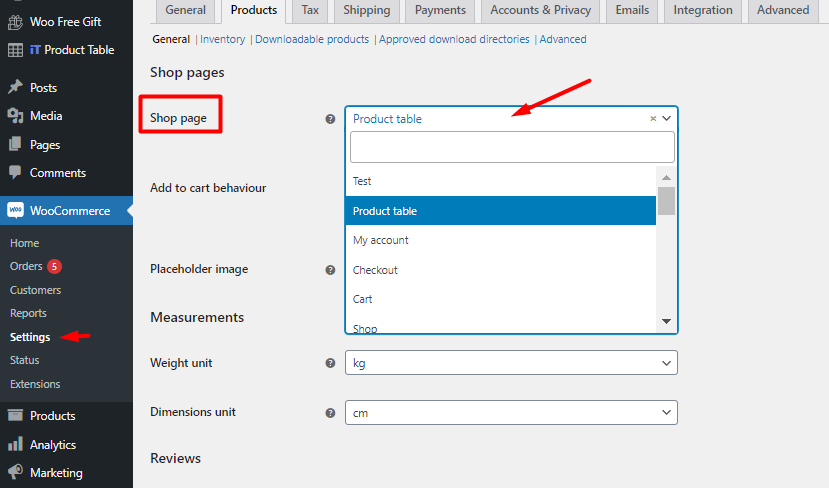
Selecting the page and pressing the Save Changes button will result in showing the product table on the WooCommerce shop page to the customers.
Extra features of the audio plugin store
WooCommerce product table comes with a lot of amazing features that are useful for making an enjoyable experience during the customer journey when they decide to order music tracks or songs from your WordPress music store.
Let’s review some of them.
Add quick view to WooCommerce audio store
One of the best features for satisfying customers when visiting your audio store is allowing them to see the details of songs on a pop-up screen without any need to open the product page. You can add this feature to your product table with the Shortcode element.
To make this feature work on your store, first, you need to install the Yith quick view plugin which is compatible with the WooCommerce product table. Then add the Shortcode element to a new column of your table and insert the YITH quick view plugin shortcode in the element setting panel.
Improve customer experience by Multi add products to cart option
Multi add to cart is a great way for improving customer experience especially when you are offering a lot of wonderful songs, podcasts, and music tracks on your website. Enabling multi-add to cart feature in your table allows customers to select as many items as they need on the shop page and add them to their carts with one click.
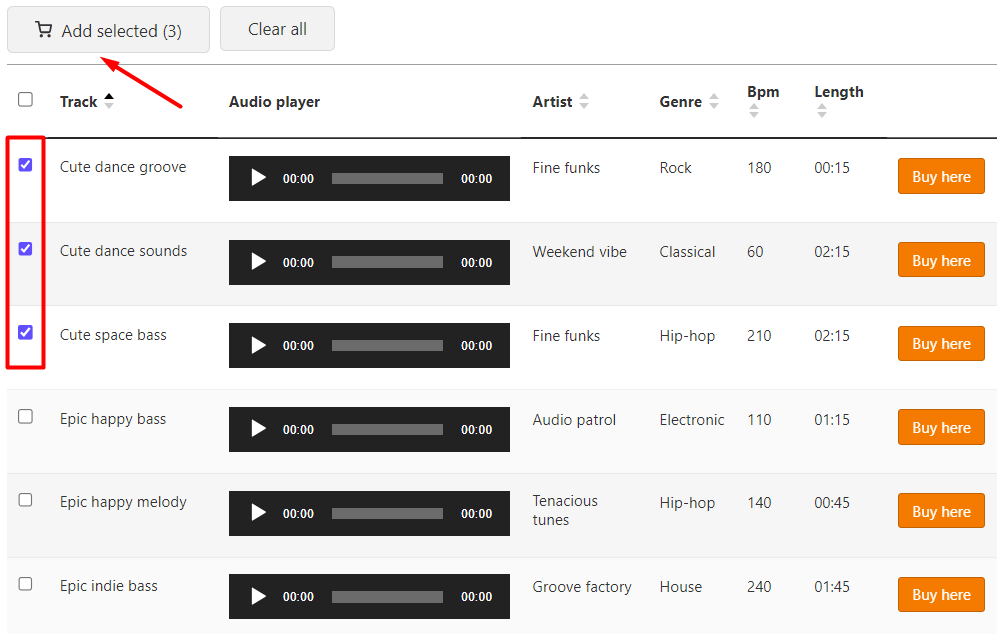
To make your customers happy with adding multi add to cart option to your table, first, you have to add a new column to the table and add a Checkbox element to it.
Then go to the Navigation tab and choose Add selected to cart element to be displayed in one of the navigation areas like Header.
As you can see in the below picture, customers are now able to select some items and press the Add to cart button to directly order them from the table.
Override cateogry/tag/attribute pages with product table
WooCommerce product table has a fabulous option for simplifying the process of overriding product catetory, tag, attribute, or WooCommerce shop page with different product tables created in the plugin with one click.
To use this feature, you need to go to the WordPress Dashboard > It product table > Setting
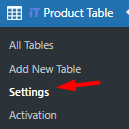
Then open the Override tab and choose one of the tables from the list.

You can create unlimited product tables and override each category, attribute or tag pages with each one, individually.
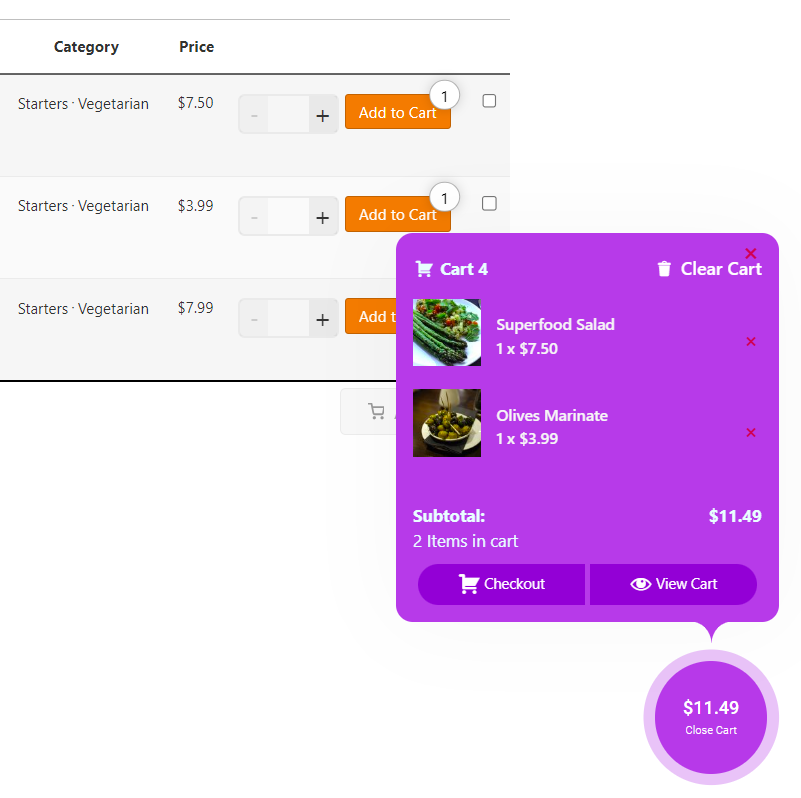
Display Mini cart on the shop page
The mini cart widget is a small shopping cart that lets customers know essential order details without leaving the shop page. To display this compact information in the WooCommerce audio store, you have to add a Mini Cart element to one of the Navigation areas like the footer.
TABLEiT – Product Table for WooCommerce
The easy way to create a WooCommerce music store
Conclusion
In this post, we have tried to show you how to create and design a professional WooCommerce audio store with the WooCommerce product table plugin. It is worth mentioning that the whole process of creating and customizing the Woocommerce music store could be done in less than an hour. So, if you have decided to sell music online, just try the best music store plugin now, and don’t forget to share your feedback with us!


