In large online stores, there are always some products that have several attributes. For example, different colors and sizes of a product may have different prices. In such a situation, those products are defined as variable products in WooCommerce and variations are also added to them. However, managing a large number of variable products is so time-consuming by WooCommerce’s default options. To solve this problem, you can use VBULKiT – Bulk Edit WooCommerce Variations – plugin to edit all product variations simply and quickly. In this article, we will teach you how to add variations to multiple products with this useful plugin.
Add variations to new simple Products
When you add new products to your online store, they appear as simple products in WooCommerce and you need to add variations to convert them to variable products. Fortunately, when you add variations to VBULKiT – Bulk Edit WooCommerce Variations – plugin, there is no need to manually change the product type to a variable product. The plugin can convert simple products to variable products automatically as soon as you add some variations to them.
To start assigning some variables to your products, first, you need to filter them by using easy to use Filter Form of our plugin. Then you have to mark the products in the table and finally open the Variations Bulk Edit Form to add or replace the variations to the selected products.
Now, let’s make an example to review these simple steps.
Step 1: Filter Products
For example, suppose that you added some new products under the Clothing and Hoodies categories to your online store and you need to add some variations to them.
To filter those products, follow the below steps:
- In the WordPress Dashboard go to iThemeland > VBULKiT.
- Click on Filter Icon.
- In the Filter Form, go to the Categories/Tags/Taxonomies tab.
- In front of the Product categories field, choose “Or” for the first combo box and select “Clothing and Hoodies” from the list of the second box.

- Now, you have to filter simple products, so, click on the Type tab and choose Simple Products from the list in front of the Product Type field.

- Finally, by clicking on Get Products, you can see them in the product table.
Step 2: Select Products
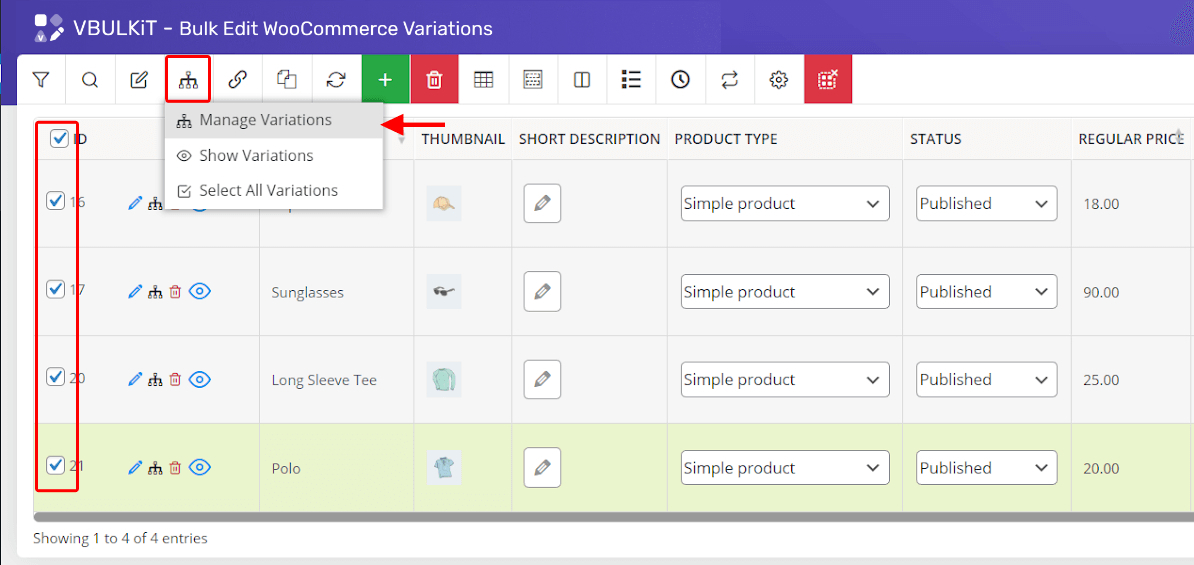
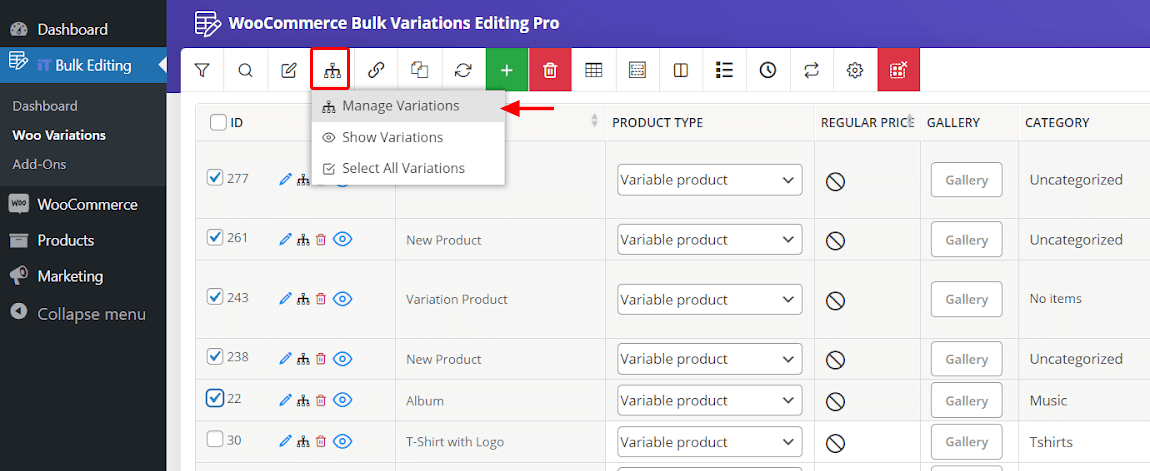
In this step, after filtering your desired products, it is time to mark the products in the table and choose Manage Variations from the toolbar to open Variations Bulk Edit Form.
Step 3: Add Variables to selected products
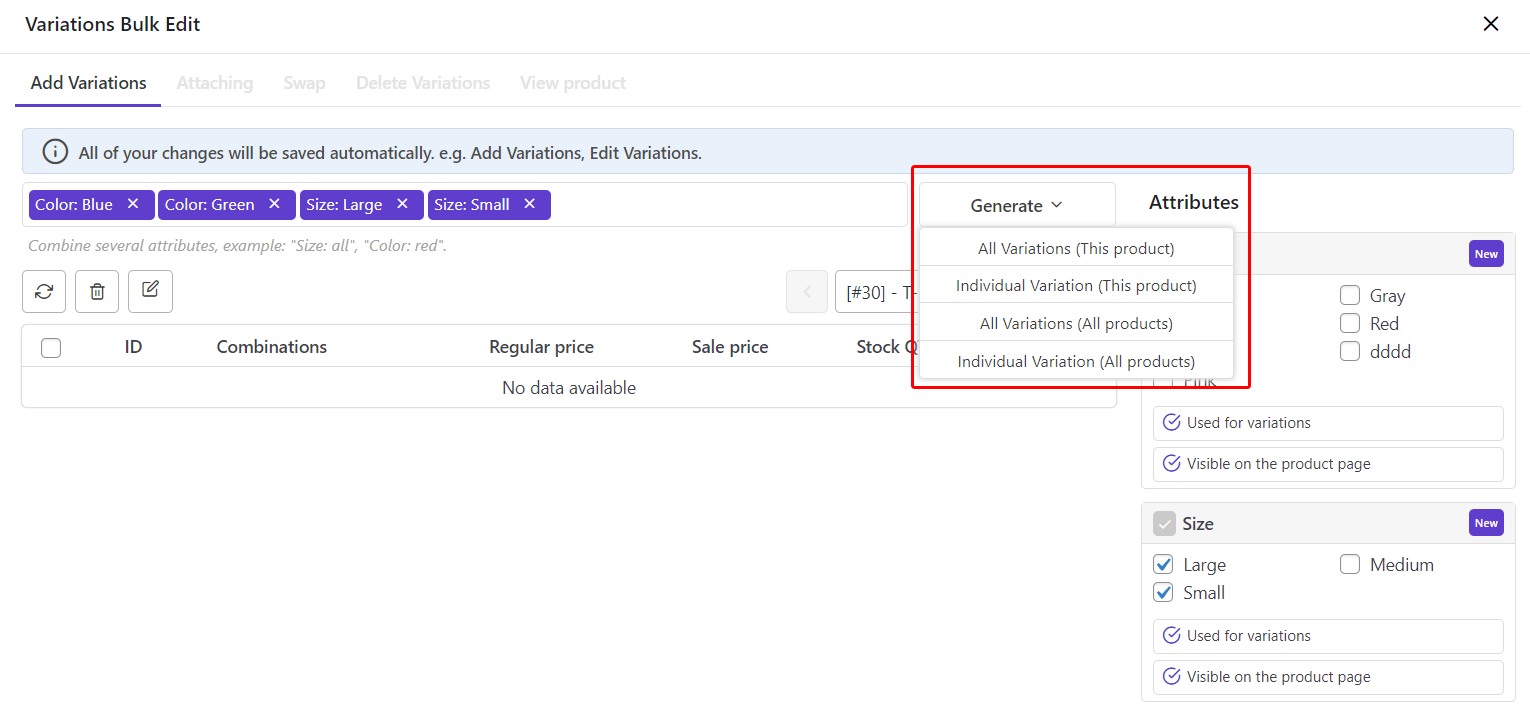
In the Variations Bulk Edit Form, you have access to all Attributes which are listed in separate boxes on the right side of the form. These boxes make adding variations to the selected products so convenient by using VBULKiT plugin.
For example, let’s consider that you want to add All variations generate by the below Attributes to those products:
- Color: Blue, Green
- Size: Large, Small
To do this, you just need to mark them in the related Attributes boxes. You should mark “Used for variations” and “Visible on The product page” as well.
Then, you can see four options by clicking on Generate button:
- All Variations (This product)
- Individual variations (This Product)
- All variations (All products)
- Individual variations (All Products)
As we aimed to assign variables to all selected products, let’s ignore the first two options and check how the other options can help you to add variations to all filtered products.
Add all variations to all selected products
If you choose “All Variations (All products)” from the Generate list, a pop-up like below will display and all possible variations are listed.
In this pop-up, you can change the order of variations and mark/unmark each variation to add/remove from the list.
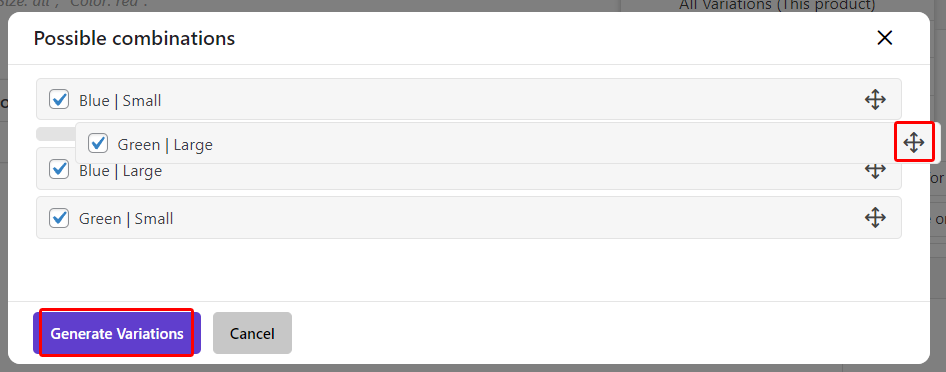
By clicking on Generate variations, all marked ones will be added to all products you have selected in the table.
Add individual variation to current product
The individual variation (This Product) option is a perfect solution when you don’t need to add all generated variations to the products. In the pop-up displaying to you after choosing this option, you can choose one option from each attribute to add one variable individually to all products.

By clicking on Add button, the final result is shown in the product table as you can see in the below picture.
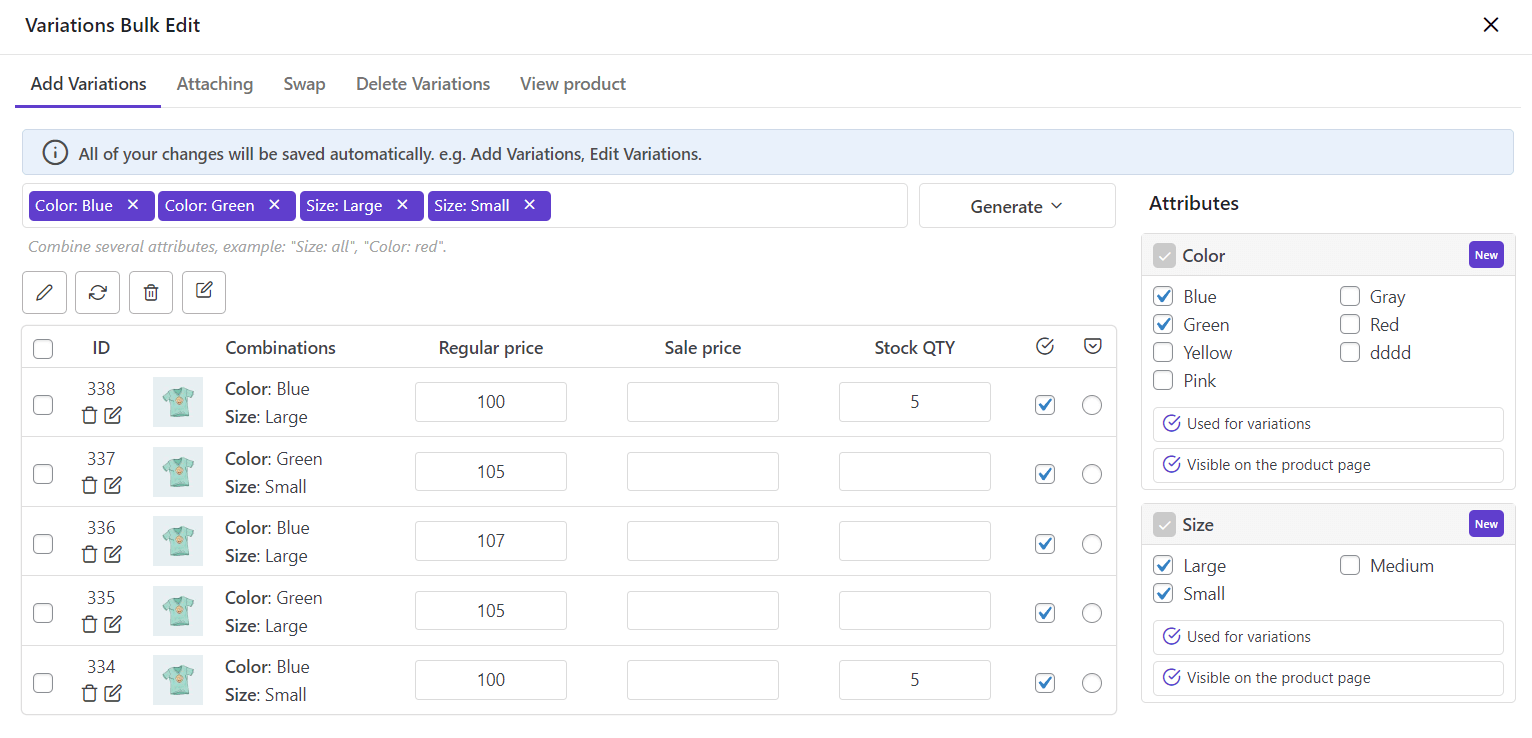
As you may notice, there is no need to spend more than a few minutes to add as many variations as you want to the new simple products by using this plugin. Now, let’s see how different is to add variations to existing variable products.
Add variations to existing variable products
The steps for adding variations to existing variable products are much the same. To make it clearer, let’s consider that you have assigned Blue and Green as variations to some products in Clothing category. Now, you need to replace or add “Red” as a new variation to them.
You can find the easy steps for editing the variations below:
Step 1: Filter Variable Products
Just like in the previous example, at first, we need to filter those products from Clothing category that Red is not assigned to them as variation.
To make this happen, go to the Categories/Tags/Taxonomies tab in the Filter Form and try the blow:
- Choose Clothing from the second box in front of the Product Category
- Choose Not from the first combo box in front of the Product Color field
- Select Red from the list in the second box
- Click on Get Products to see them in the product table

Step 2: Select Variable Products
By filtering the products, you have now access to them in the product table and you can mark some of them to manage their variations.
Step 3: Generate and apply variations to all selected products
If you choose more than one product from the table and then click on Manage variations, the Variations Bulk Edit form is displayed to you as below:
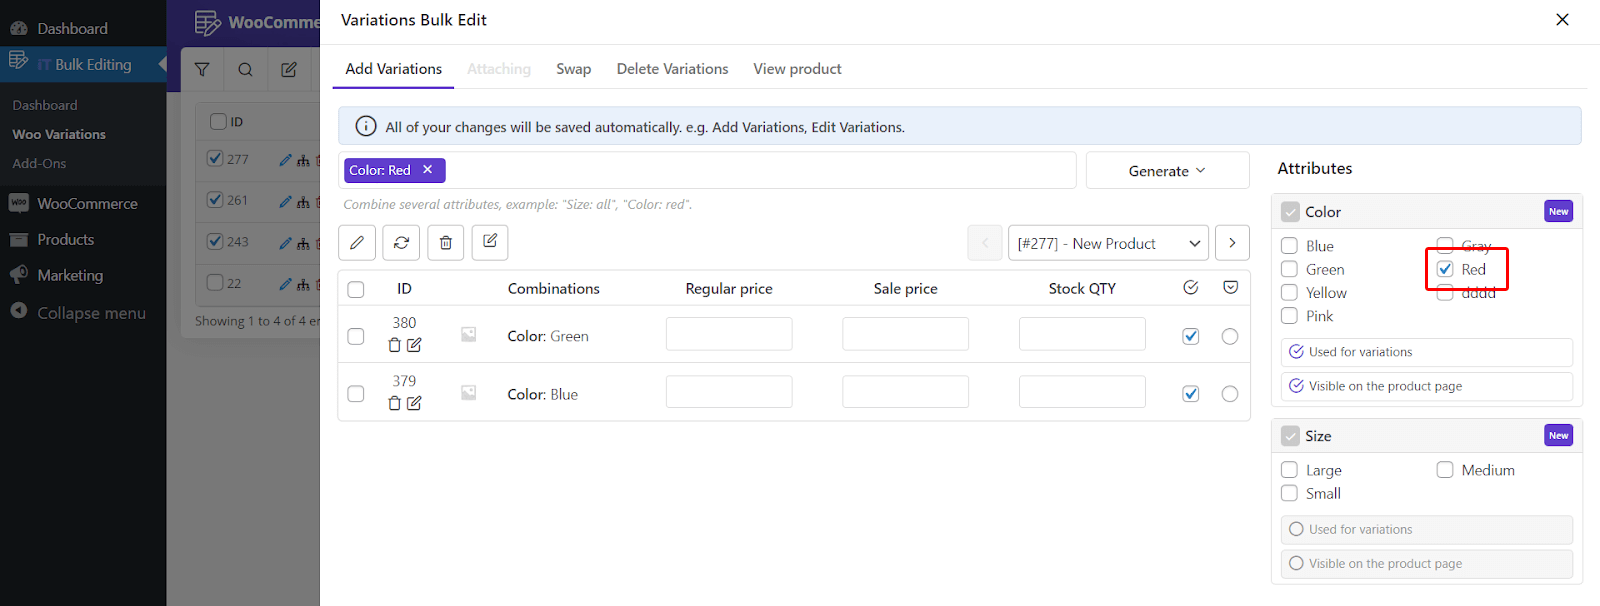
Now you can choose Red in the attributes box and click on Generate button. As we mentioned before, 4 options are displayed:
- All variations (This product)
- Individual variations (This Product)
- All variations (All Products)
- Individual variations (All Products)
If you click on All variations (All products), Red is replaced by all previous variations and a new ID will be assigned to this new variation.
Note: If you want to keep previous variations and their IDs by adding a new variation to them, you have to select All Variations (This product) or Individual Variations (This Product). We will explain it in more detail later.
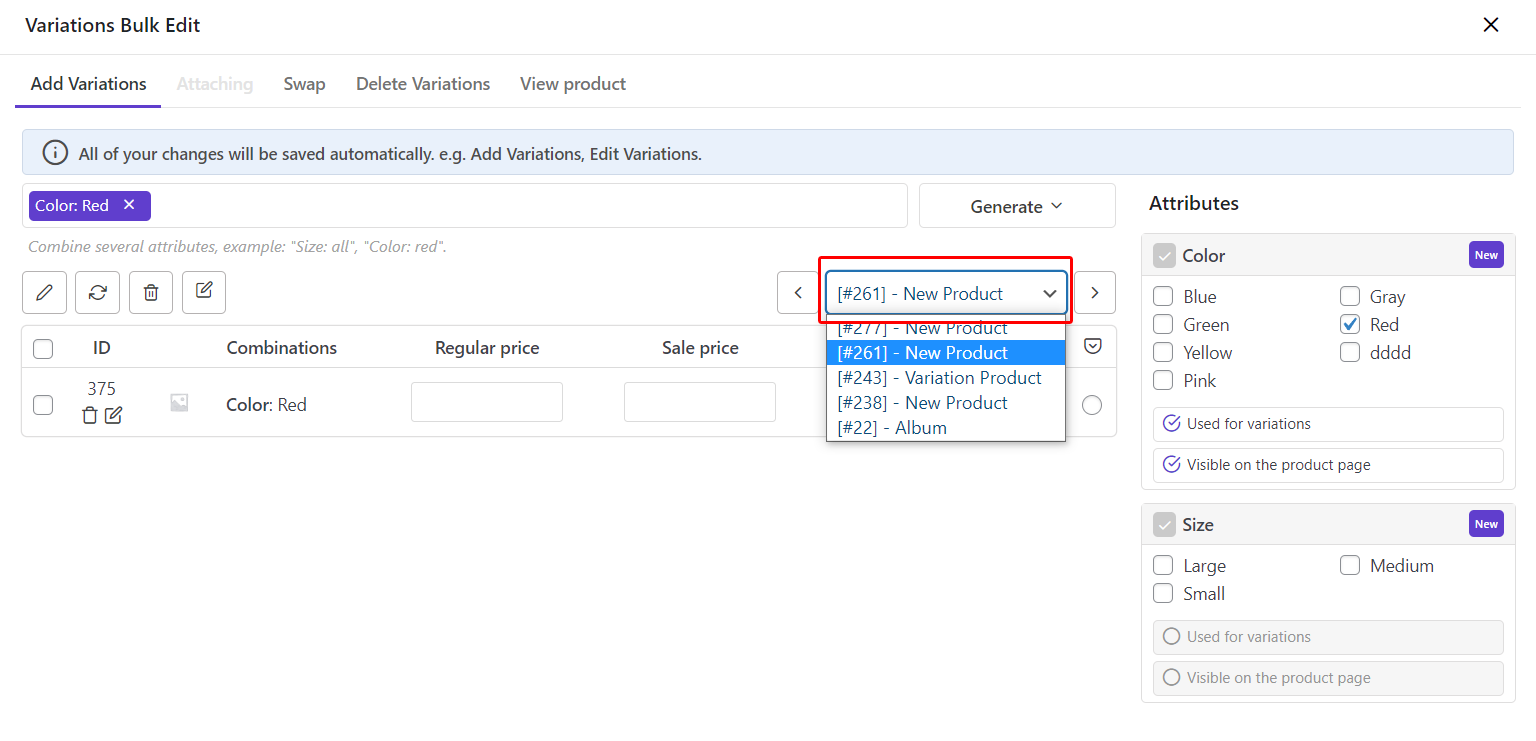
To help you easily see the changes in each variable product, a navigation bar is designed in this form. By clicking on the right or left navigator, the variations of each product are displayed in the below table.
You can also click on the Product box between navigators to see the list of variable products and choose one of them to see its information in the table.
Step 4: Generate and add variations to one product
Sometimes it is important to keep the ID of previous variations and you just need to add a new variation not to replace them.
To do this, you have to assign new variations to each product. So, you can use the navigator to choose the product you want and then select the All Variations (This Product) option from the Generate button.

Final Result of add variation to one product
As you can see in the below table, Red has been added to the Green and Blue and the ID of the variable product remained the same.

Comments