WordPress websites are now the most popular and functional ones in the world. It is not surprising that the first option of any website designer is making websites by this free and open source software as the most secure and effective web designer with powerful “Content Management Systems”.
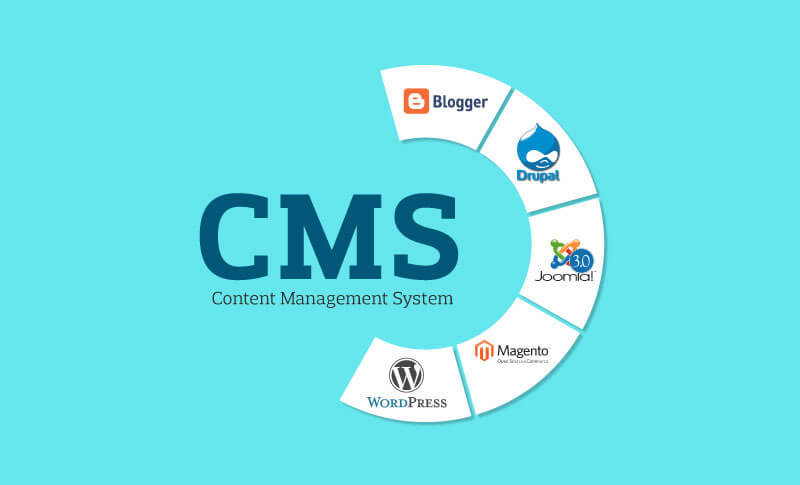
More than 30% of websites including eCommerce, blogs or business websites published on the internet are based on WordPress and they are using various kinds of plugins and extensions which make application of WordPress features easier and faster.

What is WordPress and how does it work?
WordPress is a platform containing the most useful tools and content management system (CMS) for designing a website. “PHP Scripting Language” and “MYSQL databases” are used to build the content management system (CMS) of WordPress which makes this platform absolutely flexible and manageable for making websites in 2020.
WordPress websites can be designed based on the below contents:
Basic contents
WordPress Core Content:
All files that you need to install before using WordPress platform are the “WordPress Core Content”. These files will automatically be installed on your host after downloading and installing this software. So, there is no need to have detailed information about it. They are just some useful codes for WordPress websites to get started.
Database of WordPress Website:
“Database of WordPress” is the contents you may add to the basic content of your website. In fact, all information about themes, plugins, settings and etc. will be saved automatically in 12 different tables on the database and each time you run your website, WordPress will load all of that information to let your website work well.
It is obvious that WordPress can not work without having a Database. So, if you are installing WordPress manually, creating a database is one of the mandatory tasks, you need to perform. However, after creating a database, WordPress will do its job automatically for saving all of your website information. So, there is no need to worry about editing or saving databases anymore.
Extra contents
Extra contents are some extensions that you can install on your WordPress to enhance the appearance or performance of your website.
These extra contents include:
- Themes
- Plugins
There are some special differences between themes and plugins in the WordPress websites, so before installing any of them on your WordPress website, consider the below points:
- Themes can change the appearance of your website pages and make it more attractive and easy-to-use for your visitors
- Plugins can enhance the performance of your websites and make it useful for different and special usage. For example, you need to install some plugins such as “Woocommerce” to your WordPress website to design it as an online store.
- Although there are thousands of themes designed for WordPress websites, you can not run more than one theme at the same time on your WordPress website. So, you have to choose your website theme very precisely.
- There are numerous and versatile plugins for WordPress as an open source platform and you can install as many plugins as you need on your WordPress website. However, installation of unusual plugins can have a destructive effect on the speed of your website. So, you have to choose the most useful plugins which are suitable for improving the effectiveness of your websites.
Why is WordPress Website so popular?
WordPress has a lot of advantages which makes it so popular among other web design platforms. We can mention the below facts as the most important reasons of WordPress popularity:
- An easy-to-use backend that is known as the WordPress Dashboard for all administrators.
- A user friendly front-end that is enjoyable for every visitor.
To go further, we can count numerous advantages of WordPress platform for making a website including:
Versatility of WordPress websites
Creating website based on WordPress has no limitation; you can create any kind of website on the WordPress basis such as:
- Blogs or news websites such as BBC News and MTV news
- eCommerce websites or online stores like Ecokitty
- Business or corporations websites as Bloomberg or The Walt Disney Company
- Educational or E-learning websites such as Harvard University
- Portfolio or advertisement Websites like eBay
There is also no limitation for growing your website during the time. You can add thousands of posts or pages as your business grows.
Fast installation, Easy workspace
Making a website with WordPress is not a complicated task even for beginners. To create your own website you just need to
- Buy a domain and a host.
- Download and install WordPress
- Start creating your web pages
That’s it. You don’t need to have any knowledge about writing codes or use any special program.
After installation, you have access to all the information you need to make a website directly from the WordPress Dashboard.
Control and manage Media
Control and managing all Media such as images, videos or music is simply possible in the WordPress website. A specific library has been designed in WordPress dashboard for adding or uploading all kinds of Media to your website.
Flexible appearance
With thousands of themes available for WordPress websites, changing the appearance of your website is not a big problem. A lot of themes designed in different categories to help you make your website exactly according to your requirements.
Easy customizations
The most important advantages of WordPress is providing an open source CMS which can be customized by a lot of plugins and extensions. There are numerous useful WordPress plugins designed for enhancement and optimization of WordPress websites performance.

To customize your WordPress website, search and installation of suitable plugins are available directly in the “WordPress Dashboard”. You can easily install the essential plugins such as “Woocommerce” plugins for eCommerce websites in less than a few minutes to build your shopping online store quickly.
Free CMS platform
WordPress is a free CMS platform for making a website. There is no need to pay for downloading and installation of WordPress on your host. You can start creating your new website by WordPress totally free.
High security
Various kinds of tools and plugins are designed for improving the security of WordPress websites. If your website is based on WordPress there’s no need to worry about its security or being hacked by using the proper plugins for enhancement of your firewall and security system.

Supporting SEO tools
Using SEO tools in the website is necessary to make it easy for search engines like google to read and index the content of your website. Using SEO friendly plugins on WordPress website is another advantage of this platform which can help your website to reach high search rankings.
Full support
WordPress has the largest developer and community support in the world. If you encounter with any problem during installation or making your website by WordPress, the below Support Forums can help you to overcome it:
- Online WordPress tutorials and courses
- The official WordPress information database
- The official WordPress support forums
Each plugin or theme designed for WordPress websites have their own Support Forums separately. For example, “Woocommerce” plugin or “Yoast SEO” has their own forums for solving your potential problems.
Link to other social media
Linking WordPress websites to other social media especially Instagram, Twitter or Facebook is so convenient. So, you can take the most advantages of the direct integration of WordPress to other social media platforms to get traffic from them.
Smooth functions
Smooth function is another important advantage of WordPress which is due to W3C compliance offered by this platform. “W3C standards” ensure you that browsing WordPress websites on all browsers are smooth and compatible.
Another positive point about websites designed by WordPress is their smooth function on mobile devices. Actually, WordPress is a responsive and adaptive platform which can adjust the content to be displayed perfectly on different screen sizes.
How to Make WordPress website step by step
To make a WordPress website, you need to buy a domain and a host at the first step. As we completely discussed “how to pick a proper domain name and buy a professional host to install WordPress” before, in this tutorial we are going to show you how to work with different functions of WordPress provided in the Dashboard to build and customize your website.
Installing WordPress
As we fully described in the above mentioned tutorial, Bluehost is one of the best options you have for buying a domain and a host to install WordPress on them. Installing WordPress on bluehost could be done by following below steps:
- Log into Bluehost account.
- Open “My site” page.
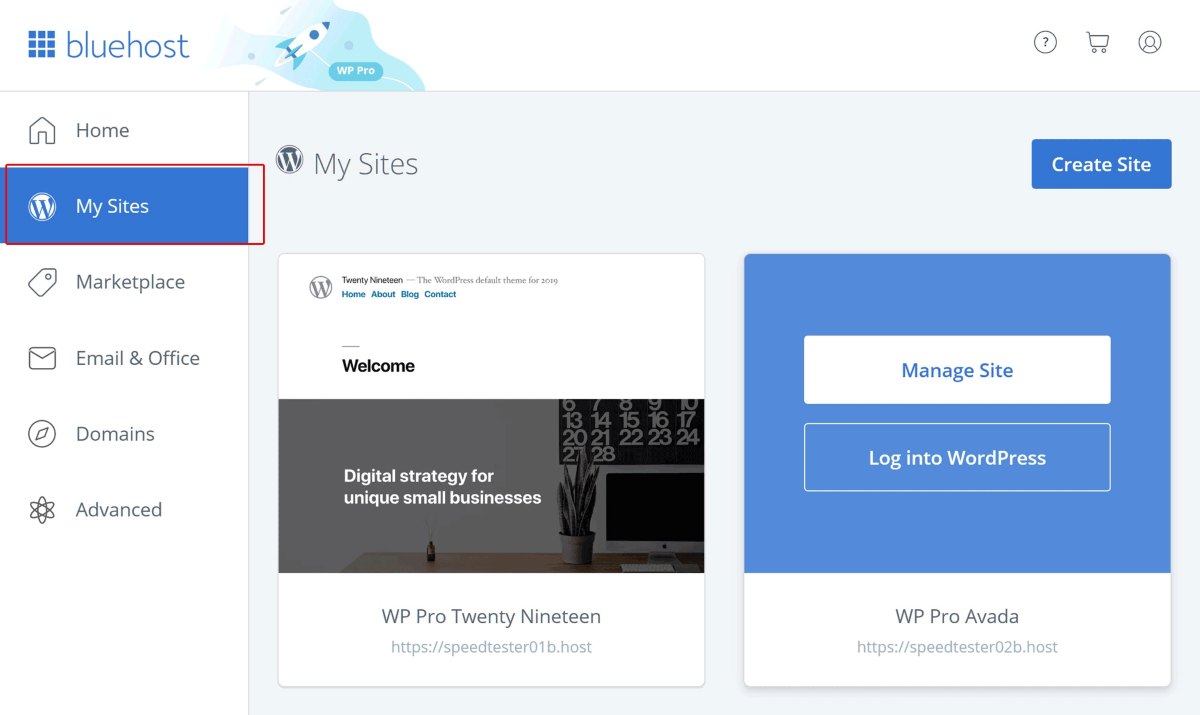
- Click on “Create Site” button.
- Type a name for your WordPress website.
- Choose a Username and an strong Password.
- Click on login to WordPress.
Navigating in WordPress Dashboard
By using the Username and password chosen in the Bluehost, you will be logged in to the WordPress as an administrator. So, you can see all options on the “WordPress Dashboard” to build and customize your website.
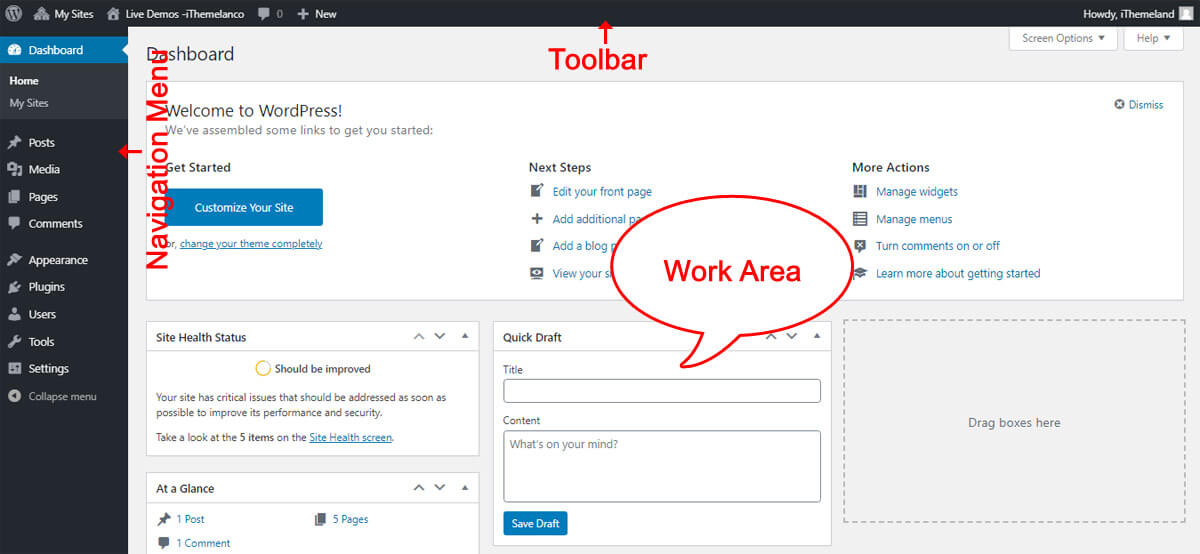
As shown in the below picture, as soon as log in to your WordPress account, the main page or dashboard will be displayed to you containing three parts:
- Navigation Menu
- Toolbar
- Work Area
Follow us to show you the main options in each part of WordPress Dashboard:
Work Area
When you see the “work Area” for the first time, a Welcome message containing the most useful guides for building and customizing a website will be displayed at the top of the screen.
Under this box, some other information about your published posts, received comments, recent activities or the latest news about WordPress are designed by default to help you get informed about what’s needed for managing your website.
However, you can add or remove any boxes you need to / from this page anytime you want.
Toolbar
In the “WordPress Toolbar”, you can see the most important notifications related to your website for example about the number of available updates or comments.
By clicking on “+ New”, a lot of options are shown and you can add them to the “WordPress Toolbar” to have access to them easily.
Main Navigation Menu
In the WordPress Dashboard menu, you have access to the below items:
- Home: This button helps you to go back to the main page from anywhere else.
- Updates: in this part you can see the status of your site and the necessary updates which are available for your website core, plugins or the installed theme.
- Posts – by clicking on posts item you can create new posts or edit old ones to be published on your blog.
- Media – in the Media library you are able to add, remove or edit images, videos and other media files.
- Pages – You need this part to create your website pages such as homepage, contact page, About page or any other subpage.
- Comments – in the Comments part, you can review and manage all received comments.
- Appearance – Appearance is the designer of your website which includes a lot of options such as themes, colors, fonts, etc, for customizing the appearance of your website.
- Plugins – finding and installing new plugins or uninstalling the old ones can be performed here.
- Users – in the Users page the administrator can create new user accounts with limited permissions to have access to some special part of the website.
- Settings – this part is designed to let you change the main settings of your website.
Installing WordPress Themes
Choosing a proper theme is the first task you have to do before going further and navigating other options of “WordPress Dashboard”.
A WordPress theme is an interface template that can change the appearance of your website. Although WordPress will automatically assign a theme to your website, this may not be your preferred one.
You need to choose a theme that suits your requirement and display what you are going to show to your visitors in an attractive and easy to understand way.
To find your preferred theme, you need to go to:
WordPress Dashboard > Appearance > Themes
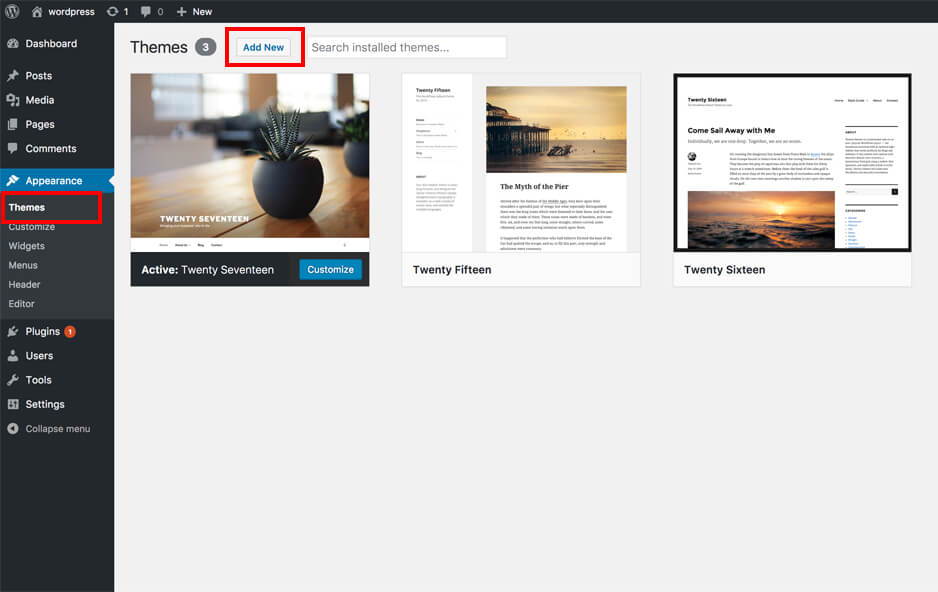
Then click on “Add new” at the top of the page:
By clicking on “Add New”, you will be led to the theme directory of WordPress and you can search among featured, popular, latest or free options.
When you find your favorite theme, just click on the “Install” button and let WordPress change the appearance of your website for you.
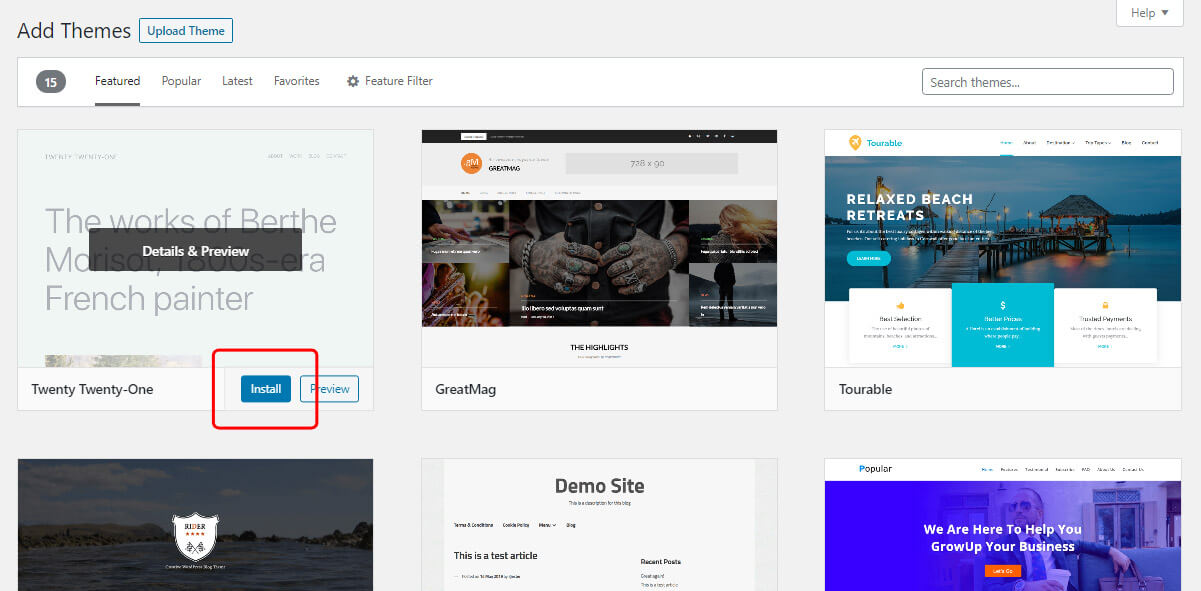
This is not the end of story; you can customize the installed theme according to your requirements by going to:
WordPress Dashboard > Appearance > Customize
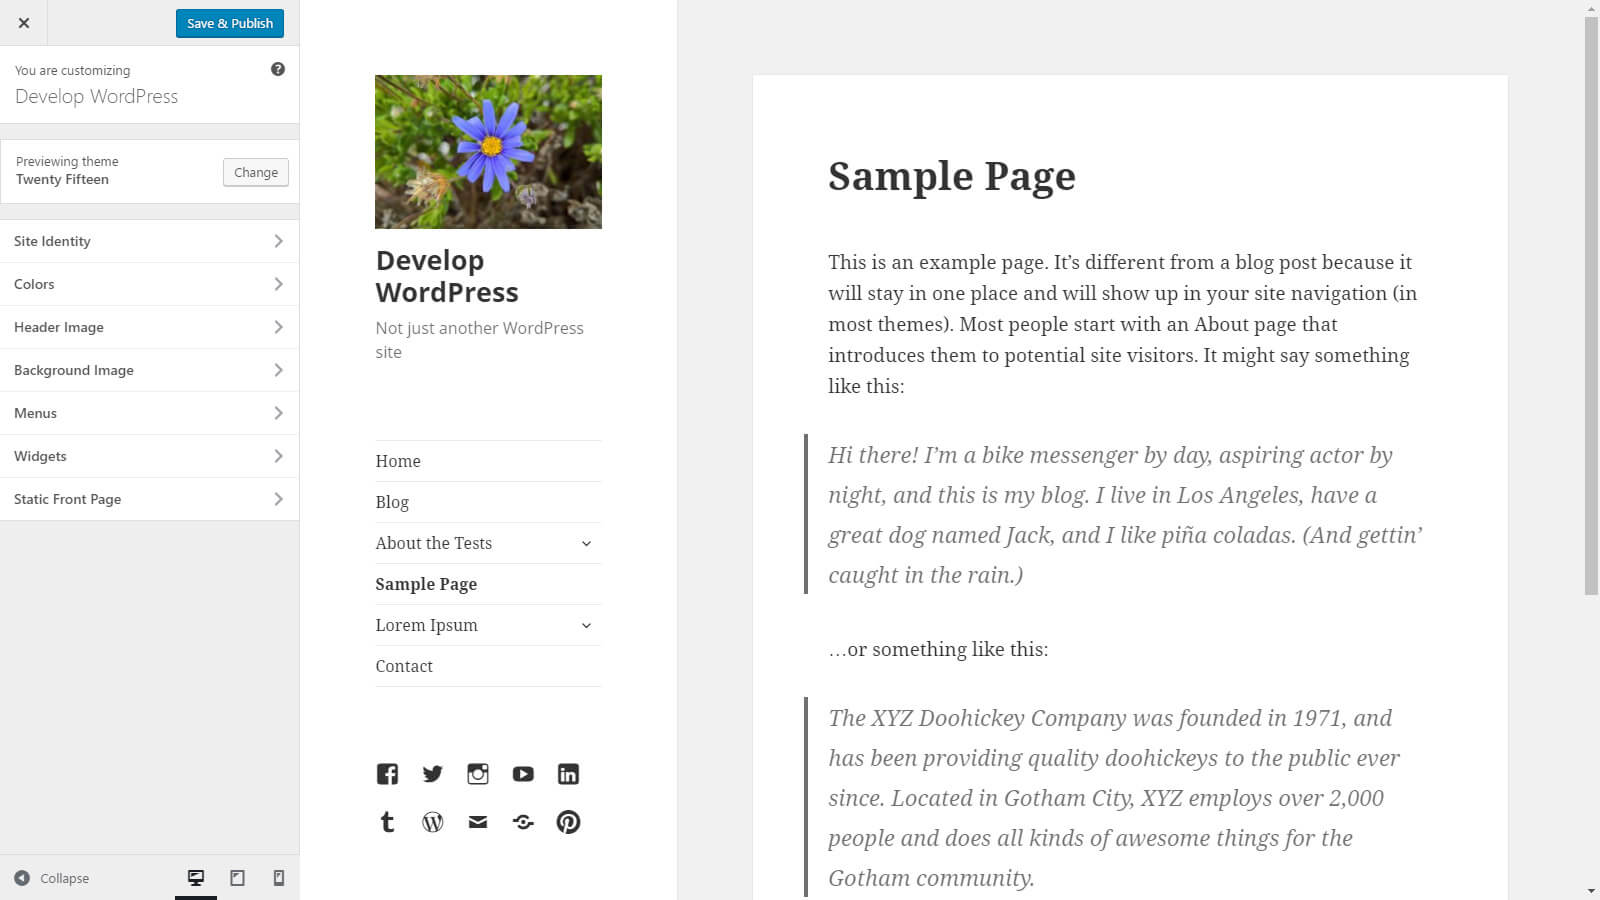
As shown below, you can change the following options to customize your theme:
Note: These options depend on your selected theme.
- Site identity: In this part you can add some important things such as your logo to the website.
- Color: This is a good way to manage the website colors as you wish.
- Background image: in this section, you can add an image to the background of your website pages.
- Menus: Creating menus is essential for helping your visitors navigate to your website.
- Widgets: Widgets are some special boxes with different kinds of contents that you can add to the footer, header, left side or right side of your pages.
- Homepage settings: There are some settings you can change to modify your home page.
- Additional CSS: If you have knowledge about CSS, this is where you can add additional CSS for improving the appearance of your website.
Publishing Content
To publish a new content, you need to use the options provided for you in the posts menu of WordPress Dashboard.
By publishing posts with blogging tools of WordPress you can build a professional and up-to-date blog to impress your visitors.
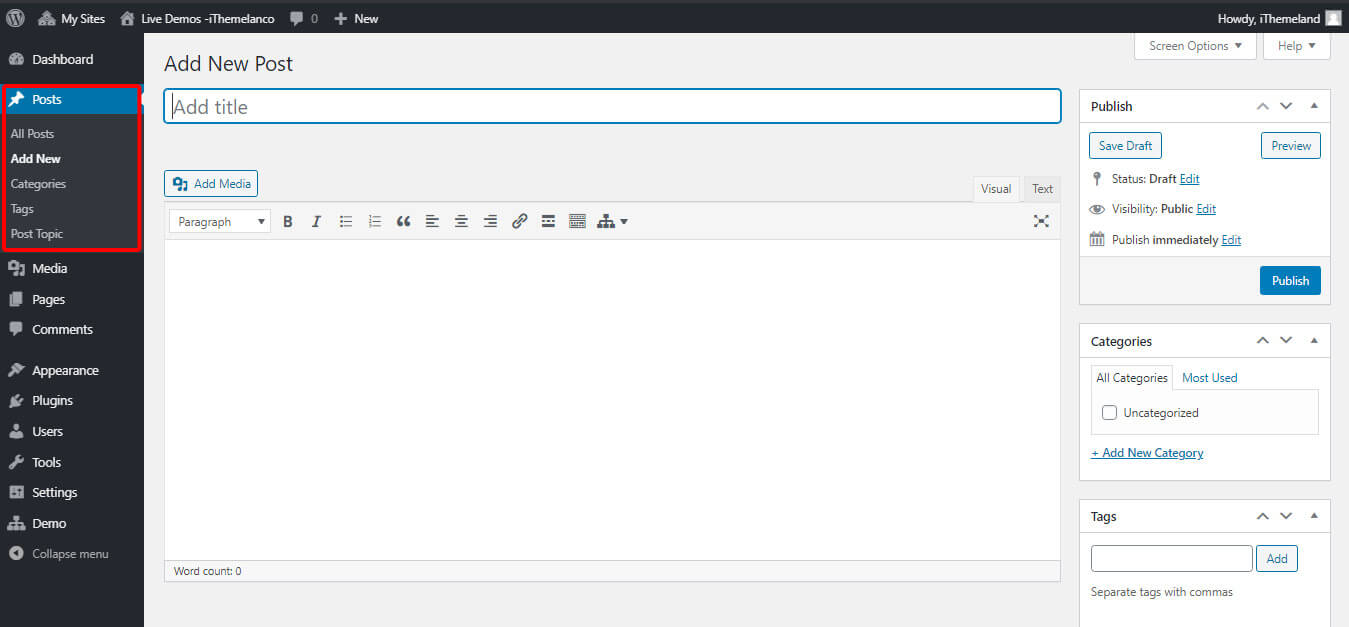
To publish a new post in WordPress, you need to follow below actions:
- Open “Posts” menu from “WordPress Dashboard”
- Click on “Add New”
- Type a “Title”
- Type a “description”
- Add “Media”
- Customize your text by text tools
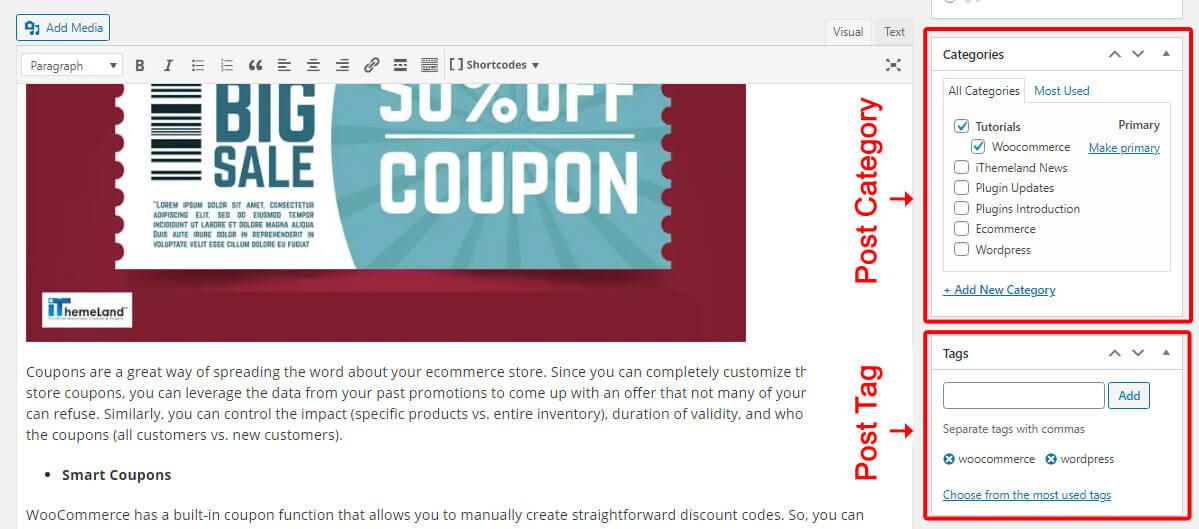
- Add “Categories” and assign your post to one or more
- Add some “Tags” to your post
- Click on “Publish” or “Save as a draft”
After publishing one or more posts, your visitors can see the latest post published on your website on the main page of your website.
However, you can create a “blog page” for your website to make it possible for your visitors to see a list of your published posts at the main page.
This is what we are going to show you in the next step.
Create the essential pages in WordPress websites
To create your WordPress website pages, you need to click on “Pages” from “Dashboard”.
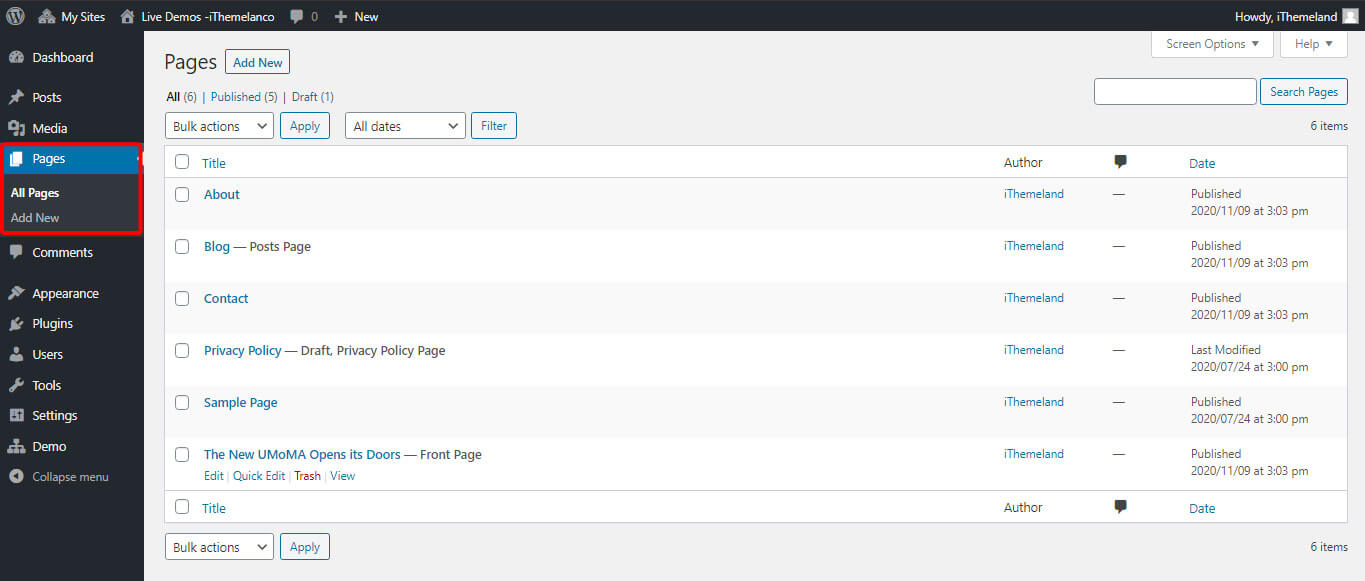
Then by clicking on “Add New”, you can use a lot of customization tools to add new elements to your webpage.
By adding a new page, you will see a blank page with some different fields that can be edited. There are some major changes in the new page appearance and functions available for editing the fields between the old and new versions of WordPress.
The new page in the old version of WordPress looks like below:
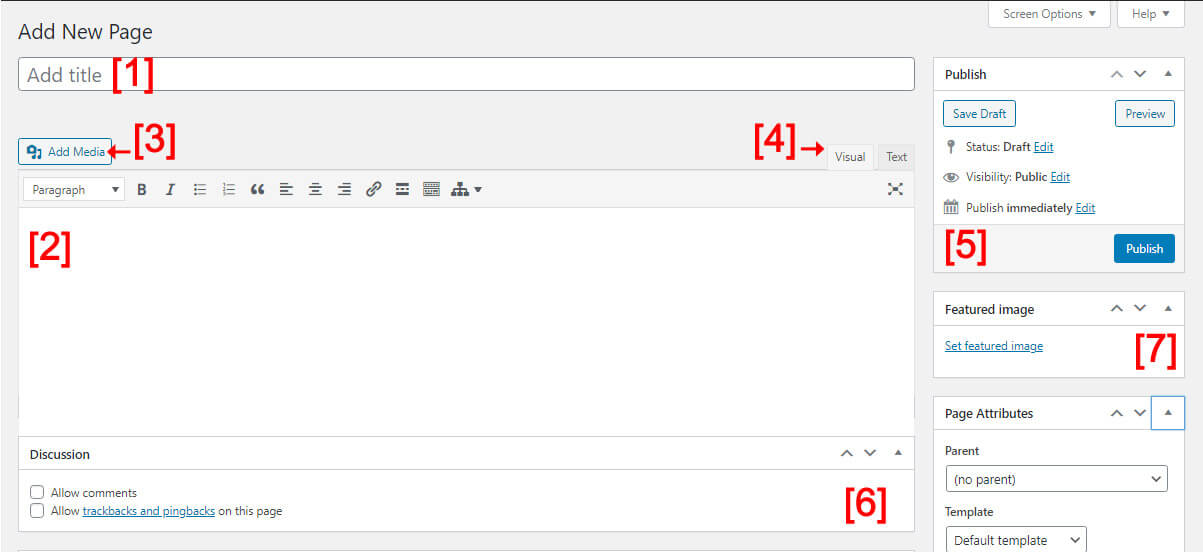
- Title of your page
- The page content contained media, description, effects, blocks, elements, etc.
- A button for adding image, Audio or video to the page.
- Adding or editing the page content using “Visual elements” or “Codes”.
- Manage how to publish a page.
- Additional settings about receiving comments or backlinks.
- Adding or editing the main image of the page
The new page on New version of WordPress is like below:
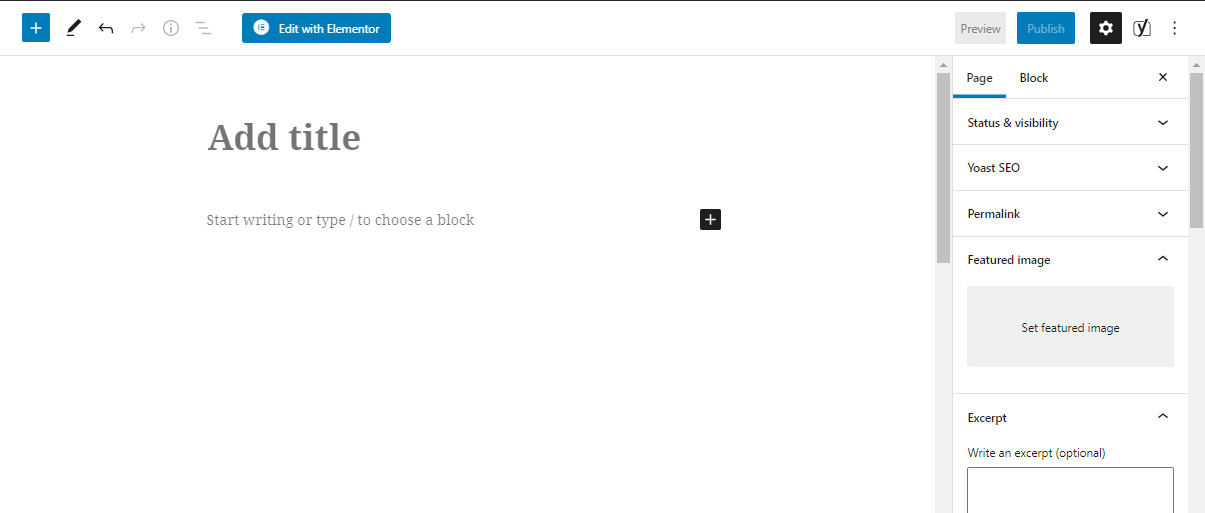
As you can see, the icons related to those fields that you can edit have been upgraded. in this new appearance you have easily access to edit tools and you are able to:
- Add a title for your page
- Choose blocks by pressing + in the middle of page to start writing
- Press + at the top of the page to add media
- Use “Edit icon” to edit your text
- Assign categories, tages or permalinks to your page
- Schedule a date for publishing the page
- Save the page as a draft
- Set the visibility for example to be displayed in public
and many other amazing features that you can discover when you are creating your web pages on WordPress.
The pages you need to create depend on the purpose of your website which are:

Blog page
If you want to create a blog page, there is no need to add anything to your webpage. You just need to
- Create a blank page by clicking on “add new“
- Change the page name to “blog”
- Go to dashboard > settings > reading,
- elect the blog page as the “posts page”
Home pages
Home page has the most impressive effect on your visitors because this is the first page that they see when navigating to your website.
It is so important to create an attractive home page which shows the most important information that your visitors are looking for by visiting your website.
After building a homepage, you need to set the Home Page in the WordPress by following below actions:

- Go to WordPress Dashboard > Settings > Reading.
- Mark “A static page”
- Choose the name of your home page from the dropdown list In front of “Homepage”
Installing WordPress Plugins
Installing WordPress plugins play a crucial role in optimizing the performance of your website, improving the appearance and improving the quality, efficiency and security of your website.
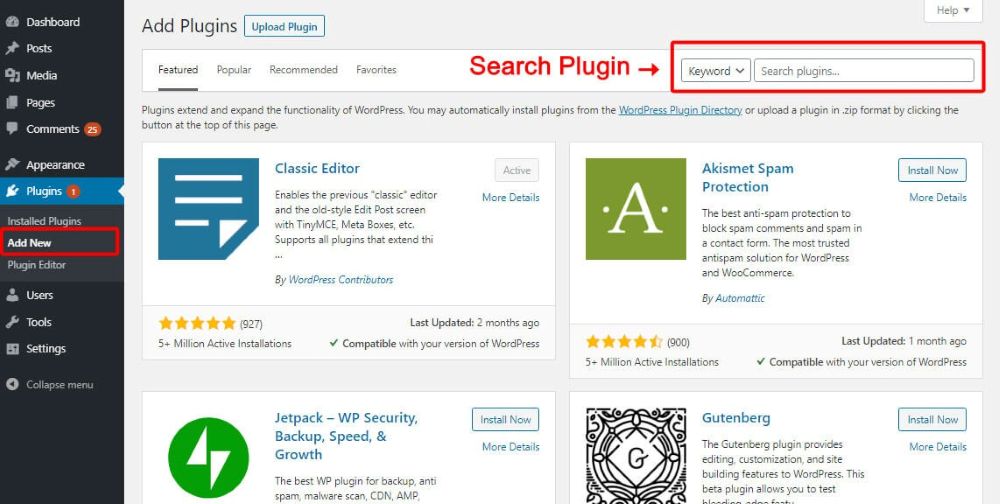
To install a plugin, you need to:
- Go to WordPress Dashboard > plugins > Add New
- Find the plugin that suits your requirements
- Click on “install plugin”
There are thousands of plugins available to install on your website in different categories for:
Customizing your WordPress website
These plugins include numerous extensions designed to help you resize or compress images and videos, translate your website, improve your SEO, making contact forms, etc.
Improving security
WordPress plugins for improving security are able to add an extra step for log in to WordPress administrator panel, block spammers, defense against hackers, tracking visitor activities, etc.
Creating an Ecommerce website
The most important plugin for creating an Ecommerce website is “Woocommerc”. This plugin helps you to add a payment gateway for selling your products and services.
There are also a lot more plugins such as Woocommerce product table plugin for enhancing the performance of your online store.
Customizing and Tweaking Your Website
As we mentioned before, the main reason that makes WordPress such a popular platform is the easy and fast customization tools provided for website designers.
You have access to any details of your website including colors, fonts, menus, widgets, medias etc. Just by a few clicks even if you don’t know anything about how to change or edit the basic codes.
By using WordPress tools in the “Appearance” tab, customizing and tweaking of your website is not complicated as you have access to the below items directly:
Widgets
In this part, you can choose the contents that must be displayed at the footer or sidebar of your websites. There are a lot of items available here such as a list of the most important pages or recent posts, gallery, Calendar, etc.
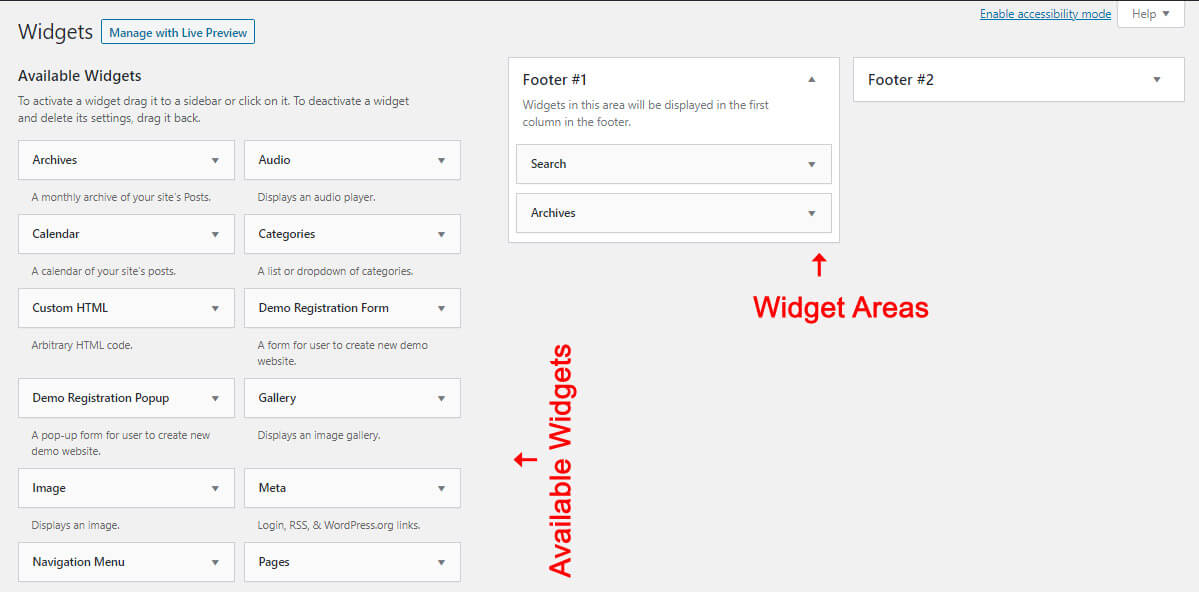
To add a widget to the sidebar or footer of your WordPress website, you need to drag the items listed in the left section called “Available Widgets” and drop them to one of the fields at the right section to be activated.
After adding a widget, you can edit some parts by clicking on the down arrow at the right of the Widget box.
For example, if you drag and drop a “Search box” to the side bar, you can edit the “Title” by clicking on the down arrow as illustrated below:
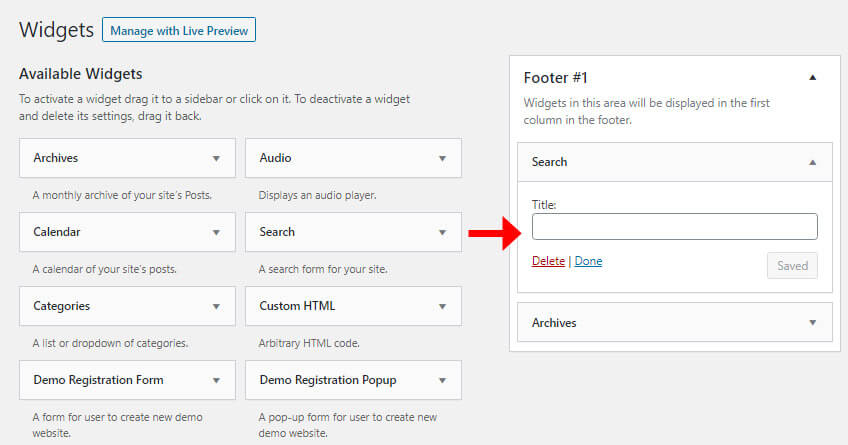
As a default you have some location in the footer and in the sidebar of your webpage to display the available widgets. However, some themes give you some extra options to customize the location of the widgets in your webpages.
Menus
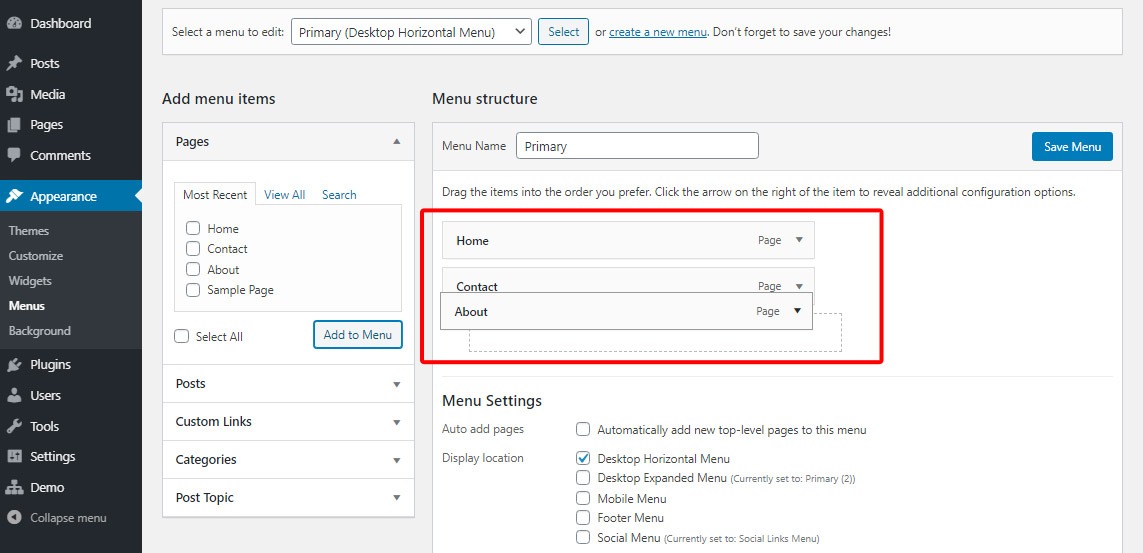
Creating Menus are another way for customizing your website. You can build different menus to be displayed in a mobile format or on bigger screens by adding pages and sub pages to make navigating through your website more easier for your visitors.
To add pages to your website navigation menu, you need to:
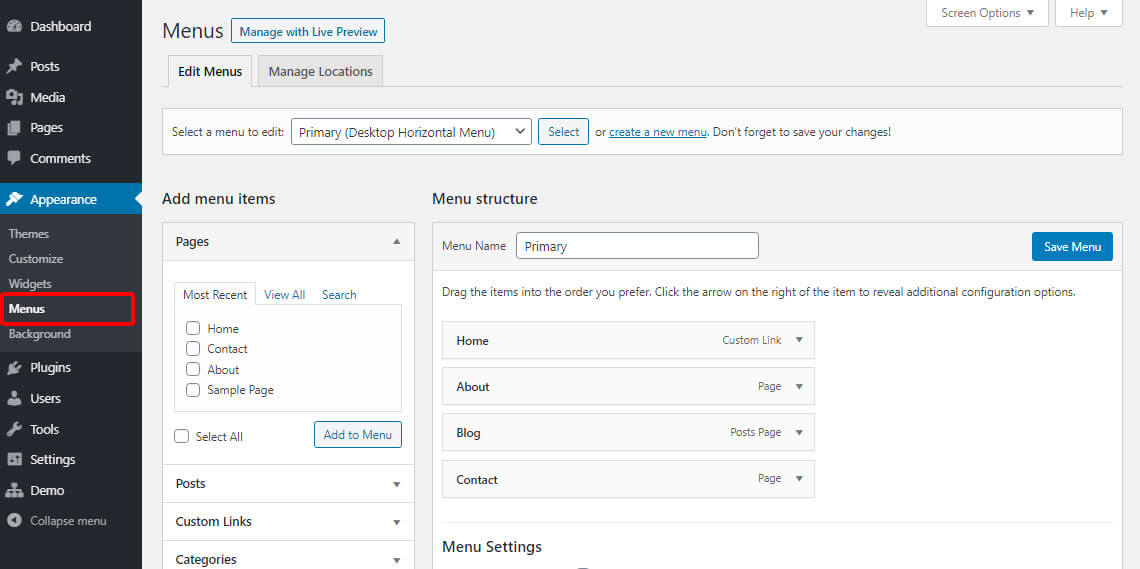
- Type a menu name in the related textbox
- Click on “Create Menu“
- Click on down arrow in front of one of the fields under “Add menu items“
- Add as many items as you need to the menu by marking an item and clicking on “Add to Menu“.
- Choose a “Display location” from “Menu Settings“
For example, as illustrated below, we opened the page item:
then we clicked on “View All” to find the pages we need to add to our navigation menu.
To add pages, we marked some of them then clicked on “Add to Menu“:
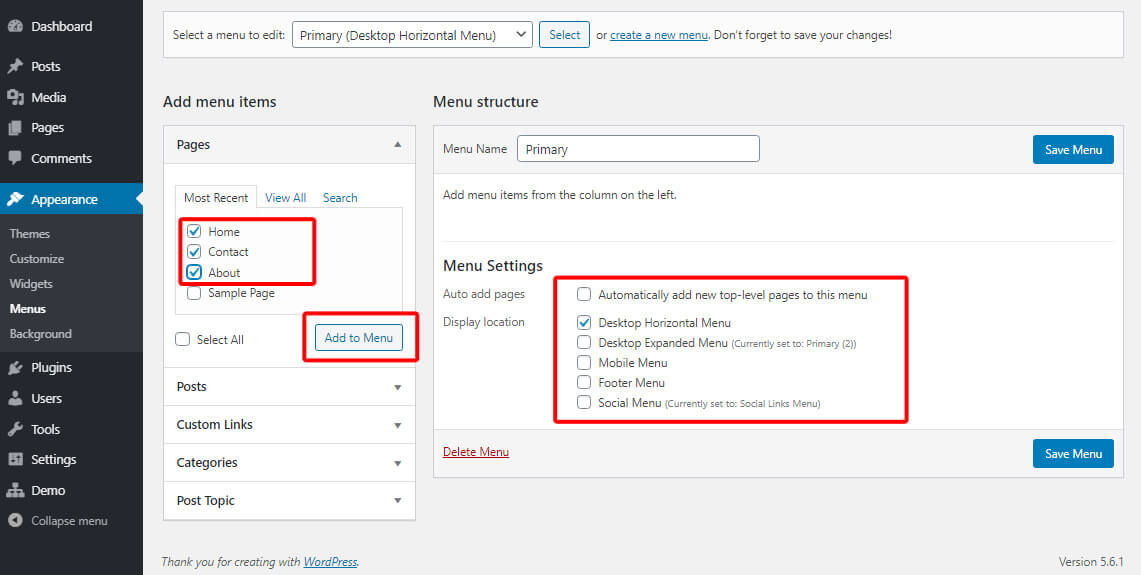
As you can see, all marked pages were added to our menu and we are now able to change their orders:
