


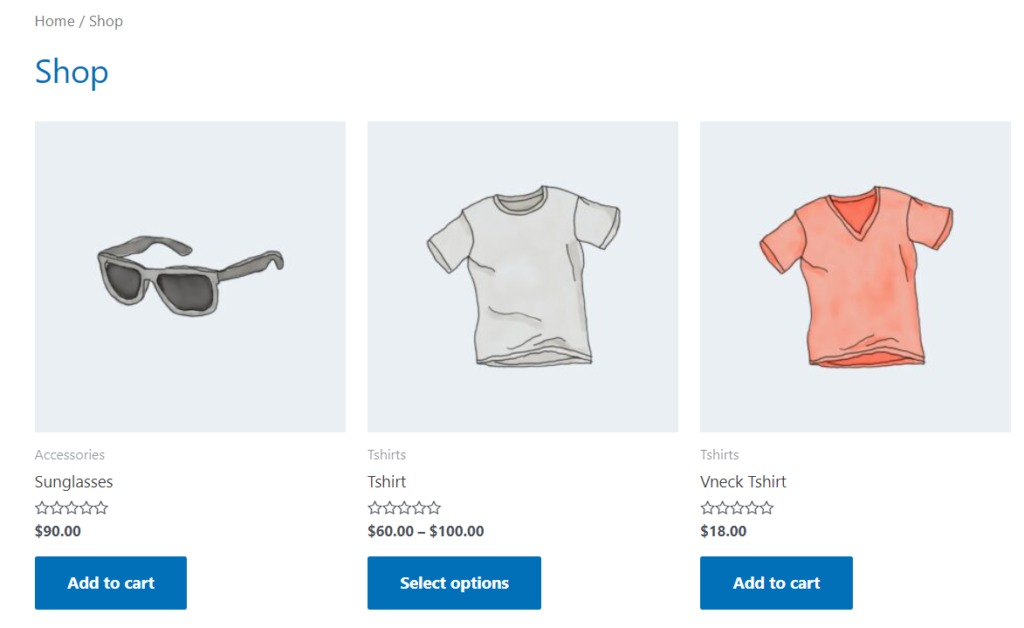
Variable products are one of the most powerful features of WooCommerce. They allow store owners to offer different product options such as size, color, or material within a single product. However, the default WooCommerce shop page does not allow customers to select multiple variations and add them to the cart easily.
Normally, customers must open each product page, select a variation, and then add it to the cart. This extra step can slow down the purchasing process and negatively affect the overall shopping experience, especially in stores that sell many products with multiple options.
For example, if a customer wants to purchase several variations of a product, they must repeat the same process multiple times. This friction can reduce conversion rates and cause customers to leave the store before completing their purchase.In this guide, we will explore practical ways to add multiple variations to cart in WooCommerce. You will learn how to add variations programmatically with custom links, how to create a quick ordering interface using TABLEiT plugin, and how variation plugins can help improve the product selection experience on shop pages.
Method 1: Add to cart variable product WooCommerce with a custom link
One of the simplest methods to directly lead customers to the cart for purchasing variable products is creating a custom URL. In WooCommerce, there are two default Shortcodes for adding Simple Product which are:
- [add_to_cart id=”XX”]
- [add_to_cart_url id=”XX”]
If you aimed to create a URL for add to cart variable product in WooCommerce, you need to insert the Product ID, Variations ID, and Attribute slug to these shortcodes, like this:
http://mysite.com/cart/?add-to-cart=PRODUCT_ID&variation_id=VARIATION_ID&attribute_pa_colour=ATTRIBUTE_SLUGNow, let’s see how you can find the required data and create a real link on your website:
Find the product ID
To find the product ID, go to the All Products page then hover over the products in the table to see the product ID as illustrated below:
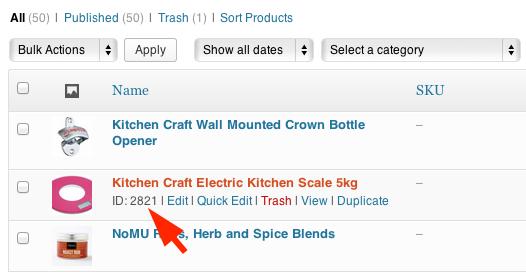
The product ID in this example is: 2821
Find the variation ID
To find the variation ID, you need to open the product edit page and go to the Variations tab. Then locate the exact variation and write down the variation ID as shown below:
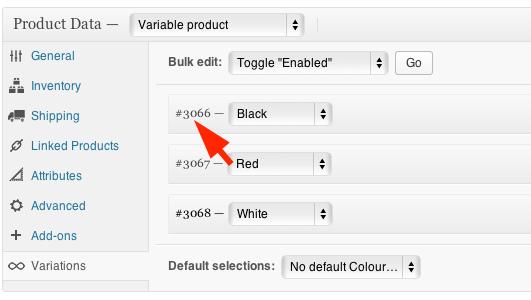
The variation ID in this example is: 3066
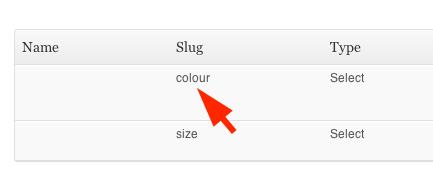
Find product attribute slug
You can find the attribute slug by going to Products > Attributes and find the attribute in the list. The slug has been written in the Slug column in front of the attribute name as shown below:
For example, we want to create a URL for the Colour attribute.
Then you have to go to the Configure terms and find the term slug as well. In this example, our preferred slug for the attribute term is Black.
Creating Custom URL for WooCommerce add to cart variable product programmatically
Finally, by inserting the gathered data, you can create the following link for the variable product:
http://mysite.com/cart/?add-to-cart=2821&variation_id=3066&attribute_pa_colour=black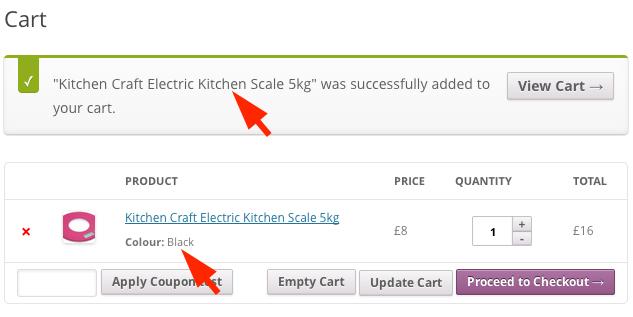
Method 2: Create a WooCommerce buy now button for variable products with the WooCommerce product table plugin
The WooCommerce product table plugin is a professional tool for showcasing your products in a table with customizable columns. You can display all WooCommerce fields in separate columns and allow customers to review and compare them at one glance. The WooCommerce product table plugin makes the product list easily responsive and user-friendly. You can completely customize the columns, content, table layout, and style as per the requirement. It is also possible to add extra features to your table like filtering, sorting, and pagination.
The wooCommerce product table plugin enables the store managers to display the WooCommerce buy now button for variable products and let customers order multiple variations with one click. This further helps to improve the conversion rate of your online store as well.
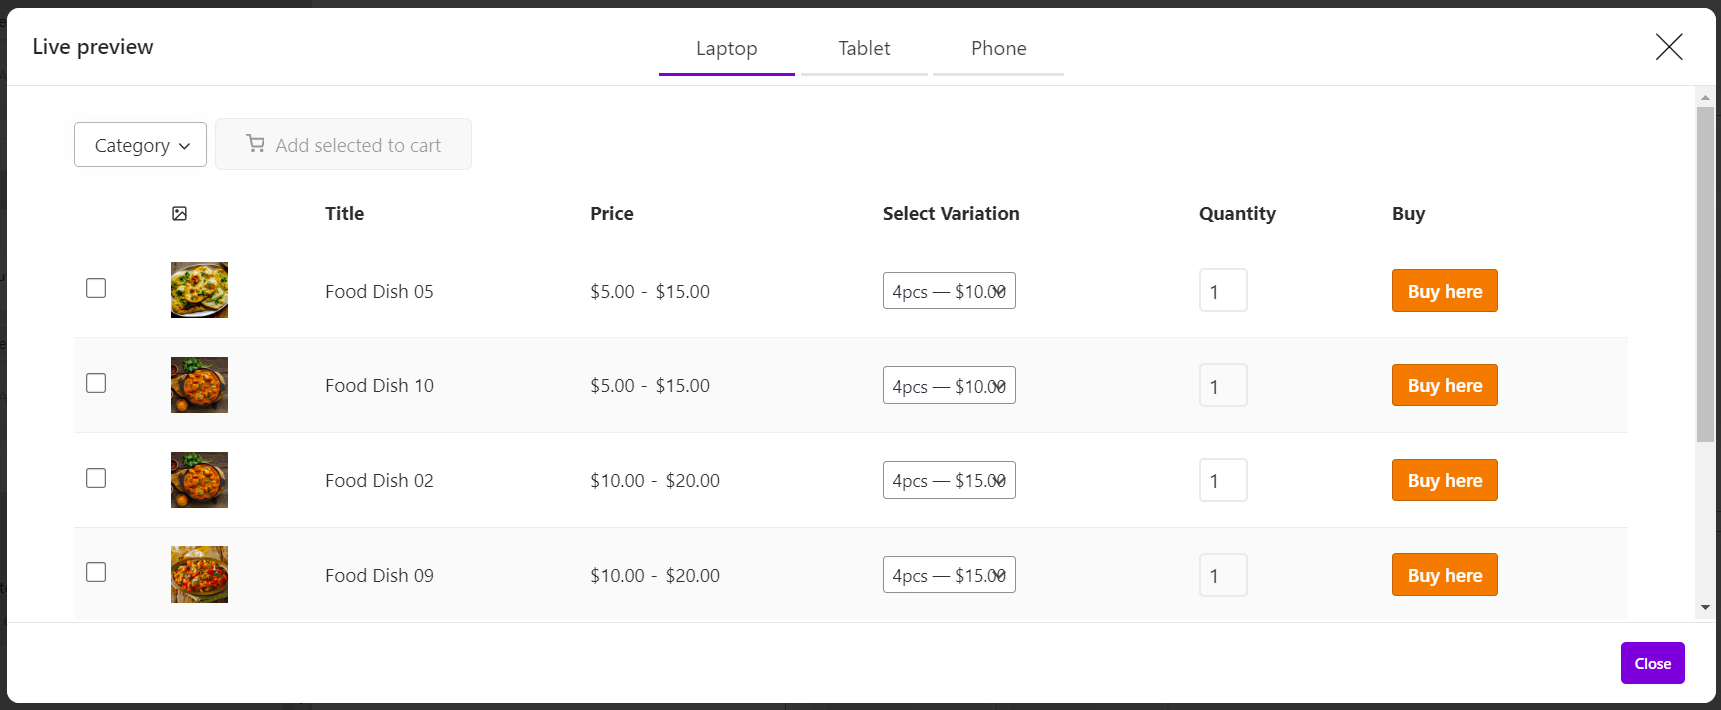
Let’s review how you can easily show the WooCommerce variable product add to cart button on the shop page with this plugin.
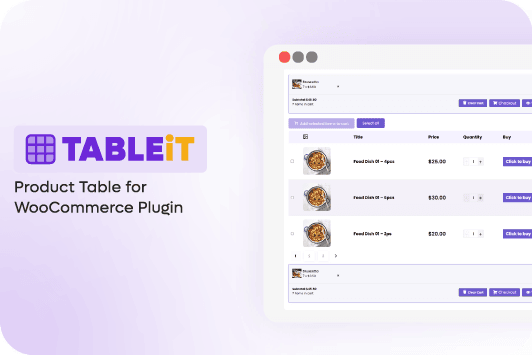
TABLEiT – Product Table for WooCommerce
The easy way to add multiple variations to cart in WooCommerce
Let’s review a step-by-step guide for creating an eye-catching product table that allows WooCommerce to add multiple variations to the cart at once.
Step 1: Install WooCommerce product table plugin
There are no complicated settings or configurations needed to install the WooCommerce product table plugin. After installation and activation, you can immediately navigate to the below address to create a new table:
WordPress Dashboard > iT product table > Add new table
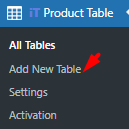
On this page, you can choose one of the preset templates or simply click the Get Start button to create your product table.

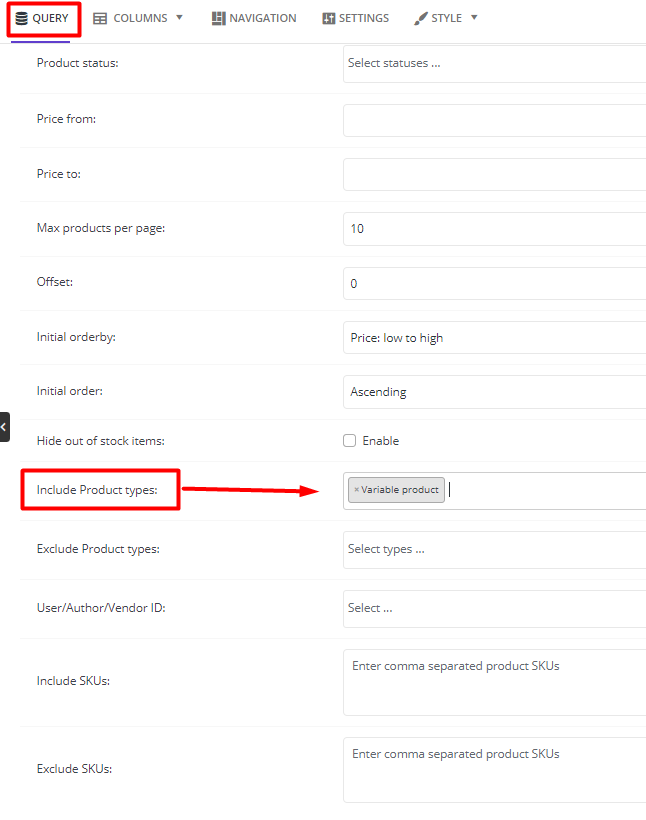
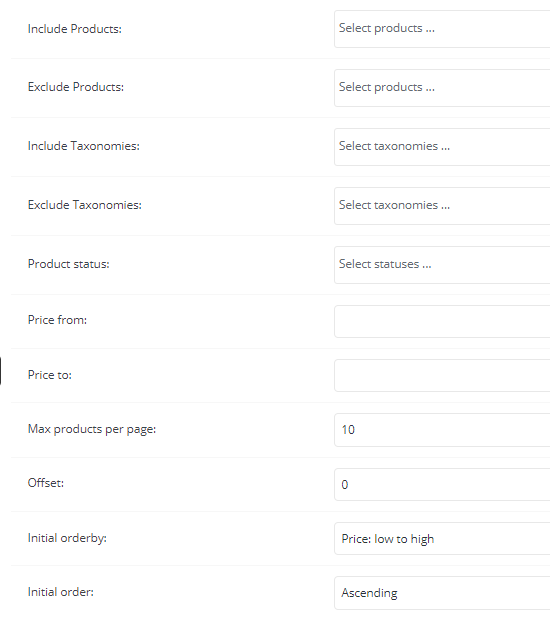
Step 2: Make a Query from Variable products
Once you get started with the product table creator, all of your WooCommerce products are imported to the plugin automatically. However, you may need to display some specific products in the table. The plugin allows you to make a Query from your products to solve this problem.
You can find flexible options for limiting the products displayed in the table by changing in the Query tab items.
For example, if you want to create a table specifically for variable products, you can simply open the dropdown list of the Include Product Types field and choose Variable products.
There are also other options for making queries about your products such as:
- Price: You can set Max and Min prices in the Price from and Price to fields, respectively to show the products with the specified price range in the table.
- Category/Tags/Taxonomies: You can add/remove one category/tag/attribute in the Include/Exclude Taxonomies field to display/hide products belonging to it in/from the table.
Etc.
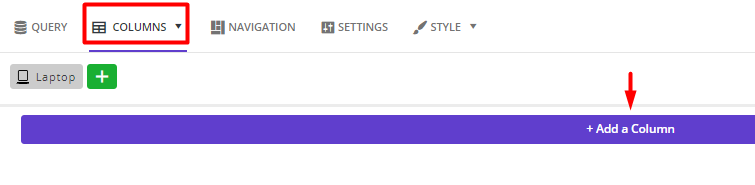
Step 3: Add proper columns to quick order form for variable products
When successfully make your query, it is time to go to the Column tab and add WooCommerce product details to the table columns by following the below instructions:
- Add a new column
To insert a new column, you just need to click on the Add a Column button in the middle of the page. There are no limitations for inserting columns in the table. So, feel free and add as many columns as you need to display the product field in each one.
- Customize Heading and Cell content
Once you add a new column, you will see a new box containing two below sections:
- Heading: The column title.
- Cell content: The column content.
To customize Heading and Cell content, first you need to press Add Element option then choose one of the elements from the left panel.
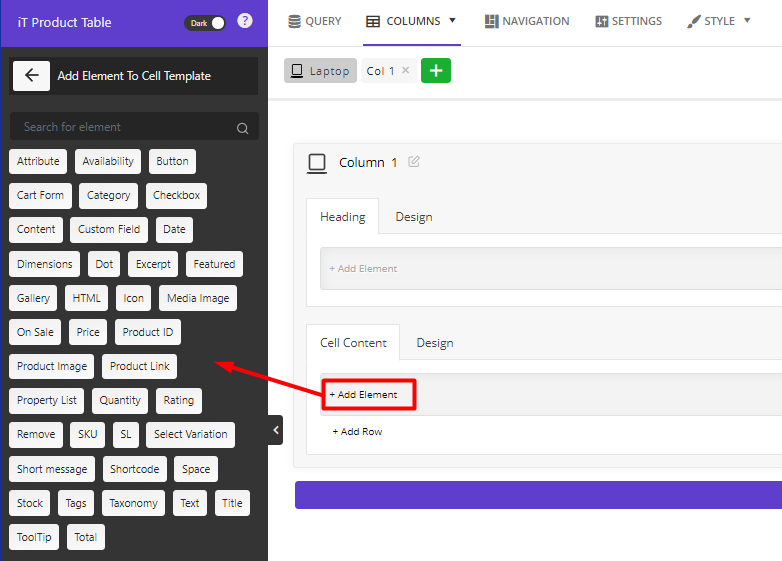
- Set Element configurations
After adding an element, you can set items in the General and Style tabs that just appeared in the Element setting panel to tweak its content and appearance.
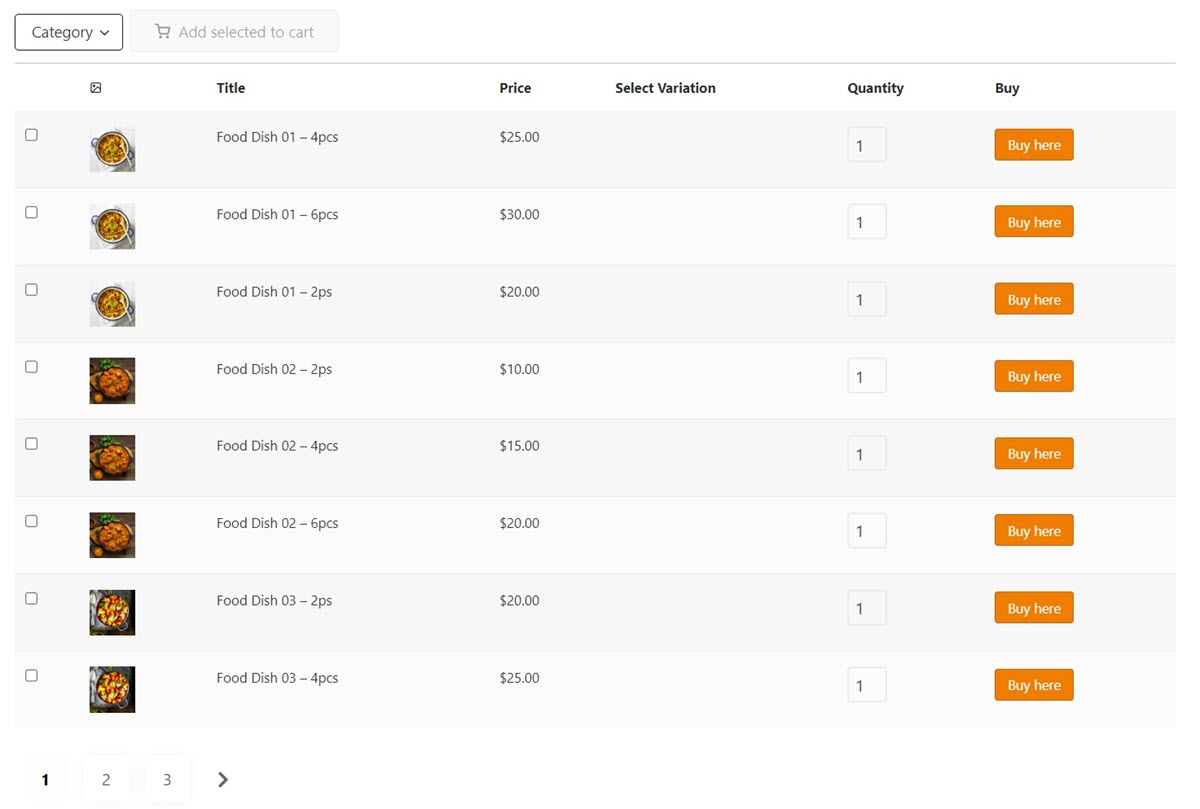
By following the above-mentioned steps, you can add the necessary fields to your product table columns, including:
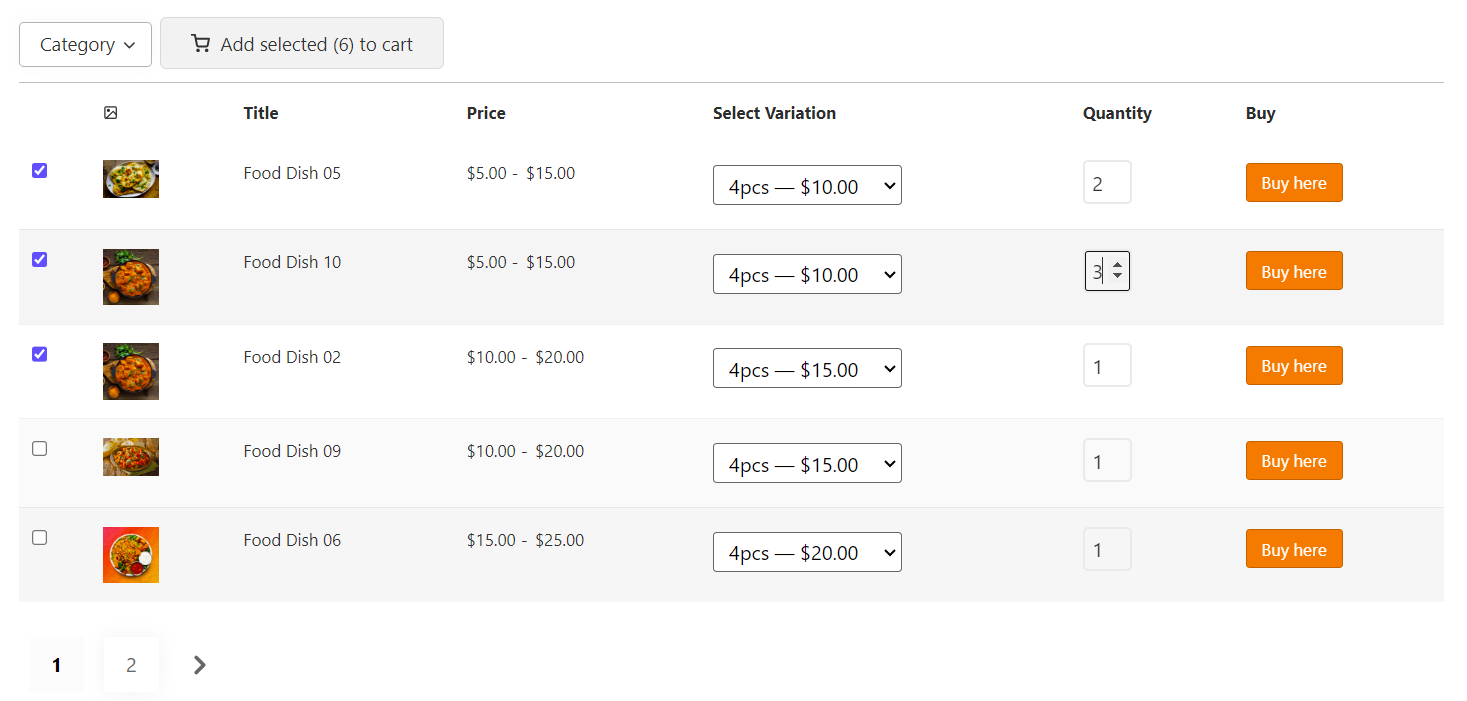
- Checkbox: To let customers select and add multiple variations to cart in WooCommerce.
- Product Name: To display the product title in the table.
- Product Price: To enable customers to compare the prices of different variations.
- Image: To show the featured image of each product in the table.
- Select variation: To allow customers to select their favorite variation from a dropdown list.
- Quantity: To enable customers to increase/decrease the quantity of products directly in the table.
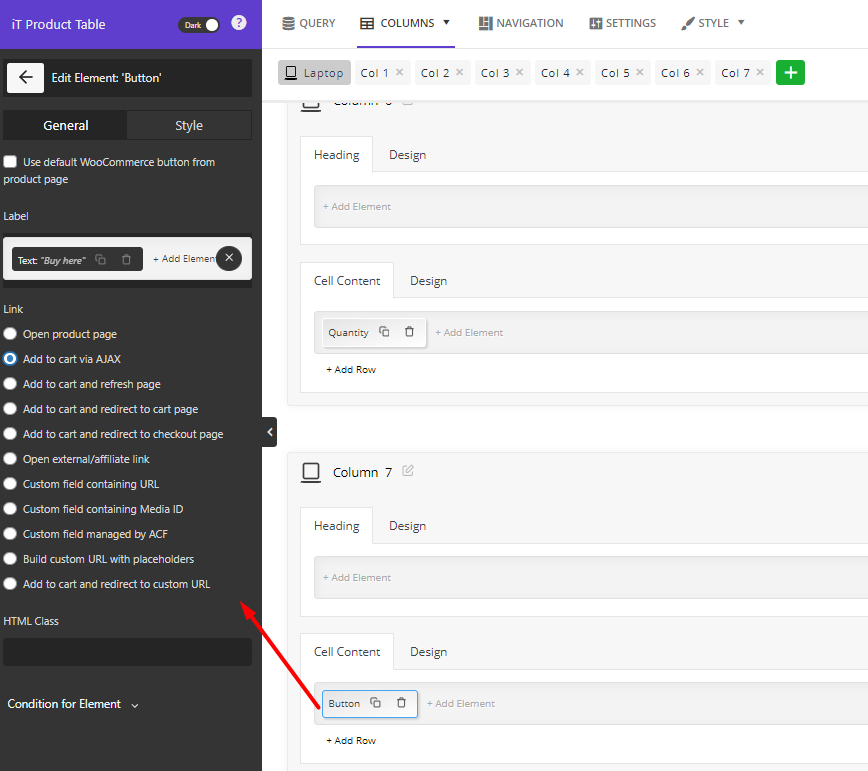
- Add to cart: To help customers easily add their favorite variation to their cart with one click.
There are a lot of amazing features available in the columns tab for taking your product table to the next level, like:
- Add rows: You can add multiple rows in one column and show different fields under each other.
- Customize Design: You are able to personalize each heading and cell content by customizing the color, font, alignment, etc.
- Change orders: You have access to the ordering tool to organize the columns and display them in your preferred order in the table.
- And more.
Step 4: Add search, filter, and sort abilities to the product table
Searching, filtering, and sorting products, play a crucial role in improving customer experience and making them happy during purchase. In the WooCommerce product table, you can add these widgets to three different areas including:
- Header: On top of the product table.
- Footer: On the bottom of the product table.
- Sidebar: On either the left or right side of the product table.
There are many items you can show to your customers in each area to help them find and order what they need easier, such as:
- Filter: To allow customers to filter products by category, attributes, availability, price, etc.
- Sort: To help customers sort products by title, price, etc.
- Pagination: To show the number of pages and let customers jump to other pages with one click.
- Multi add to cart: To enable WooCommerce to add multiple variations to the cart at once.
- Search: To make finding products more convenient for customers use the Search box.
- Etc.
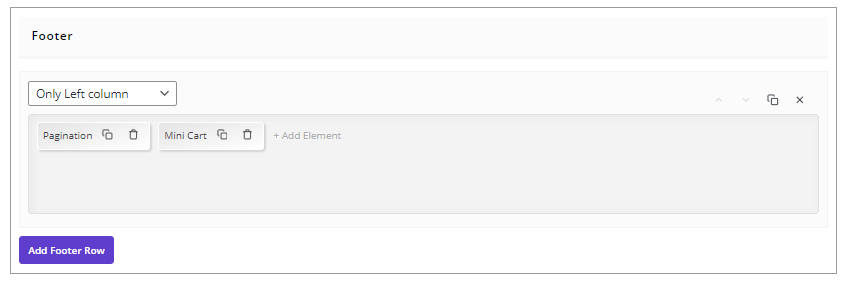
To satisfy your customers by displaying widgets to your product table, try to:
- Go to the Navigation tab.
- Choose one of the areas: Header, Footer, Sidebar.
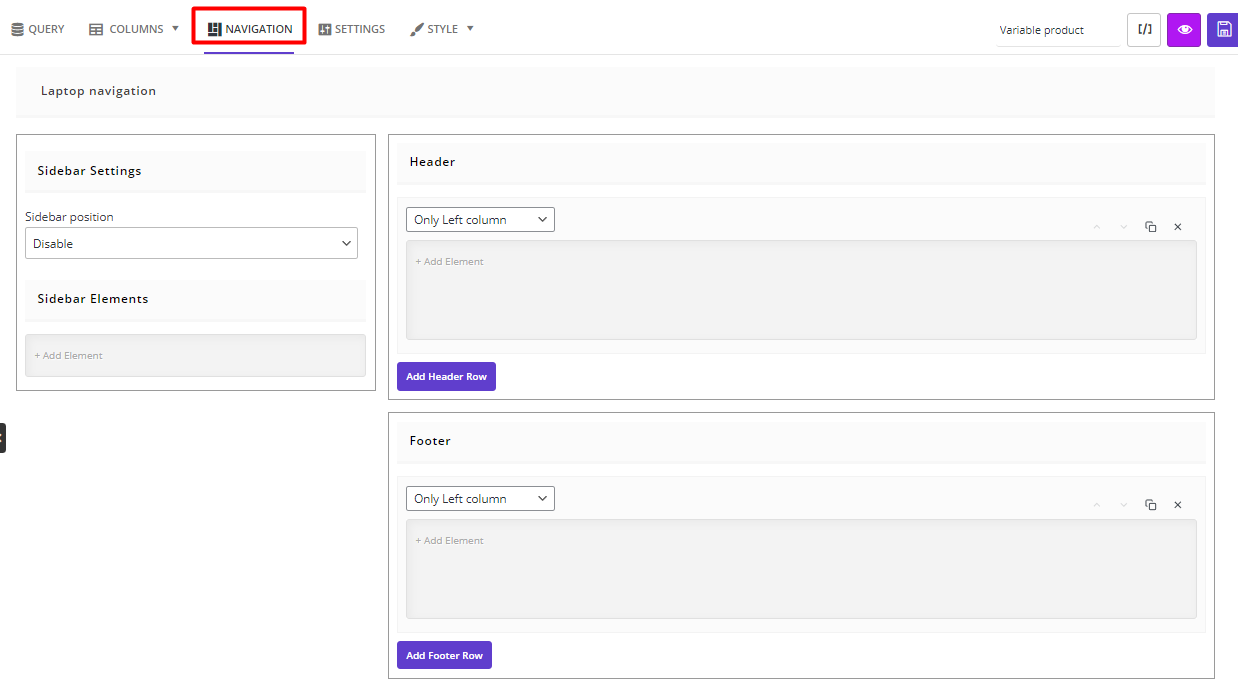
- Press Add Element option and choose one of the elements from the left panel
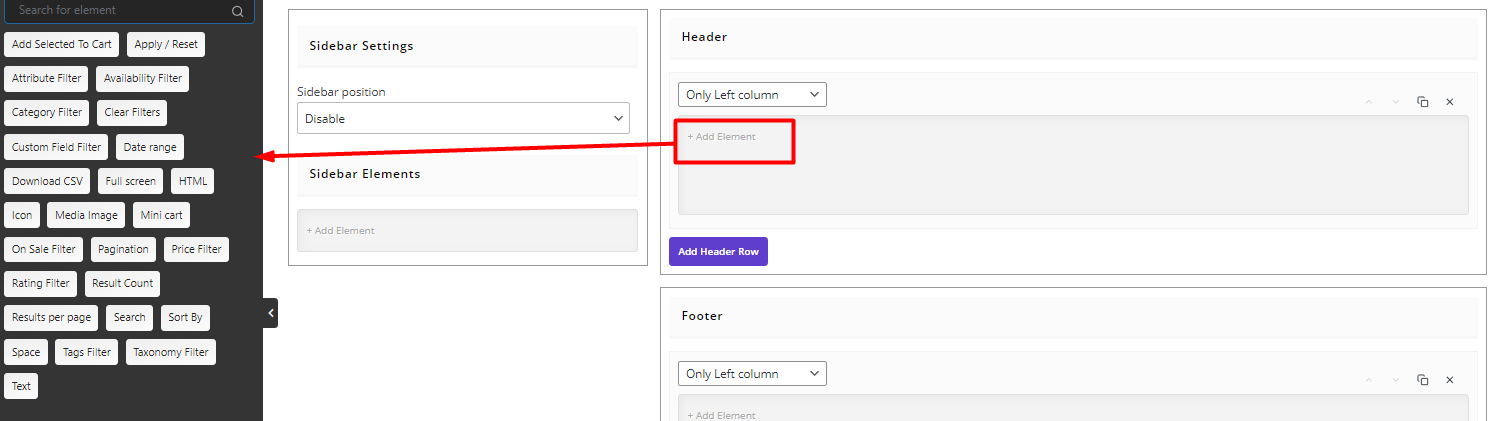
- Customize the elements in the General and Style tabs of the Element setting panel.
The most important element that you need to display in the product table is Add selected to cart. By using this element, your customers are able to add multiple variations to your cart WooCommerce with one click.
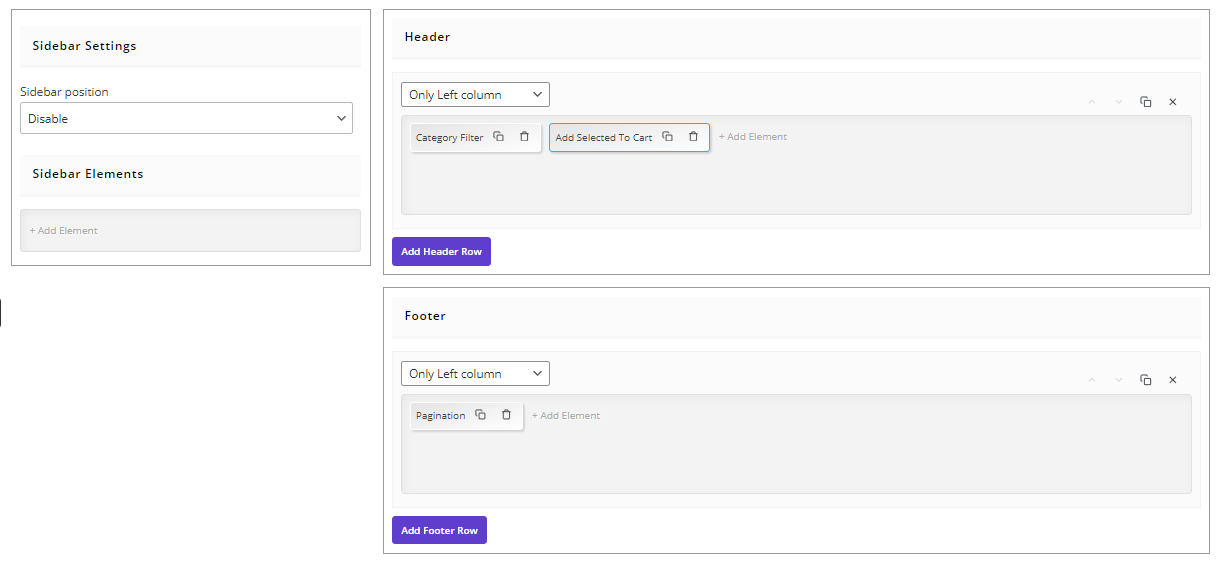
As illustrated below, we chose the following widgets to be displayed in the product table:
- On Header: Category filter element, Add selected to cart element.
- On footer: Pagination element.
Step 5: Change configurations in the setting and style tabs
The final step in customizing the product table is tweaking the configuration settings and overall style.
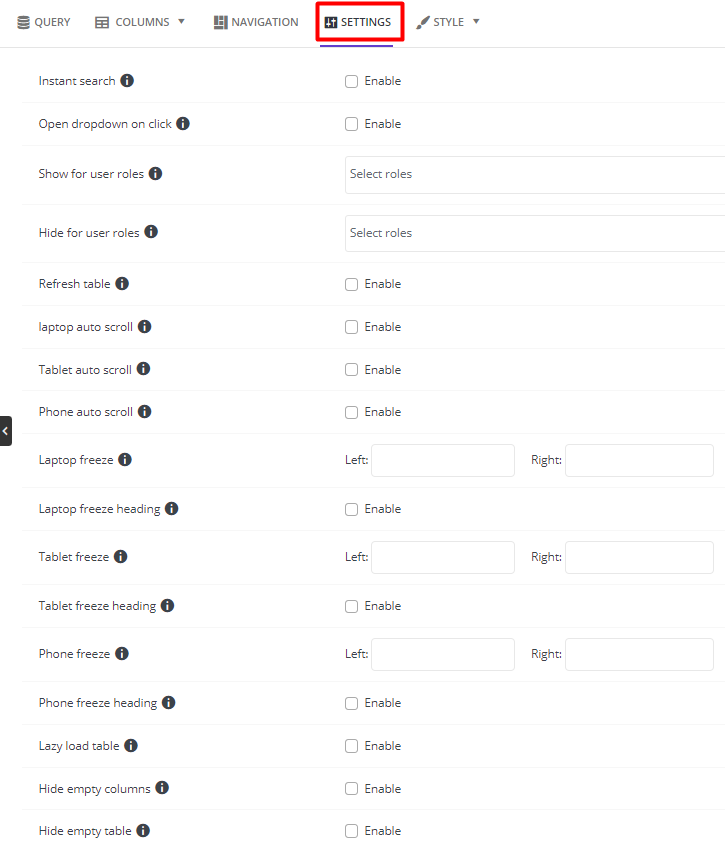
In the Settings tab, you have access to general configurations like enabling Instant search or Refresh table, show/hide table for specific users, activating phone or tablet scroll, and more.
The Style tab provides necessary tools for making your desired changes to the appearance of your product table like changing the color, font, alignment, etc.

Finally, if you click on the Preview icon, it is possible to see how your product table will be displayed to your customers in your online shop.
Step 6: Show the WooCommerce product table in your online store
WooCommerce product table plugin lets you display the new product table across any page with a shortcode. So, you can include product tables anywhere on your site as you wish by following the below steps:
- Write a name for your table and save it.
- Press the Shortcode icon on top of the table to copy the shortcode.

- Create a new page in the WordPress.
- Paste the Shortcode on the page.
- Add a title to the page
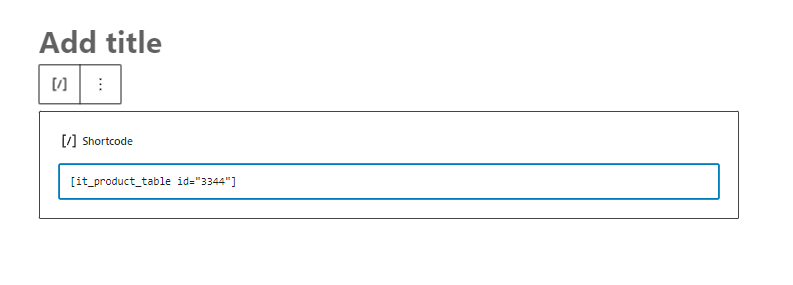
- Publish the page to see the result.
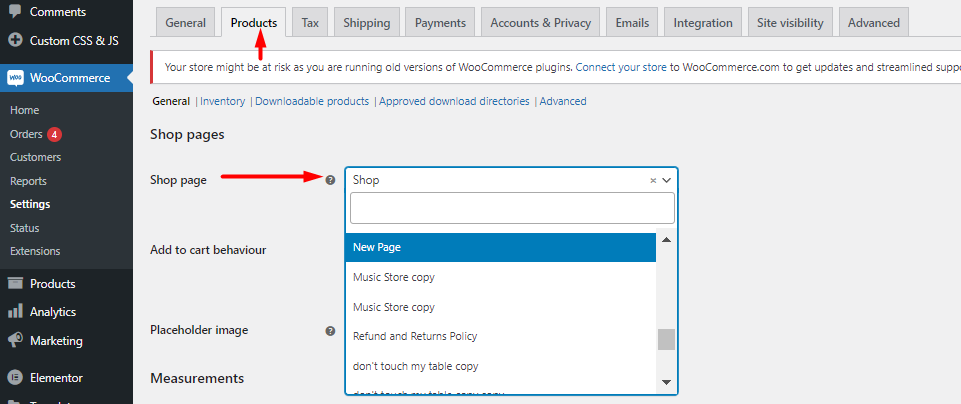
You can replace the default shop page of WooCommerce with this new page by navigating to WooCommerce settings > product and choosing the new page from the list.
TABLEiT – Product Table for WooCommerce
The easy way to add multiple variations to cart in WooCommerce
Extra feature of WooCommerce product table plugin
WooCommerce product table plugin comes with a powerful product table editor, allowing you to obtain results based on your preferences. Drag and drop the table columns or add product filters easily, making it easy to adjust the element positions to meet the requirements of your customers and satisfy them. However, this is not the end of the story, there are a lot of additional user-friendly features that help customers get connected to their desired products quickly and seamlessly.
Let’s review some of them.
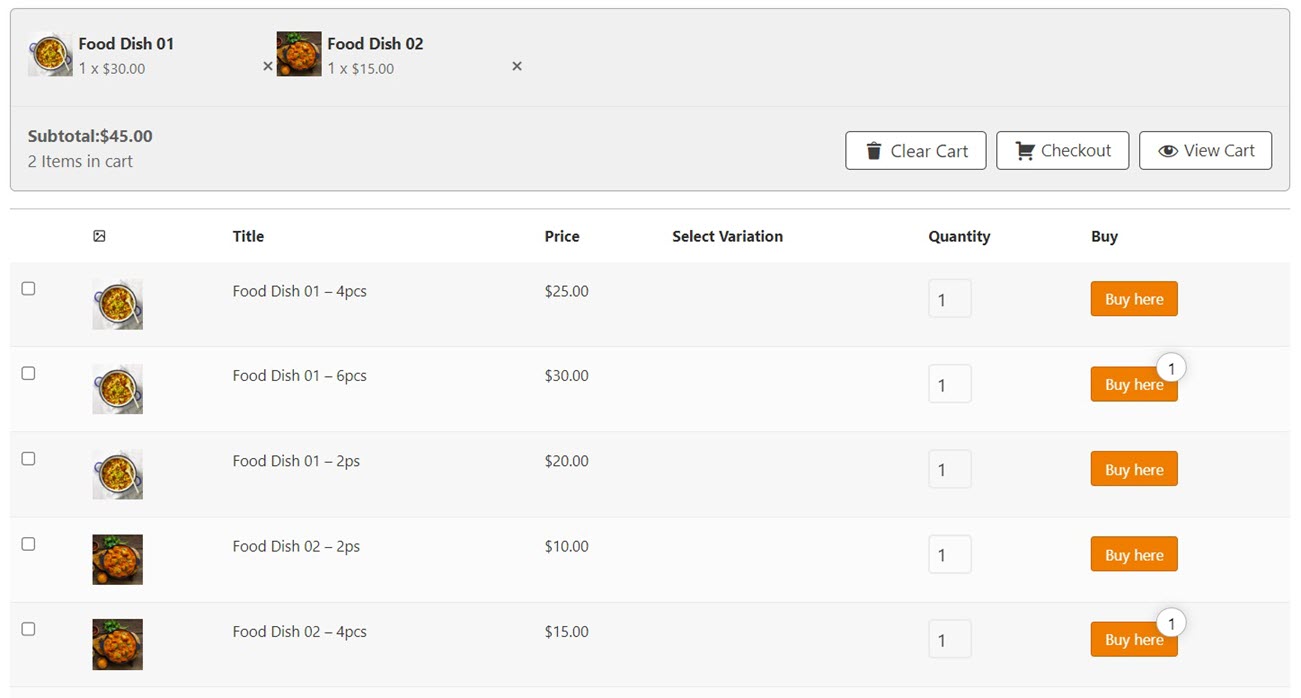
Display product variations in separate rows
The WooCommerce product table plugin allows you to replace the dropdown view of variations and show your product variations in different rows of the table. To enable this option, you need to open the Settings tab and mark enable in front of Show variation on one row.

As illustrated below, each variation is displayed in a separate row, so customers can their features like price, image, etc at one glance and add their favorite ones to their carts.
Add a Mini cart to the product table
The “Mini Cart” feature can significantly improve your customer experience. It empowers them to effortlessly review the items in their carts, adjust their quantity, and seamlessly proceed to checkout, all without having to leave the shop page.
A mini cart is one of the available elements in the Navigation tab. So, you can easily add this feature to one of the navigation areas and customize it to look perfectly.
For example, if you choose to display the mini cart in inline mode, the customers will see the selected items as illustrated below:
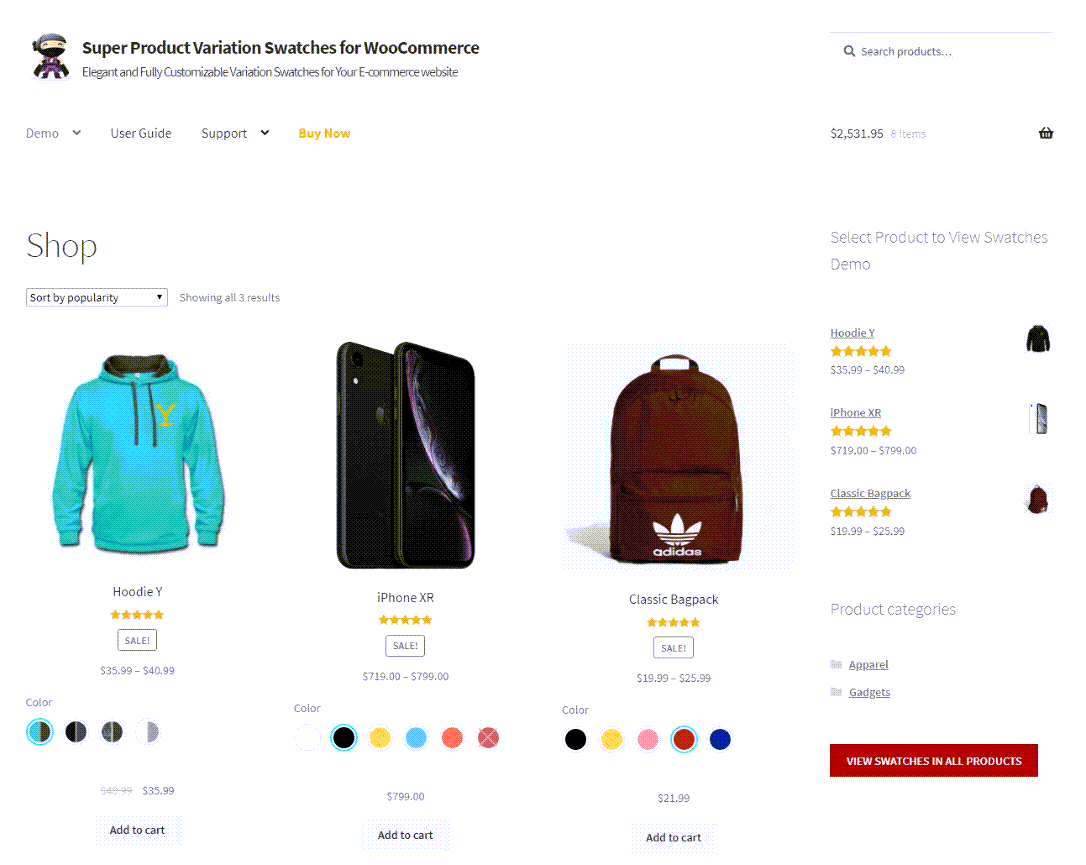
Method 3: WooCommerce Variation Swatches plugin
The WooCommerce variation swatches plugin is an easy-to-use tool that offers an aesthetic and professional experience to select attributes for variation products on the archive page. It allows store managers to turn the WooCommerce add to cart button variable product into radio images, colors, or labels. It means with the help of these powerful plugins, you can show product variation terms in images, colors, and labels. To maximize and personalize your development process, the product attribute swatches provide an option to write your own CSS. Besides creating size, brand, image, color, and label variation swatches, these plugins allow you to handle the swatches’ shape style Rounded and Circle.
Usually, you can use the aesthetic items for WooCommerce variations either in the single WooCommerce product or the product archive page. In this way, your customers can review the product variations in the archive page and click on the WooCommerce variable product add to cart button to order it.
Although variation swatch plugins have many awesome features, you can not use them to change the grid view of the archive page. It is not also possible to enable multi-add to cart feature on the shop page. We recommend you use this method only if you have a few number of variable products in your online store.
Which Method is the best?
All three methods we have introduced in this post are helpful for making the process of WooCommerce add to cart variable products easier for your customers. However, the WooCommerce product table plugin works perfectly as a bulk add to cart order form, including quantity selectors and product variations.
There are a lot of important features you can use to satisfy your customers when deciding to add to cart variable product WooCommerce, including:
- Products are listed in a customizable table layout, and each item has a check box.
- You can create a single listing of all your products with the WooCommerce buy now button for variable products, or you can create tables listing specific products only (e.g. by category).
- You can show product variations as dropdown lists next to the WooCommerce variable product add to cart button.
- Alternatively, each product variation can have its row in the product table with a separate WooCommerce add to cart button.
- There are options to add the product table shortcode anywhere on your site or to replace it with the default shop and archive pages.
- You can enable the multi-add-to-cart feature and let customers order various products at once without leaving the shop page.
- It provides useful options for displaying all details of the product in the table columns as well as filtering, sorting, or searching boxes in the navigations.
All of these features reveal that the WooCommerce product table plugin is the best tool you can utilize to make an enjoyable purchasing journey for your customers.
Benefits of WooCommerce add multiple variations to cart
The advantage of WooCommerce adds multiple variations to the cart is facilitates the purchasing process for customers. It allows customers to easily select and add as many variations as they need to their cart without leaving the shop page.
Below, you can find the other benefits of this practical feature:
Increase transparency
Multi-add to cart provides transparency, as customers can see the prices of the variations before making their decisions. It provides a seamless buying experience by allowing customers to compare the features of all available variations like price, image, etc. on the shop page before making a final purchasing decision.
Facilitate purchasing process
The Add to Cart feature simplifies the purchasing process for customers resulting in improving conversion rates on e-commerce sites.
Encourage customers to buy
Allowing customers to add multiple variations to cart WooCommerce will encourage them to order more from your shop. This is a great solution for bringing your online store much more revenue by attracting and satisfying customers.
Conclusion
Allowing customers to select multiple variations and add them to the cart quickly can significantly improve the shopping experience in a WooCommerce store. When customers can choose different product options and set quantities directly from the shop page, the buying process becomes faster and more convenient.
In this article, we explored several ways to enable this functionality. You can create custom add-to-cart URLs to add variations programmatically, which is useful for developers and advanced users. WooCommerce product table plugins provide a more user-friendly approach by displaying products and variations in a structured table where customers can select and order multiple items easily. Variation swatches plugins can also improve the visual selection of product options.Among these methods, using a WooCommerce product table solution like TABLEIT, often provides the most flexible and conversion-friendly experience. It allows customers to view product details, compare variations, choose quantities, and add multiple products to the cart in one step. This streamlined process helps reduce friction during checkout and can lead to higher sales and better customer satisfaction.
FAQ
How can customers select multiple variations in WooCommerce?
By default, WooCommerce allows customers to select only one variation at a time on the product page. To enable selecting multiple variations, store owners usually use product table plugin like TABLEiT, custom add-to-cart links, or quick order forms that allow customers to choose several variations and add them to the cart simultaneously.
Can WooCommerce add multiple products to cart at once?
Yes, WooCommerce can add multiple products to the cart at once using custom links, bulk order forms, or product table plugins. These tools allow customers to select several products or variations and add them to the shopping cart with a single action, which improves the purchasing experience.
How does WooCommerce add product to cart programmatically?
WooCommerce allows developers to add products or variations to the cart programmatically using specific URLs or WooCommerce functions. By including parameters such as product ID, variation ID, and attribute values in a URL, a specific variation can be added directly to the cart without requiring the customer to visit the product page.
Why is adding multiple variations to cart useful for WooCommerce stores?
Allowing customers to add multiple variations to the cart makes the shopping process faster and more convenient. Customers can compare different product options, choose quantities quickly, and complete their purchases with fewer clicks. This improved user experience often leads to higher conversion rates and increased sales.
What is the best way to show WooCommerce products with multiple options?
The best way to display WooCommerce products with multiple options is to use tools that allow customers to see variations clearly and select them quickly. Product tables, quick order forms, and variation selection interfaces can display product details such as price, attributes, and quantity fields directly on the shop page, making it easier for customers to choose the variations they want.


