Finding products quickly is one of the most important parts of a successful WooCommerce store. When customers visit a large online shop with hundreds or thousands of products, they expect fast product search, advanced filtering, and an organized shopping experience. Without these features, visitors may leave your website before finding what they need.
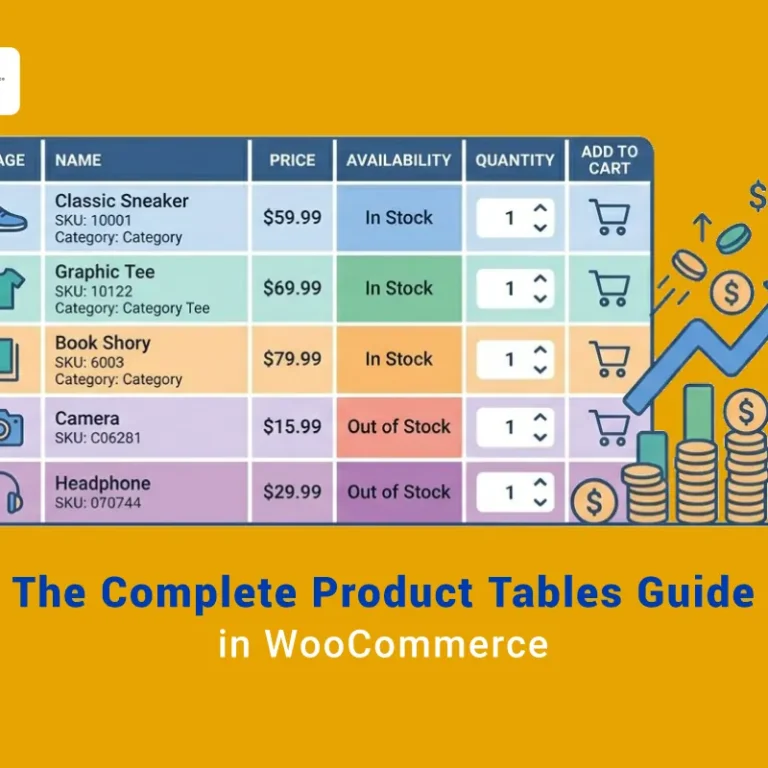
A searchable WooCommerce product table helps customers browse, search, and filter products more efficiently by displaying products in a structured table layout. Instead of opening multiple product pages, shoppers can instantly compare products, search by keyword, filter by category, attribute, price, stock status, and quickly add products to their cart.
With TABLEiT – Product Table for WooCommerce, you can easily create advanced WooCommerce product search tables with customizable filters, WooCommerce search boxes, sorting tools, AJAX navigation, and responsive product grids. This powerful plugin improves the customer experience, simplifies product discovery, and helps WooCommerce stores increase conversions and sales.
In this guide, you will learn how to create a searchable WooCommerce product table with advanced search and filtering options for your online store.
Search is most effective when it works with filters, sorting, and clear table columns. R̲e̲v̲i̲e̲w̲ t̲h̲e̲ f̲u̲l̲l̲ p̲r̲o̲d̲u̲c̲t̲-̲d̲i̲s̲c̲o̲v̲e̲r̲y̲ f̲r̲a̲m̲e̲w̲o̲r̲k̲ before configuring the search experience.
Quick Answer:
A searchable WooCommerce product table helps customers find products faster, especially in stores with many items, variations, categories, or SKUs. Instead of browsing through multiple shop pages, customers can search, filter, compare, and add products to cart from a single table layout.
To create one, use TABLEiT – Product Table for WooCommerce. After installing the plugin, go to WordPress Dashboard > iThemeland > TABLEiT, create a new table, and use the Columns tab to add the product fields you want to display. Then open the Navigation settings and enable search, filters, sorting, pagination, quantity selectors, and add-to-cart controls.
After saving the table, copy the shortcode and place it on the desired page. TABLEiT plugin is useful because it lets you create a searchable product catalog without coding, making the shopping process faster for customers and easier to manage for store owners.
TABLEiT – Product Table for WooCommerce
The easy way to create a searchable product table in WooCommerce

The advantages of search and filtering in the product table
If you are a WooCommerce online store manager, you surely know that one of the most effective ways to improve the customer experience of your store is to add the ability to search and filter products. Searching and filtering are essential to customer satisfaction, especially for sites with many products.
If you have a large store with many products, visitors may have to scroll through several results pages to find what they want. This can negatively affect the customer experience. For this reason, in most e-commerce sites, a search box is available for the customers, where they can search for a product by typing a keyword.
The filtering feature also helps customers narrow their searches by choosing the features to quickly find the products they want to buy on the site.
Searching and filtering also help your customers reach results faster and find the products they need among the thousands of products on the site.
Installing the WooCommerce product table plugin can improve the user experience (UX) by adding a search box and advanced WooCommerce filters to your store.
Add search and filter functionality using WooCommerce product table plugin
Installing the WooCommerce product table plugin allows the site administrator to create a product table with custom columns and rows. Using this plugin, the site manager can display all the essential product data on one page to the customer by creating different columns and rows. Also, adding search and filter capabilities to the table allows the customer to find the desired product more easily.
You can use the Column and Query tabs to create a custom table of products. This plugin is designed with a very simple user interface where you can easily create your custom table product.
After making the product table, you must enter the Navigation tab to add search and filter functionality, as seen in the image below.
You can see three main parts on this page:
- Sidebar setting
- Header
- Footer
The product table page’s sidebar, header, and footer are the three main areas. You can add search and filter options in each area with the help of the plugin.
In the following, we will fully explain how to add search and filter options to these areas of the product table.
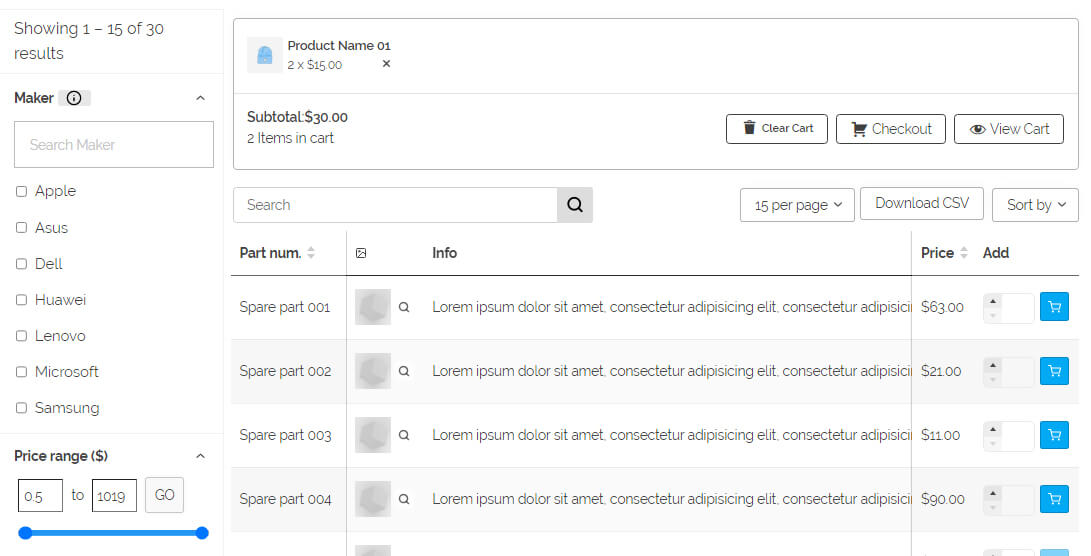
Add search and filters in the sidebar
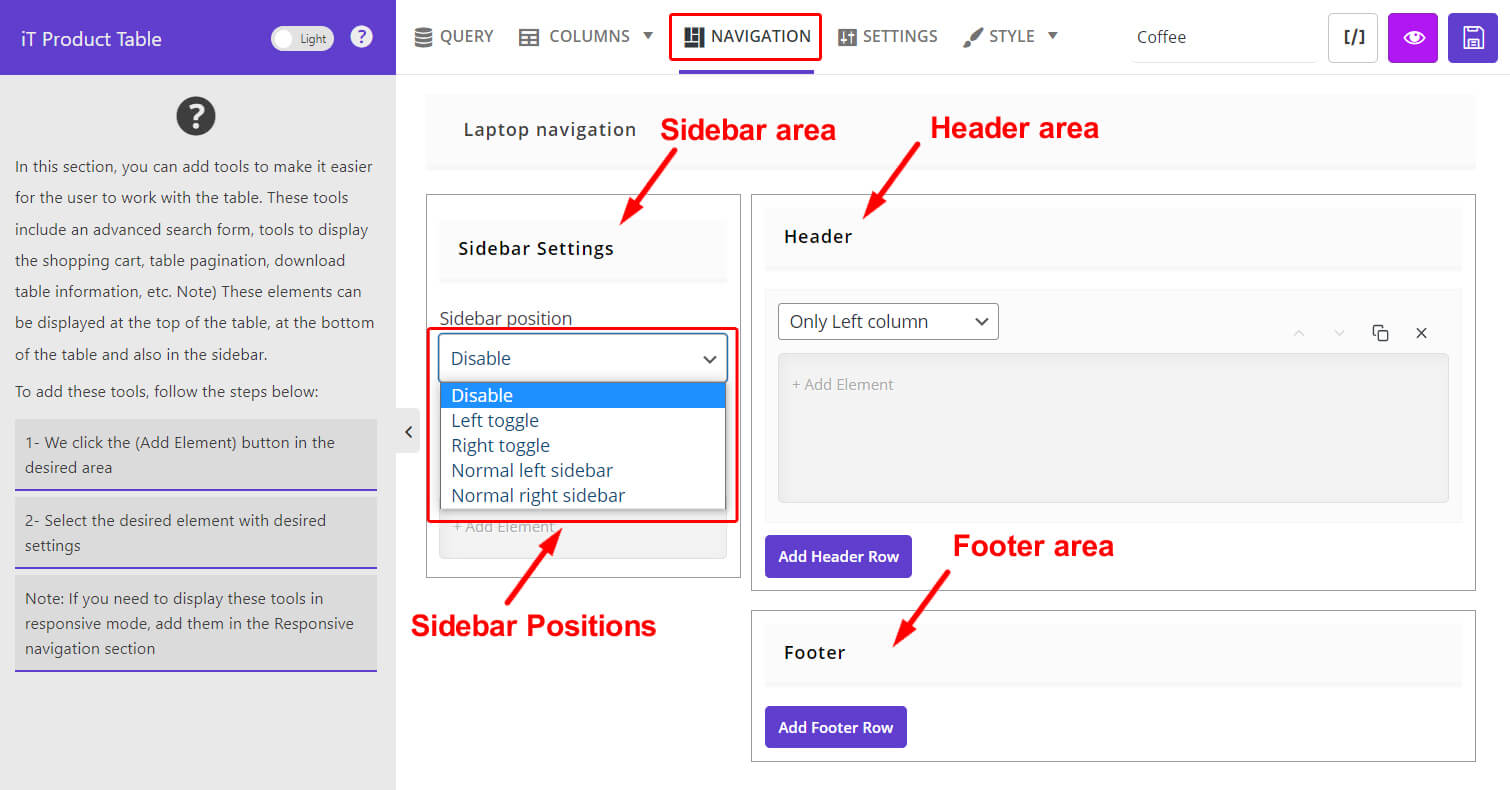
In the Sidebar Settings area, using the Sidebar Position and Sidebar Elements options, you can display the search and filter options in the product table in different ways that we will explain below.
Sidebar Position
If you click on the combo box of this field, you will see the following options:
- Disable/Enable: Enable or disable the sidebar area
- Left Toggle: Open the sidebar as a toggle from the left side.
- Right Toggle: Opening the sidebar as a toggle from the right side.
- Normal Left sidebar: Display the sidebar on the left side of the product table.
- Normal Right sidebar: Display the sidebar on the right side of the product table.
Sidebar Elements
In the Sidebar Elements field, you can add as many elements as you like so the customer can search and filter based on those elements.
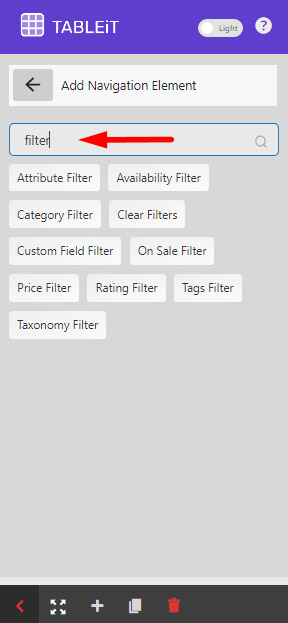
We must first click the Add element button to add filter and search elements. After clicking, as you can see in the image below, all the required elements will be displayed on the left side to add them to the sidebar.
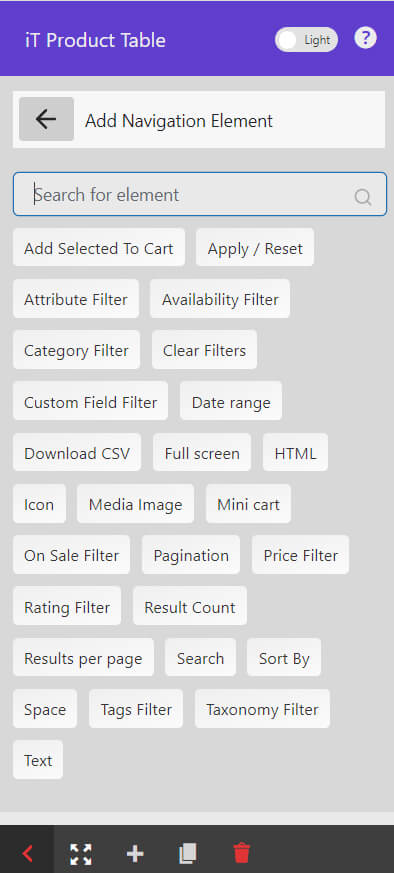
A series of these elements are related to filters, shown to us if we type the word Filter in the top bar.
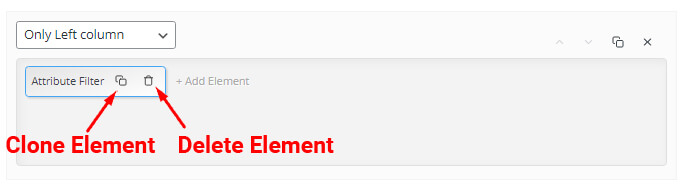
You can click on the trash can icon to delete any elements.
The elements that can be added to the sidebar are:
- Add selected to cart: This element add a button to product table allows the customers to add one or more products to their cart by clicking this button.
- Apply/Reset: Apply or reset the filter or search.
- Attribute Filter: This element allows the customer to filter products based on their attributes.
- Availability Filter: This enables the customer to filter products based on availability.
- Rating Filter: Allows the customer to filter products based on rating.
- Tags Filter: Allows customers to filter products based on tags.
- Category Filter: Allows customers to filter products based on categories.
- Custom Field Filters: Customers can filter products based on custom fields.
- On-sale Filter: This allows the customer to filter the on-sale products.
- Price filter: This will enable customers to filter products based on price.
- Taxonomy Filter: Allows customers to filter products based on taxonomy.
- Clear Filters: The customer can delete the previously applied filters by clicking this button.
- Date Range: The customer can filter the products on the site for sale on a specific date.
- Download CSV: The customer can download the list of products in a CSV file by clicking on this option.
- Full Screen: By clicking this option, the product table will be displayed to the customer in full screen.
- Mini Cart: Displays the shopping cart to the customer.
- Pagination: Displays the page numbers of the product table, and the user can move between pages through it.
- Result count: Displays the number of filtered or searched products.
- Results per page: shows the number of filtered or searched products on each page.
- Search: Add a search box where the customer can see related products in the table by typing the main keyword.
- Sort By: allows the customer to sort products based on different parameters.
- Space: Add a space between elements.
- HTML: Add a custom HTML code to the navigation areas.
- Icon: Add a custom icon to the navigation areas.
- Media Image: Add a custom media image to the navigation areas.
- Text: Add a custom text to the navigation areas.
Each of these options have special settings. When you click on each element, the settings section will be displayed.
Example: Add category, attributes and price filters to the drop-down sidebar on the left side of the table
To add category, attributes and price filter to the left sidebar area, first select the Left Toggle option from the Sidebar Options field. Then, in the Sidebar Elements field, click the Add elements option and select the following options from the left menu:
- Category Filter
If you click on Category Filter, the settings of this filter will be displayed. You can customize this filter in the General and Style tabs.
In the General tab, you can change the Heading title. You can also limit the customer’s category choice to only one item by activating the “only allow one option to be selected” option.
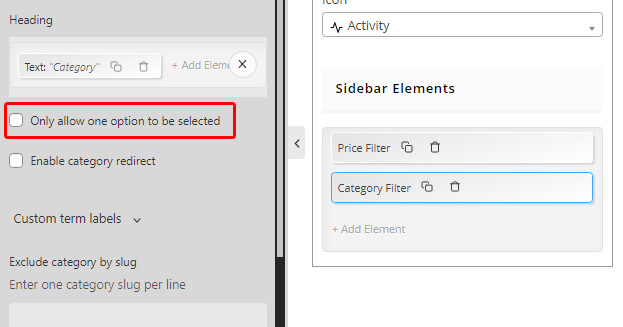
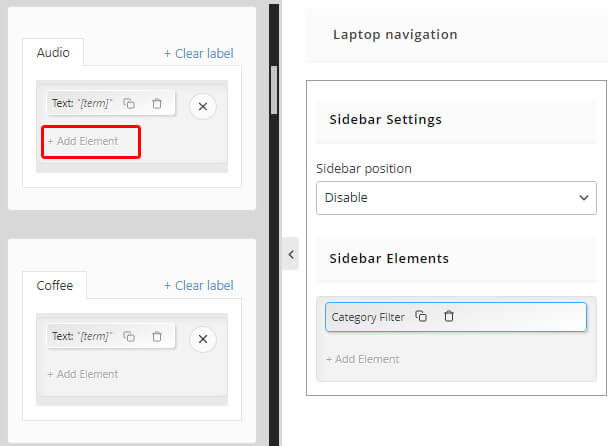
You can add different labels in the Custom term labels section by clicking the Clear label icon. In this section, you can define what should be displayed instead of the default text and label of each category term. For example, you can display a photo, icon or custom text for each term.
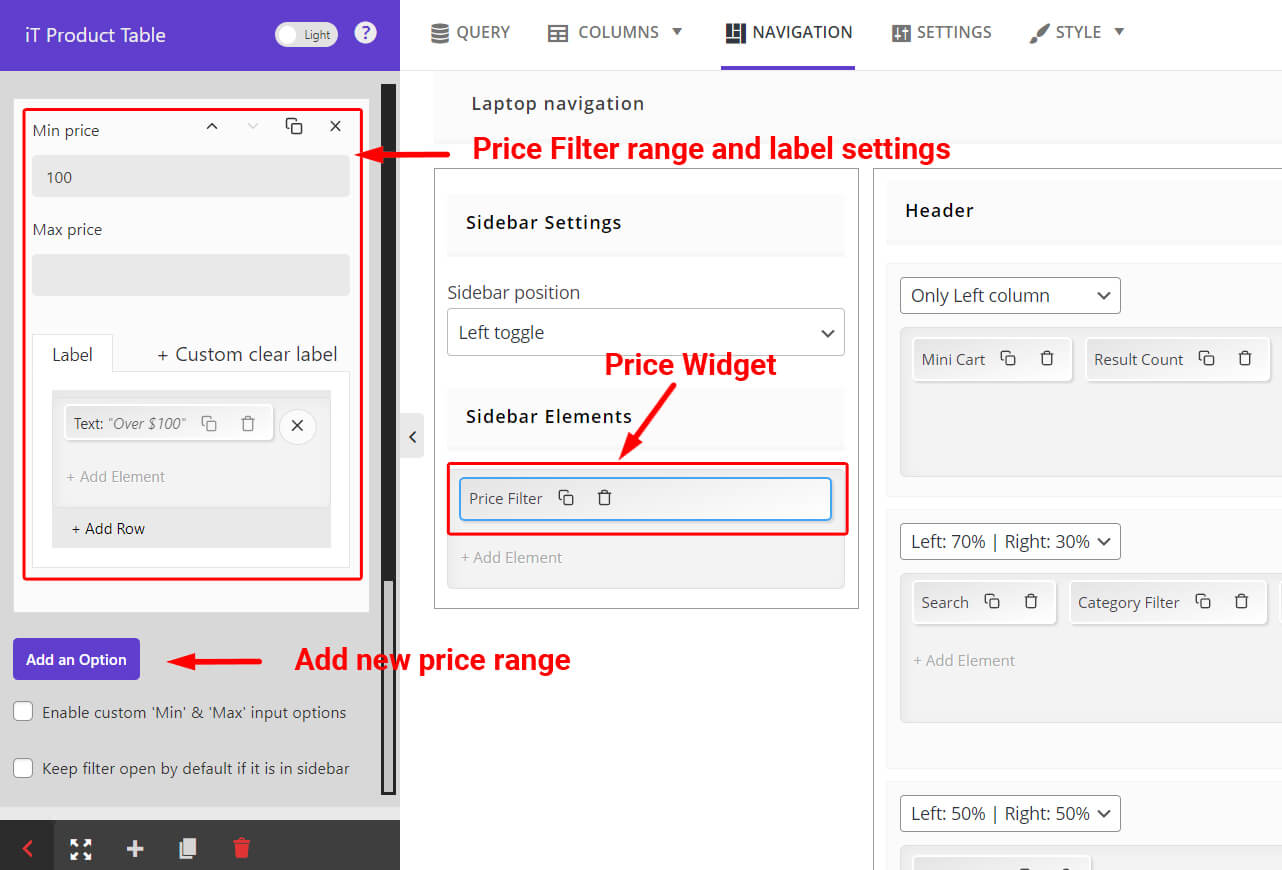
- price filter
One of the most used options for filtering products is price range. The related settings will be shown if we add the price filter element to the sidebar area.
In the price filter settings, we can create several ranges for the price by clicking on the Add an option button. And determine the Max price and Min price for each range.
In these settings, it is possible to edit the label and add different fields for each label.
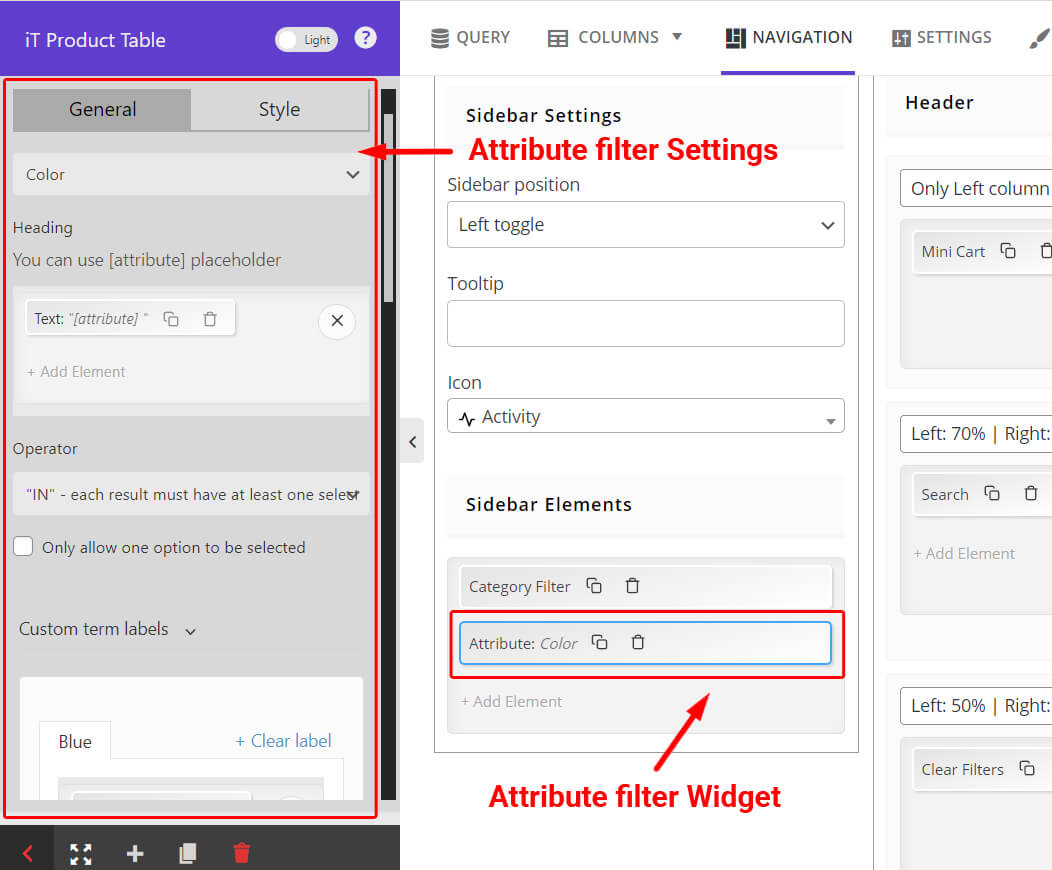
- Attribute Filter
If you have variable products with various attributes on your online store, it is important to allow the customer to filter products based on these attributes. To create such access, you can select the Attribute Filter element.
After choosing the Attribute filter in the settings section, it is possible to add any attribute, such as color or size, … in this field so that the customers can easily filter the products based on each.
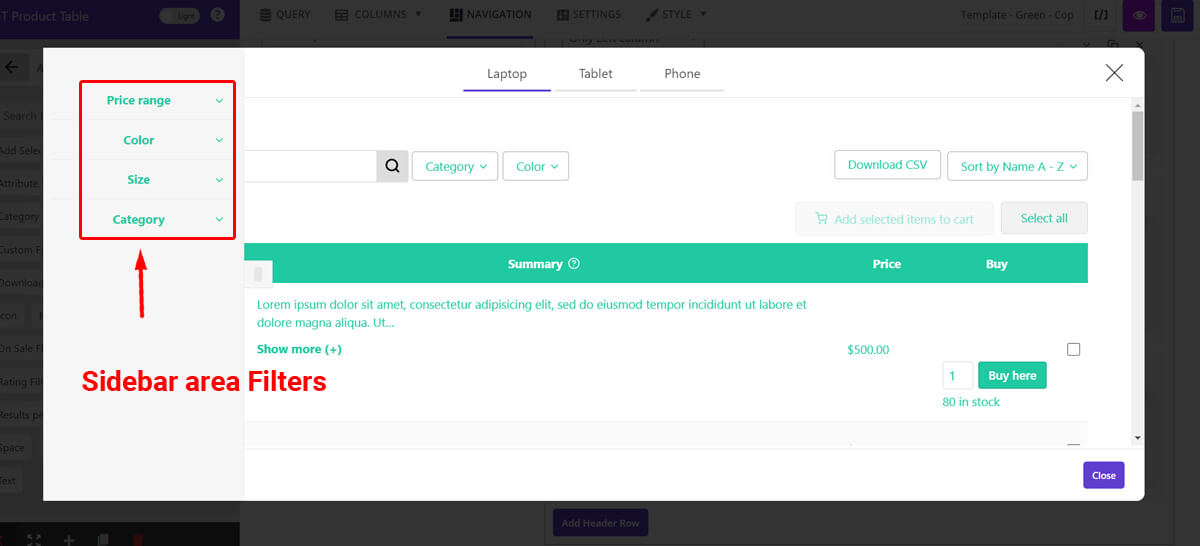
If you want to see how the sidebar will be displayed in the product table after adding these elements, you can click on the eye icon called Live Preview. A pop-up will open, and you can see how the product table will be displayed in the output.
Add search and filter in the header and footer area
You can add the same elements explained in the previous section in the header and footer areas. But the way to arrange and display the elements can be different, and this part gives the site manager more flexibility to set various options.
To customize the arrangement of search and filter options in the header and footer area, you can use the following features in the WooCommerce product table plugin:
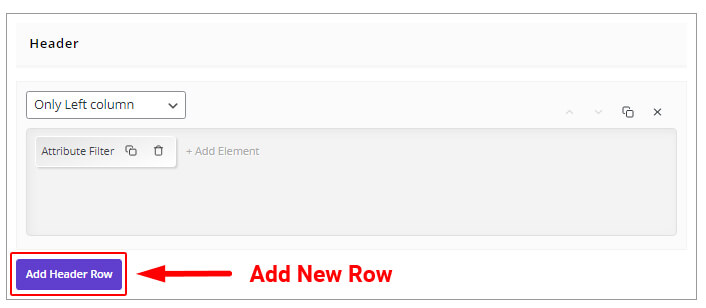
Add header/footer row
By clicking this button, we can determine the number of rows in the header/footer.
Arrangement of the columns of each row
At the top of each row, a combo box opens that allows you to specify the size of each element in that row. The available options are:
- Only left column: display all elements on the left side.
- Left 70%|Right 30%: The elements on the left have 70% of the space of each row, and the elements on the right have 30%.
- Left 50%|Right 50%: The size of the left and right columns should be equal.
- Left 30%|Right 70%: Elements on the left have 30% of the row space, and elements on the right have 70%.
- Only Right Column: Display all elements on the right side of the row.

Add element
After choosing the columns arrangement of each row, we can add the desired elements to the header and footer for filtering and searching by selecting the Add element option.
Example: creating various rows and adding elements to the header and footer in the WooCommerce product table plugin
For example, as you can see in the image below, three rows are added for the header section with these settings:
- First row sets only the left column.
- Second row set Left 70% | Right 30%.
- Third row set Left 50%|Right 50%.
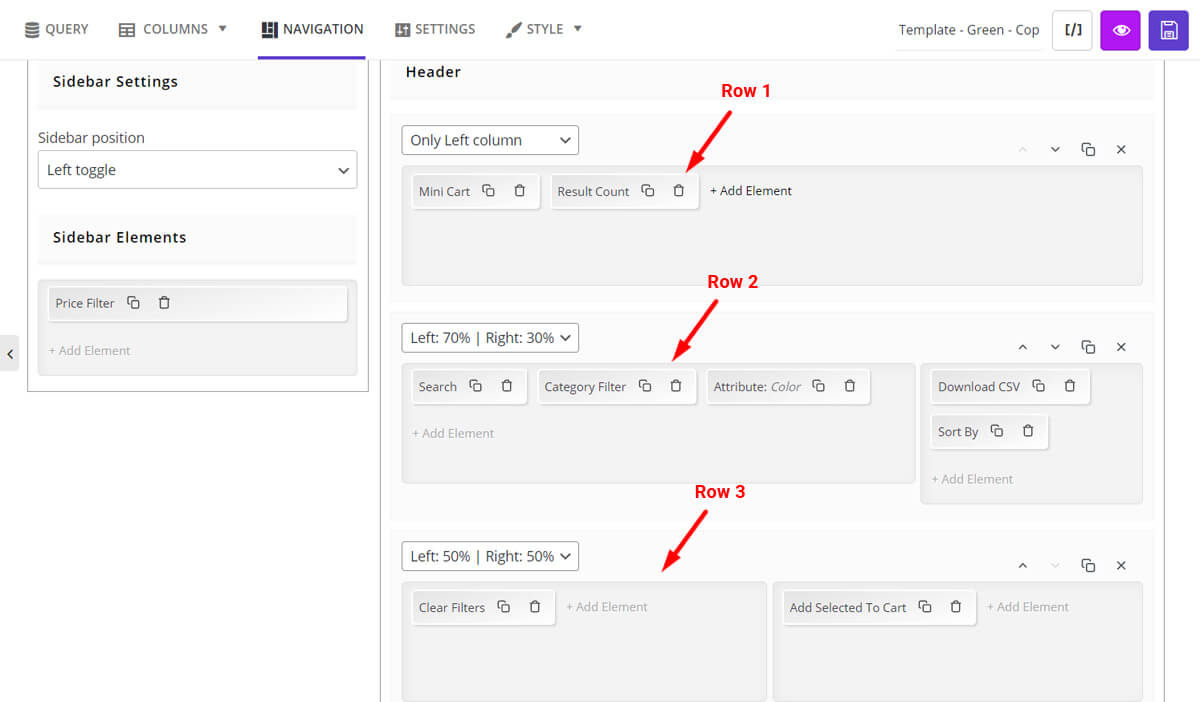
Different elements have been added in each row, as shown in the picture.
After selecting the header and elements, you can view the live preview by clicking the eye option on the table’s upper right side.
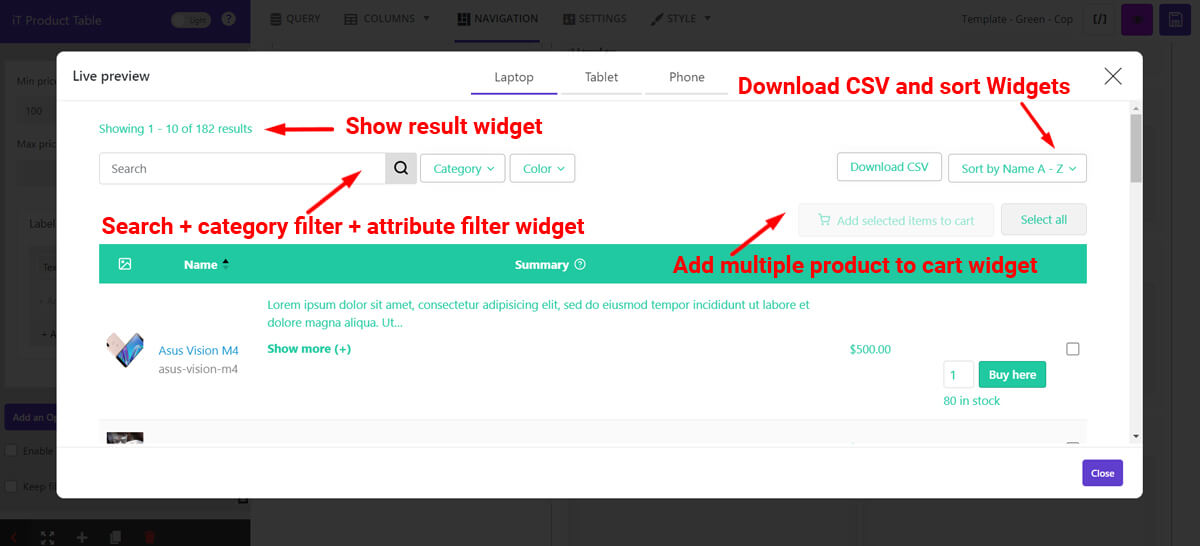
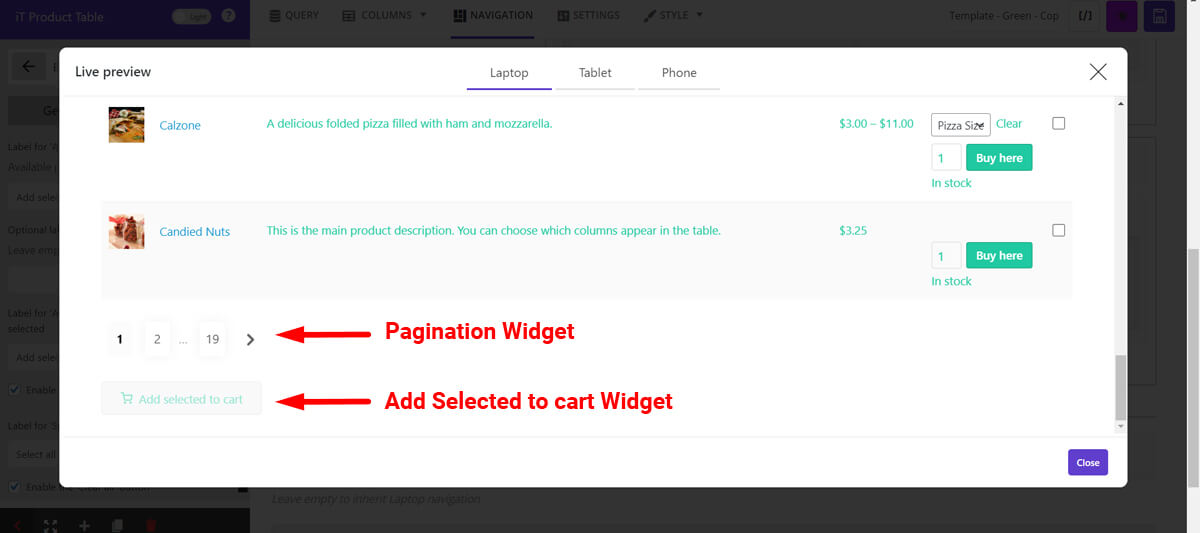
If you choose the Pagination element in the footer, the output can be seen as follows:
How to display the WooCommerce product table on the site?
When you have completely edited the settings and added the search and filter fields to the sidebar, header or footer, you can display the product table on the site by following the steps below:
Click the [/] button in the upper right corner to copy the table’s Shortcode.
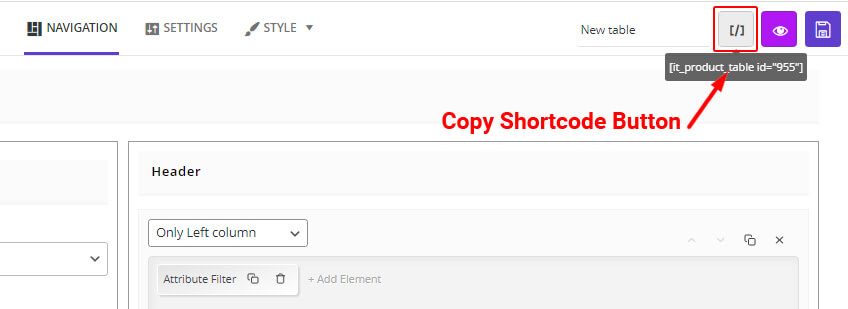
Enter the WordPress dashboard and click on Pages > Add new.
Paste the copied Shortcode on this new page and publish the page.
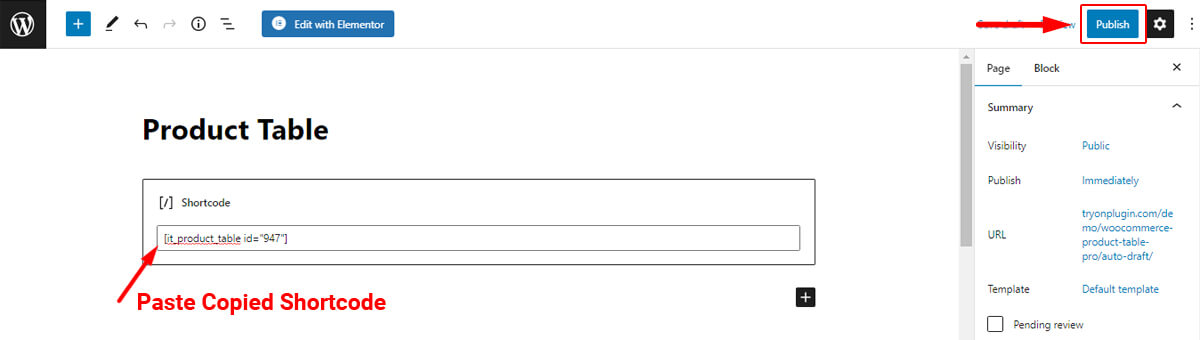
Enter the page address in the browser to view the product table on your site.
TABLEiT – Product Table for WooCommerce
The easy way to create a searchable product table in WooCommerce
Conclusion
Adding advanced search and filter functionality to your WooCommerce store is essential for improving customer experience and helping shoppers find products faster. A searchable WooCommerce product table allows customers to browse large product catalogs more efficiently, compare products instantly, and complete purchases with less friction.
With TABLEiT – Product Table for WooCommerce, store owners can create fully customizable product tables with advanced WooCommerce search boxes, category filters, attribute filters, price filtering, sorting options, pagination, and AJAX-based product navigation. These features not only improve usability but also increase engagement, conversions, and customer satisfaction.
Whether you manage a small WooCommerce shop or a large eCommerce website with thousands of products, implementing a searchable product table can significantly improve your store performance and provide a more professional shopping experience for your visitors.
After configuring search, connect it with sorting, category filters, and responsive columns. The advanced WooCommerce product table guide covers the full workflow.
FAQ
What is a searchable WooCommerce product table?
A searchable WooCommerce product table is a table-based product layout that allows customers to search, filter, sort, and browse products quickly from a single page.
Why should I add a WooCommerce search box to my store?
A WooCommerce search box helps customers find products faster, improves user experience, reduces bounce rates, and increases the chances of completing purchases.
Can I add product filters to WooCommerce product tables?
Yes, you can add filters for categories, attributes, prices, ratings, stock availability, tags, taxonomy, and custom fields to WooCommerce product tables.
How do searchable product tables improve WooCommerce UX?
Searchable product tables improve UX by simplifying navigation, reducing the number of clicks needed to find products, and making large product catalogs easier to browse.
Can customers search WooCommerce products by category and price?
Yes, advanced WooCommerce product tables allow customers to filter and search products by categories, price ranges, attributes, tags, ratings, and other product data.
Is TABLEiT compatible with large WooCommerce stores?
Yes, the TABLEiT plugin is designed to handle large product catalogs and supports advanced search, filtering, AJAX pagination, and responsive layouts.
Can I display WooCommerce filters in the sidebar or header?
Yes, you can place WooCommerce search boxes and filters in the sidebar, header, or footer areas of the product table, depending on your store design.
Does a searchable WooCommerce product table help increase sales?
Yes, faster product discovery and better navigation improve customer satisfaction, reduce frustration, and help increase WooCommerce conversions and sales.