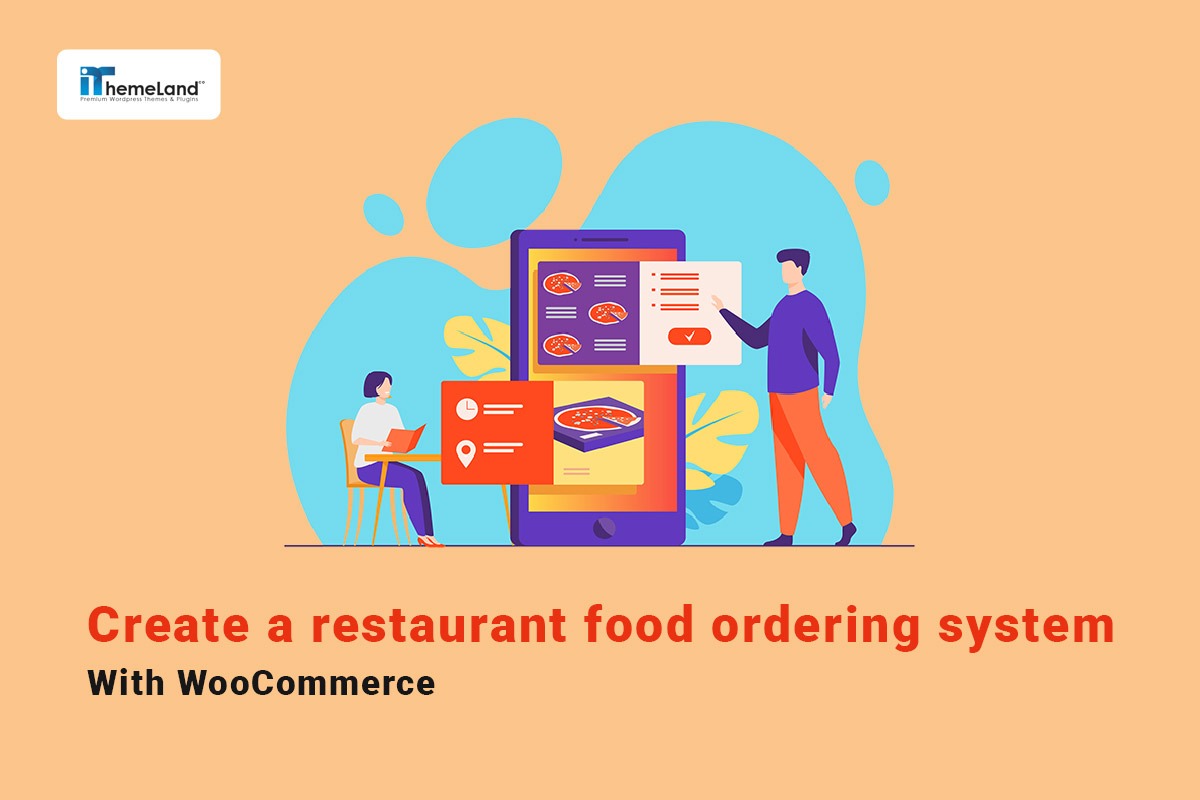

Creating a restaurant ordering system with WooCommerce is a practical way to accept online food orders directly from your own website. Instead of sending customers to third-party delivery platforms, you can display your food menu, receive orders, manage payments, and keep more control over the customer experience.
A normal WooCommerce shop layout is not always ideal for restaurants. Customers usually want to browse food categories, compare menu items, choose quantities, add several dishes to the cart, and complete their order quickly. If they have to open every product page separately, the ordering process can feel slow.
In this step-by-step guide, you’ll learn how to create a WooCommerce restaurant food ordering system using TABLEiT – Product Table for WooCommerce. We’ll show you how to turn your food menu into a product table, add useful columns, enable search and filters, display a mini cart, and let customers add multiple food items to the cart from one page.
A restaurant menu needs fast scanning, quantity selection, and a simple cart flow. The TABLEiT product table guide explains the wider table experience for WooCommerce stores.
Quick Answer:
A WooCommerce restaurant food ordering system should let customers view menu items quickly, choose quantities, add multiple dishes to cart, and complete checkout without unnecessary page loads. A product table layout is often better than the default shop grid because food ordering requires speed and compact product comparison.
To build this system, install TABLEiT – Product Table for WooCommerce and go to WordPress Dashboard > iThemeland > TABLEiT. Create a new table, use Query to show food categories or menu items, add columns such as image, meal name, description, price, quantity, and add-to-cart button, then enable search, filters, and mini cart options if needed.
This setup is useful for restaurants, cafes, bakeries, catering websites, and takeaway businesses. TABLEiT plugin helps turn WooCommerce into a faster ordering interface because customers can browse menu items in rows, add several products at once, and review their cart more easily.
What do you need to create a restaurant food ordering system?
If you have designed a WordPress site for your restaurant and your site is active and usable, you have come a long way. Now, just install the following two plugins on the site to start creating your restaurant ordering system:
- Installing the WooCommerce plugin for free
Installing the WooCommerce plugin turns your restaurant site into a versatile online store. After installing this plugin, you can import your restaurant menu along with the price and allow customers to buy and order food from your site. But WooCommerce alone is not enough for building a customer-friendly online food ordering system because it does not provide you with the right tools for designing a sales page. Therefore, you must also install another plugin that we introduce below.
- WooCommerce product table plugin
The advantage of installing the WooCommerce food ordering plugin is that you can display your restaurant menu as a list in a customized table. This plugin provides everything you need to implement a restaurant ordering system. From displaying the different features of foods, pizzas, sandwiches, and more to allowing the customer to filter, search, and even add multiple foods and drinks to the shopping cart at the same time with one click.
There are many WooCommerce restaurant ordering plugins that you can use to enhance your online restaurant. However, we recommend you use the WooCommerce product table plugin that provides you with all you need to create a customer-friendly ordering menu.
Are you curious to see how this WooCommerce food ordering plugin can help you build an online food ordering system? So, keep reading.
How to create a restaurant ordering system by WooCommerce product table plugin?
WooCommerce product table plugin is a great tool for making queries and creating astonishing restaurant menus with ordering options like multi add to cart button, filtering, searching, mini cart, etc. The easy-to-use interface and powerful tools make this plugin so popular among store managers who aim to improve the customer buying experience.
Here, you can find how to create and customize a WooCommerce restaurant ordering system with this plugin in 3 simple steps.
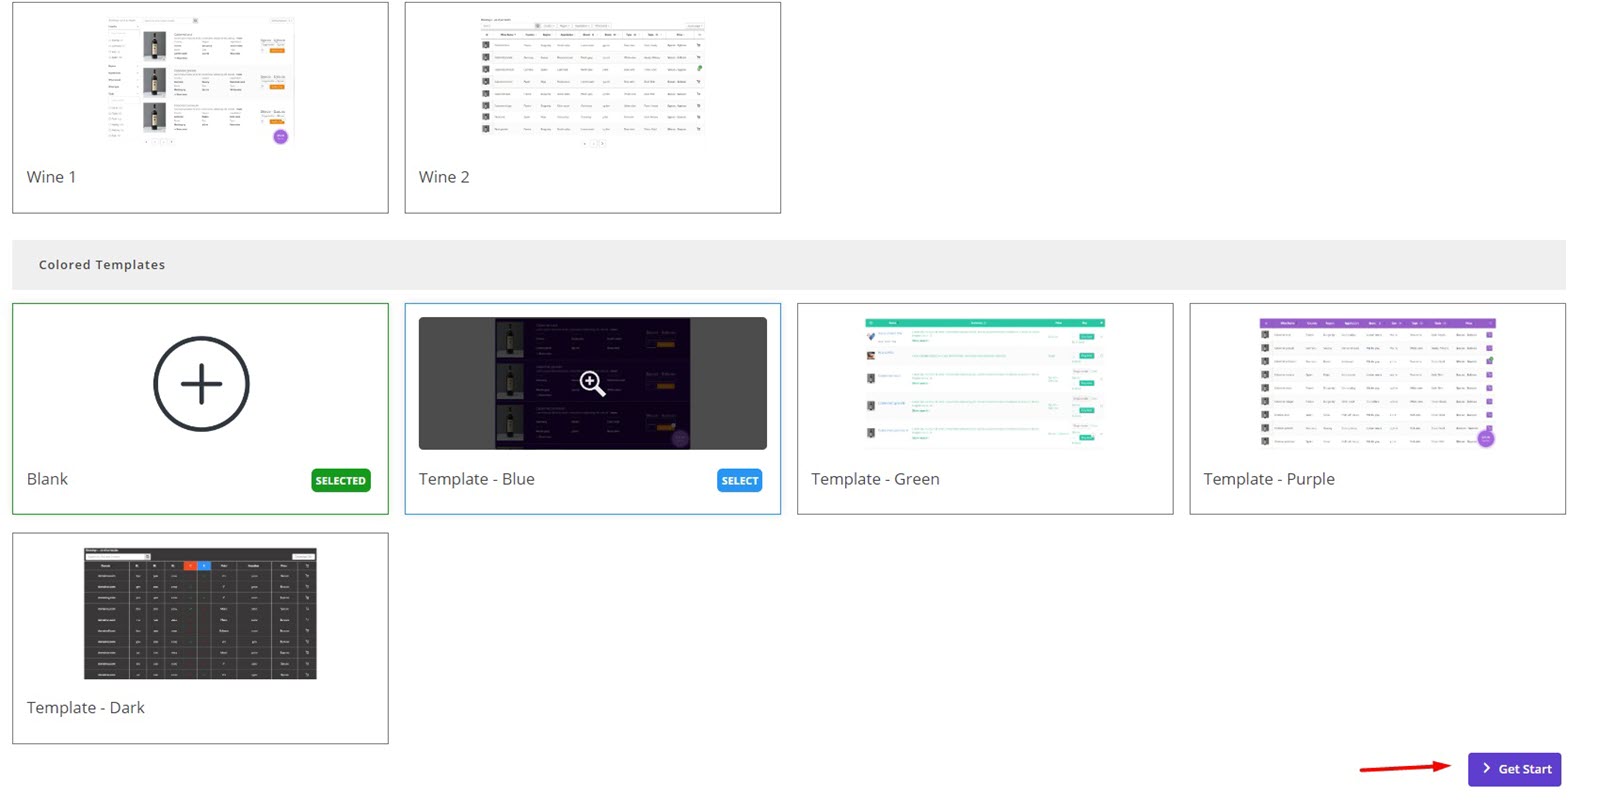
Step 1: Install the WooCommerce product table plugin on your website
If you have already installed WooCommerce on your WordPress website, try to download and install the WooCommerce product table plugin. Then, activate it on your website. Our plugin is fully compatible with WooCommerce. So, all products you have added to WooCommerce will automatically import to our plugin after activation.

You just need to go to the WordPress Dashboard > iT Product Table > Add new table and create a new table by pressing the Get Start button.
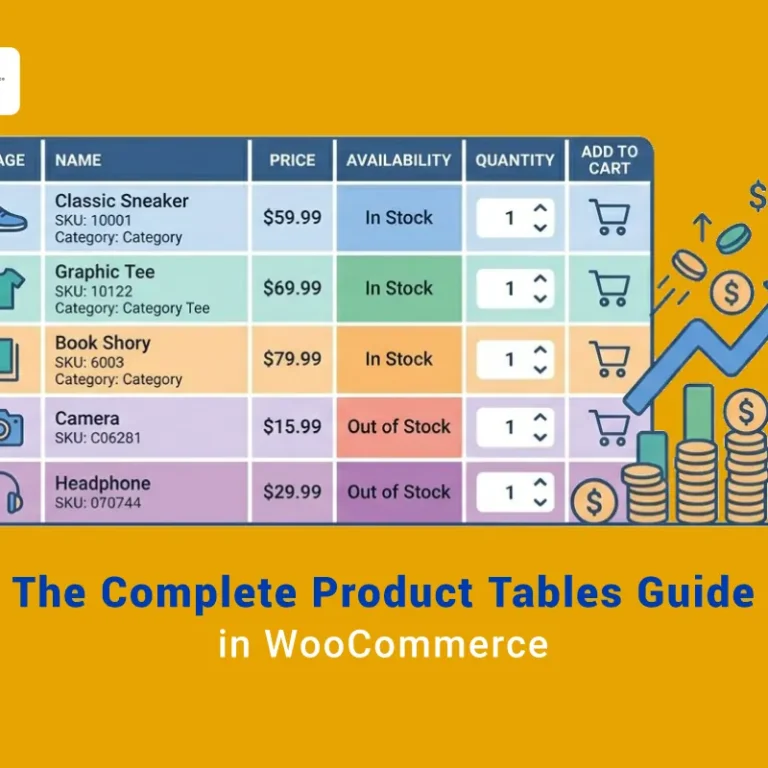
Now, you are ready to customize your WooCommerce restaurant ordering system by adding different columns to the table.
Let’s see how in the next step.
Step 2: Add columns to design your WooCommerce restaurant ordering system form
To add columns in this WooCommerce restaurant ordering plugin, first, you need to go to the Columns tab and choose Laptop from the list of devices to see the columns page.
A big button in the middle of the page allows you to add a new column to your table.

As soon as you create a new column, you can see a Column box with two separate sections, including:
- Heading: To customize the title of product table columns.
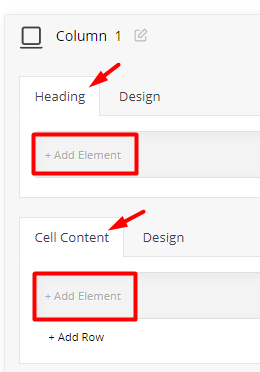
- Cell Content: To add elements to be displayed in the product table columns.
To customize each section, you need to press the Add Element option, then choose one of the Elements from the list displayed in the Left panel.
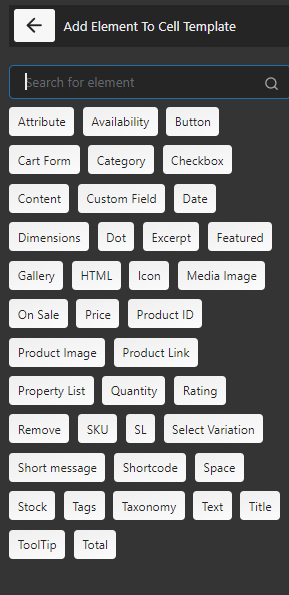
After adding one Element, the Element setting panel appears, and you can customize the content and appearance of the selected element in the cell by editing the items in the General and Style tabs, respectively.
The most popular Elements that you can add to creating a WooCommerce restaurant ordering system are:
- Checkbox: To allow customers to select items to add to their carts.
- Title: To show the product title to the customers.
- Content: To let customers review the food description.
- Category: To show the food categories to the customers.
- Quantity: To let customers increase or decrease the quantity of items directly from the table.
- Price: To enable customers to review and compare the prices of different items in the restaurant ordering system.
- Add to cart button: To make the process of ordering easier for customers and let them add items to their carts with one click
So, by following the above-mentioned instructions, you can add all of these elements to your product table.
There are also some extra features on the Column page to help you create a more customized ordering system. Let’s get familiar with some of them:
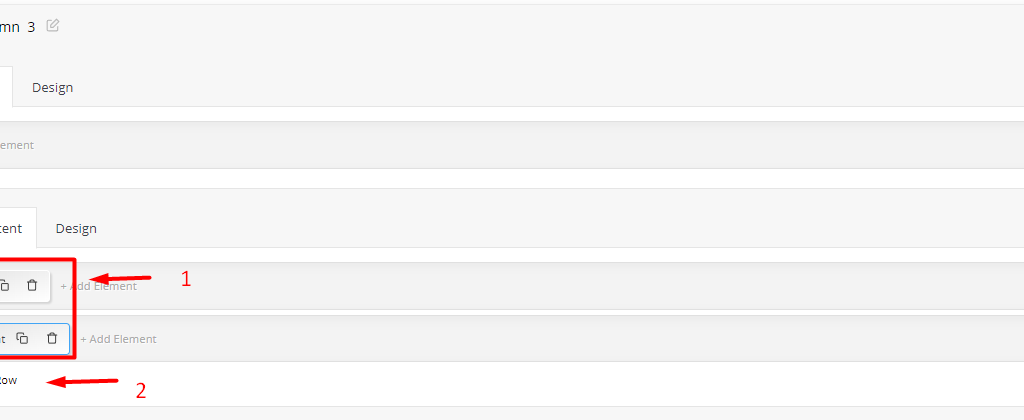
Add rows to one of the product table column
One of the most useful features of this WooCommerce restaurant ordering plugin is the ability to add more than one row in one column and show different elements there.
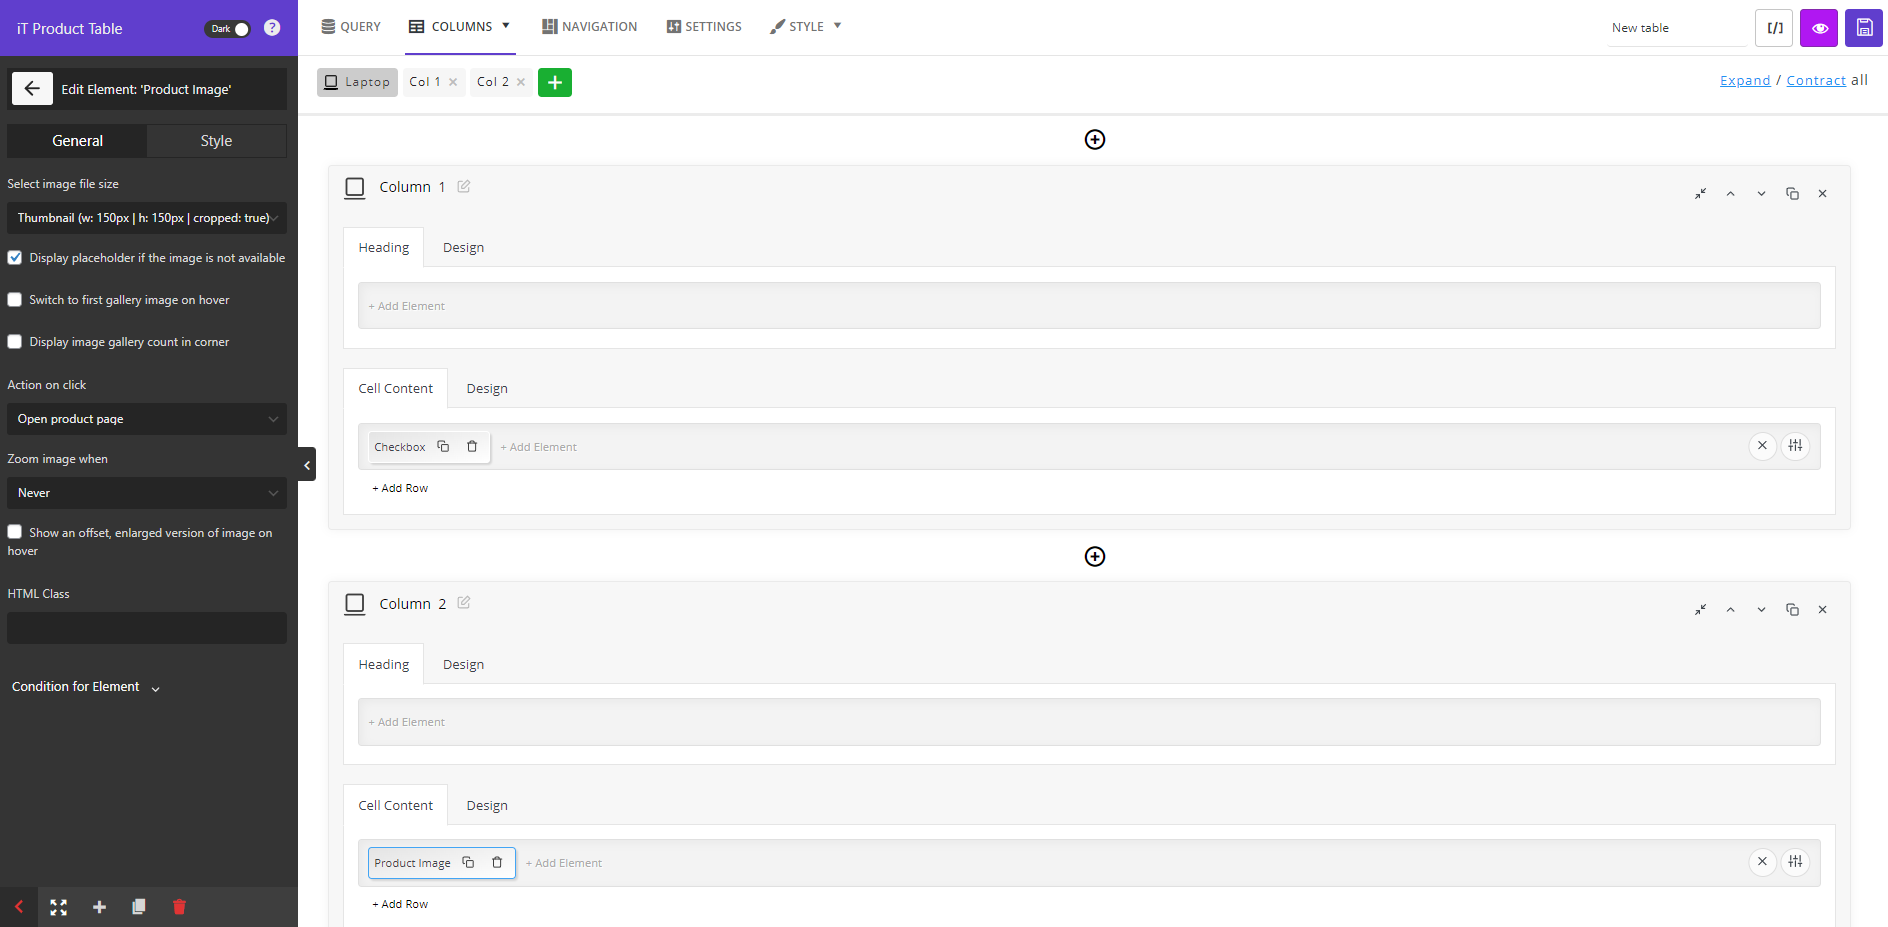
For example, to show the Title and Description in one column, you can follow the below instructions:
- Press the Add Element option, choose Title from the Element list, and customize it by editing the items in the General and Style tabs.
- Click on the Add Row button, then in the new row, click on the Add Element option again and choose Content from the list of Elements.
- In the General tab of Content Element, write 5 in the Limit word count to instruct the plugin just display the first 5 words of the product description in the cell.
Add to cart button
Another amazing option available in our WooCommerce product table plugin is displaying an Add to Cart button in front of each row in the product table to let customers add products to their cart directly from the table.
To add this feature, you just need to choose Button from the Element List in one column and then choose Add to Cart via AJAX in the General tab. You can also edit the button label or use other items in the Link list.

After adding and editing all columns in your WooCommerce restaurant ordering system, you can see a preview of the created table by pressing the Eye icon.
The online food ordering system that we designed in this tutorial is like below:
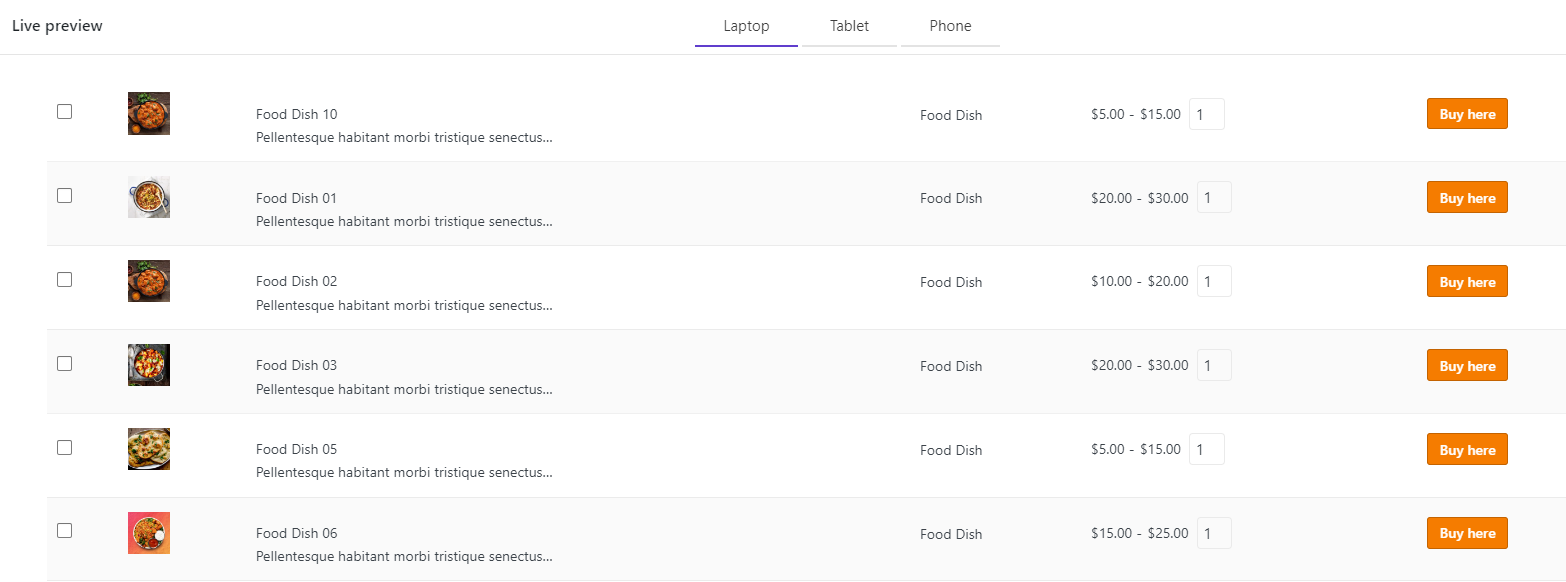
This is the simplest ordering form that you can display to your customers. However, the tools and options available in our plugin provide you with everything you need to create more practical and customer-friendly tables based on your needs. We will show you some of these tools in the Extra Features section.
Step 3: Use Shortcode to show the WooCommerce restaurant ordering system to your customers
The final step is to show the WooCommerce restaurant ordering system to your customers, which is easily possible by following the below steps:
- Write a name for your table – like Restaurant in this example then save it.
- Click on the Shortcode icon to copy it.
- Go to WordPress Dashboard > Pages > Add new page.
- Paste the shortcode on the new page.
- Publish the page.
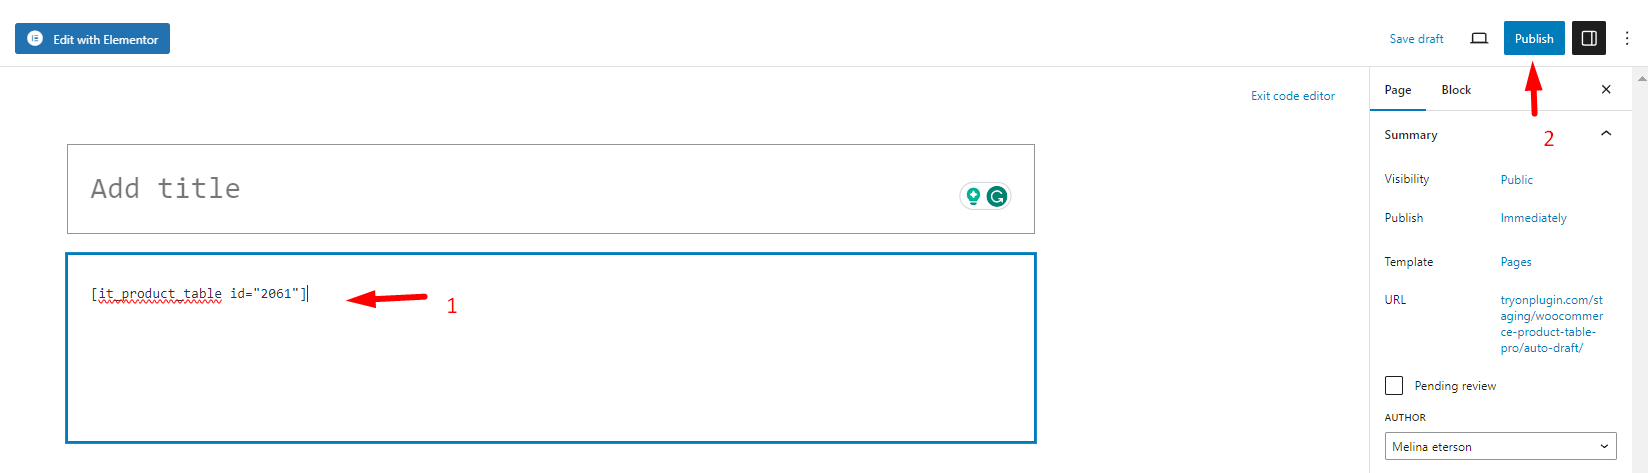
Now, you can use the URL of this page anywhere on your site to let customers use the online WooCommerce restaurant food ordering system, which is something like this:
TABLEiT – Product Table for WooCommerce
The easy way to create a restaurant food ordering system with WooCommerce
Extra features of WooCommerce product table plugin
WooCommerce product table plugin comes with a lot of fabulous features that help you convert a simple restaurant ordering system to a professional one. These features are important when you want to create a useful and eye-catching online menu to improve your customer buying experience. These extra features like filtering, sorting, multi-add to cart buttons, Mini cart, and more are the most effective ways to gain a competitive advantage in eCommerce.
Let’s get familiar with some features available in this WooCommerce restaurant ordering plugin that allows your online ordering system to attract more customers and have a better performance.
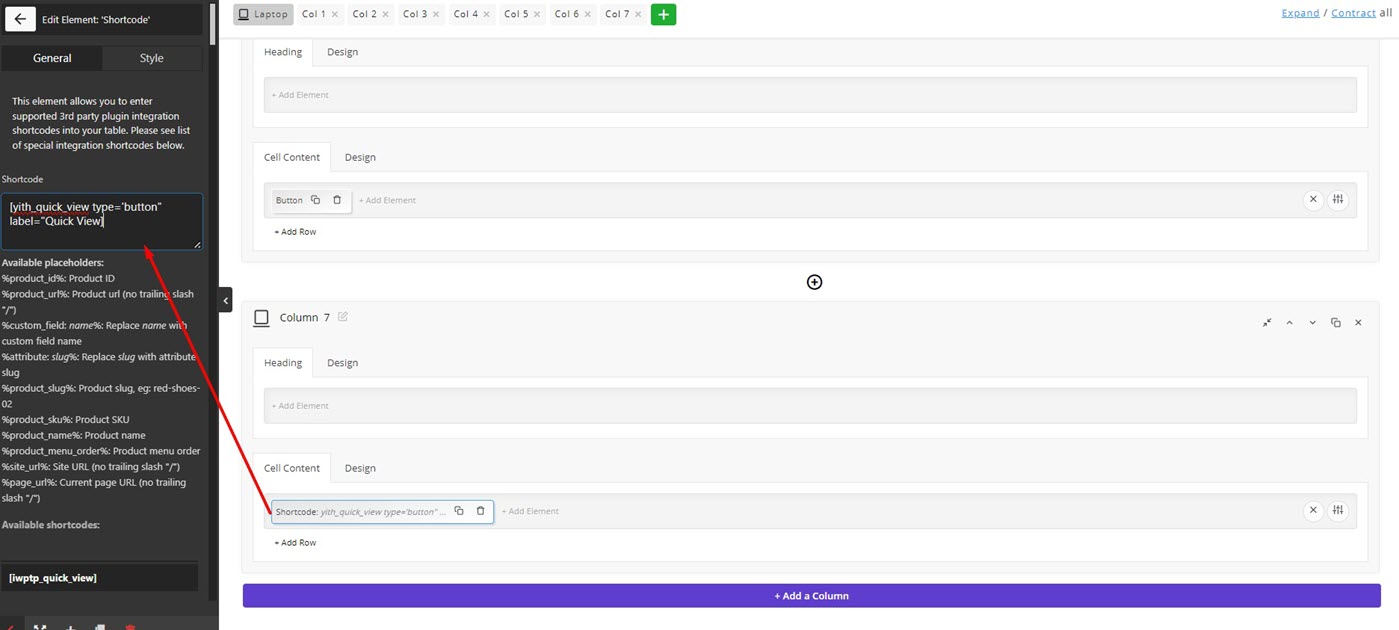
Add a quick view button to WooCommerce ordering form
The Quick View button allows your customers to see more details about the foods on the table, so there is no need to waste their time opening each page of products on your website.
The good news is that the WooCommerce product table is compatible with other WooCommerce plugins like YITH Quick View. To add this feature to your ordering system, add the Shortcode element to one column, then insert the Quick View shortcode in the textbox available in the General tab.
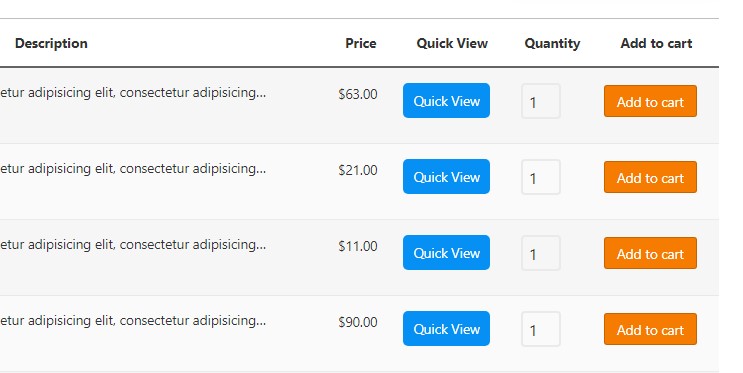
The final result is like below:
Make a custom query for the restaurant food ordering system
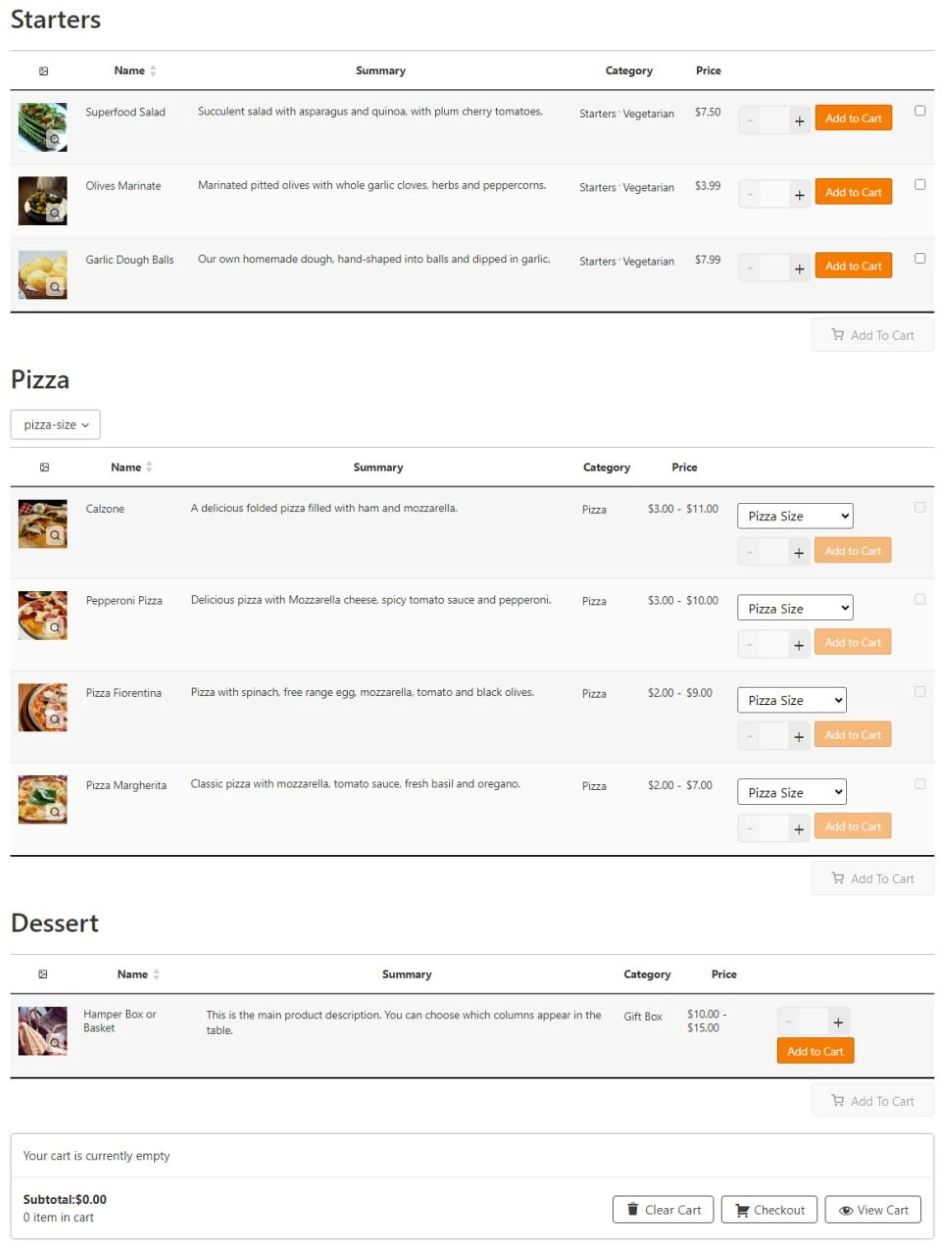
As usually a variety of dishes are available on a restaurant menu, store managers need to display food, desserts, or drinks at different tables to customers to make the ordering process easier for them. In our plugin, it is possible to create different queries of your items in the menu and arrange them in different tables with different layouts and appearances. Finally, you can display the shortcode of all the tables on one page with a suitable layout for customers to see food, desserts, and drinks at separate tables but on the same page.
To make this happen, you just need to open the Query tab in our plugin and then choose one of the product categories in the Include Taxonomies field.
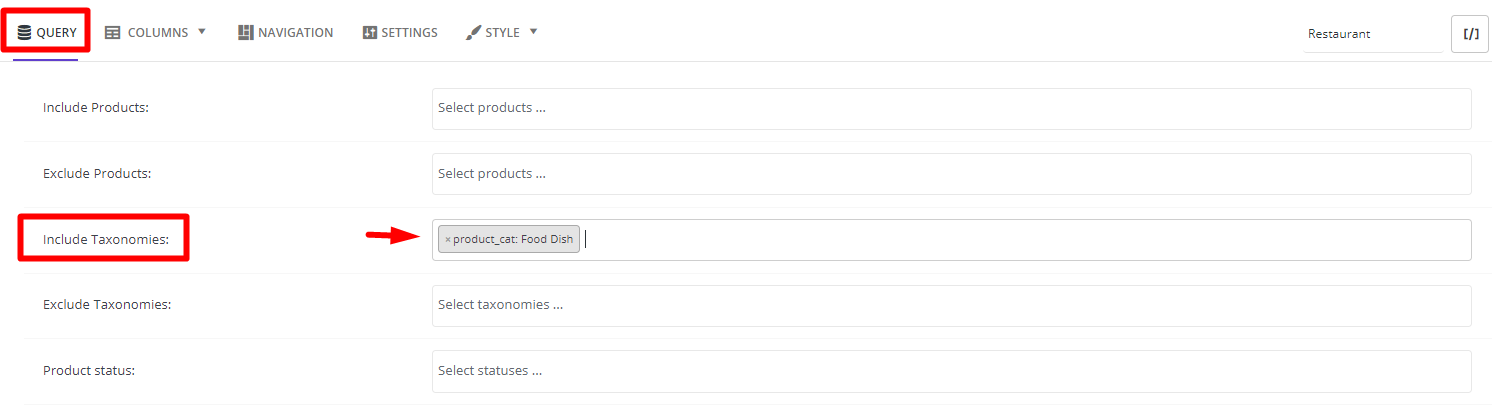
For example, you can add Starters, Pizza, and Dessert in three separate tables, then go to the All tables option and copy and paste their shortcodes one by one to a new WordPress page. By publishing the page, all three menus are displayed in a responsive ordering system.
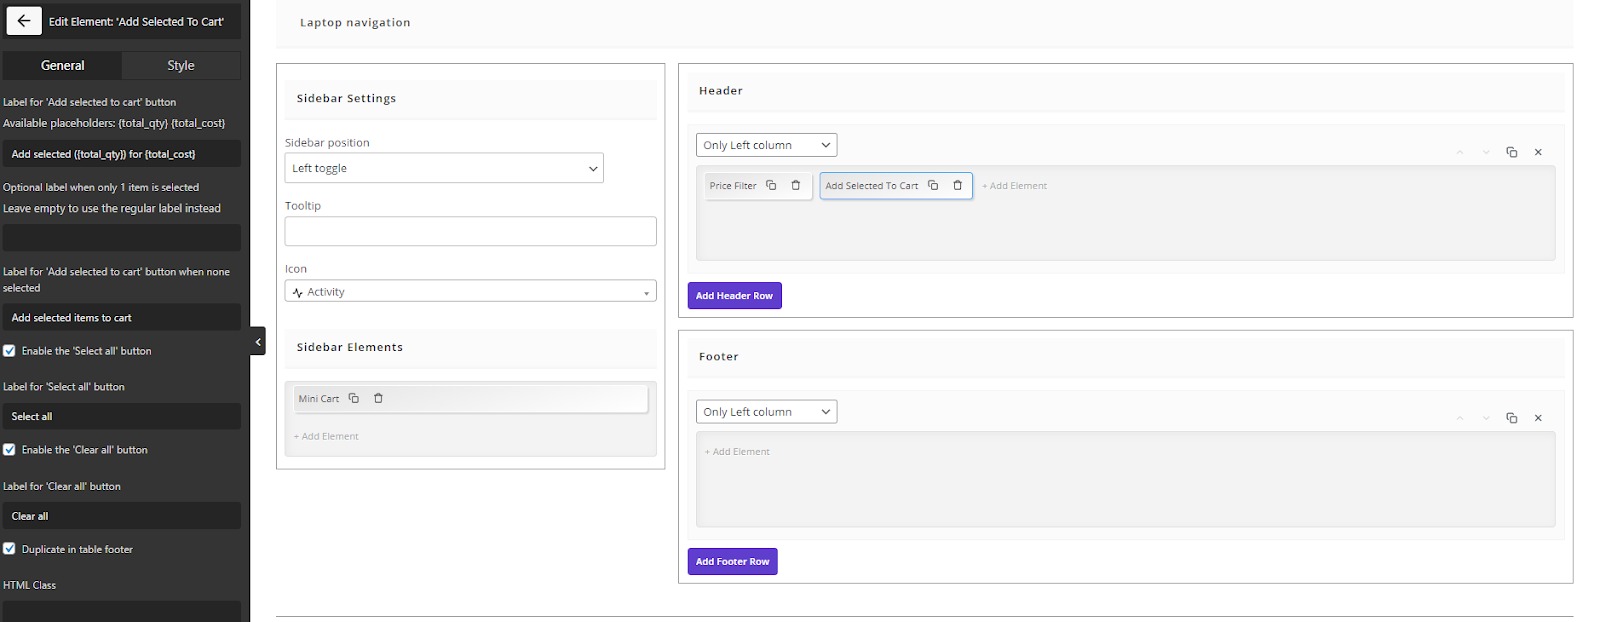
Add a mini cart to the restaurant ordering form
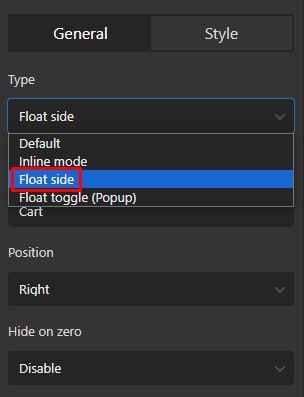
Adding a mini cart is another feature for satisfying customers and making a great buying experience for them. The mini-cart is usually added to the navigation bars. So, to show a customized mini cart to your customers, you need to go to the Navigation tab in our plugin and then add the Minicart element to the Header, Footer, or Sidebar section.
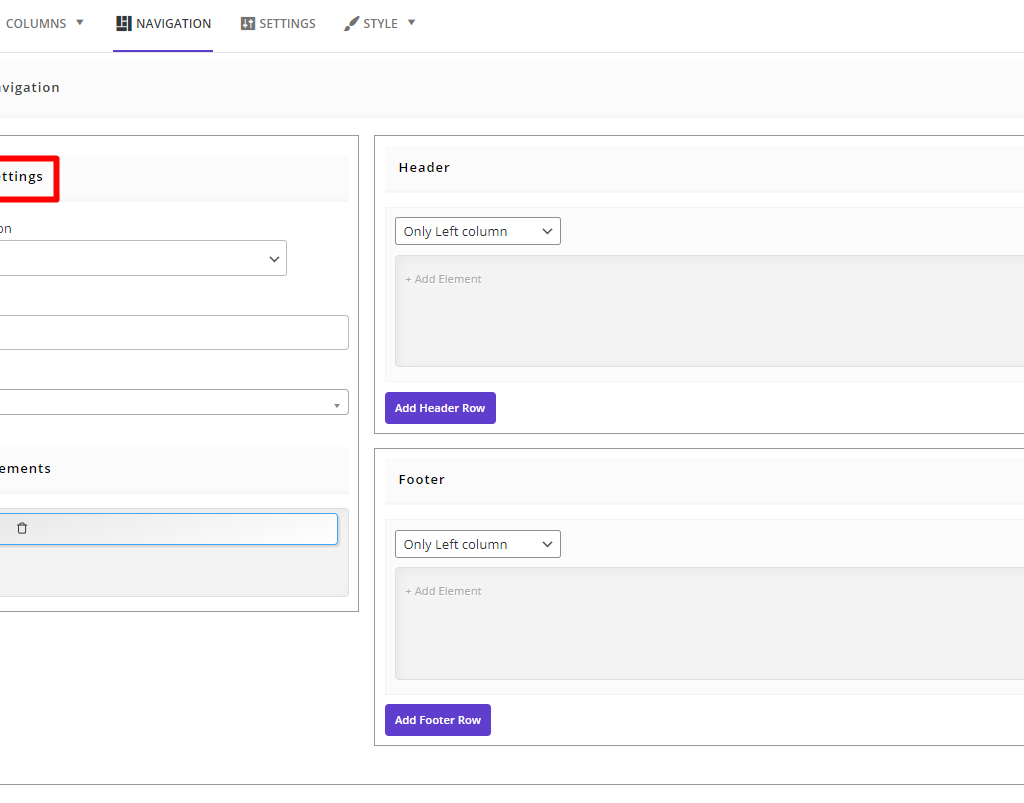
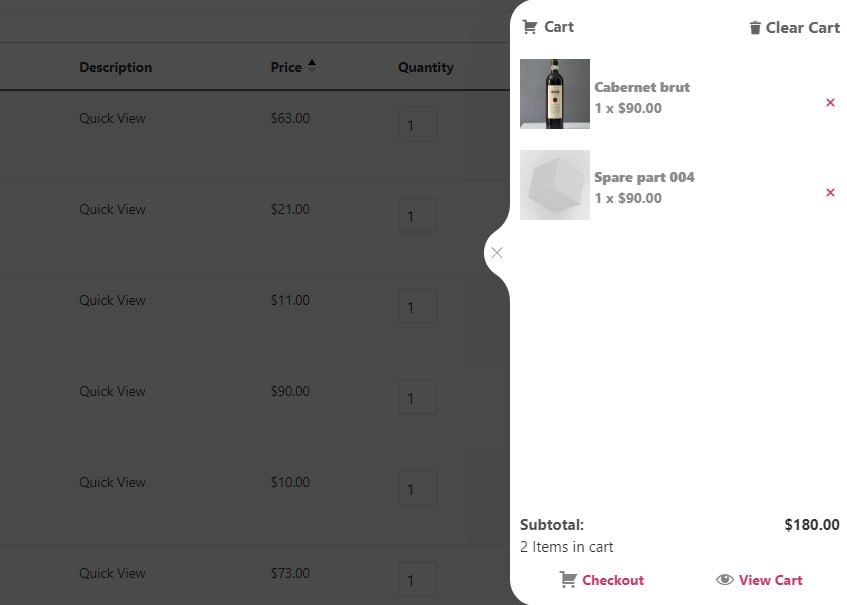
For example, we set the below configurations in the General tab of the Minicart element and added the mini cart to the sidebar:
So, they can see the result below in the table:
Add product filter and search to the restaurant order form
Product filter and search are essential features for WooCommerce restaurant ordering systems that make the process of finding food easier and faster for your hungry customers. Just like the mini cart, you can add filtering and searching options to the navigation bars by opening the Navigation tab and adding different elements to the Header, Footer, or Sidebar.
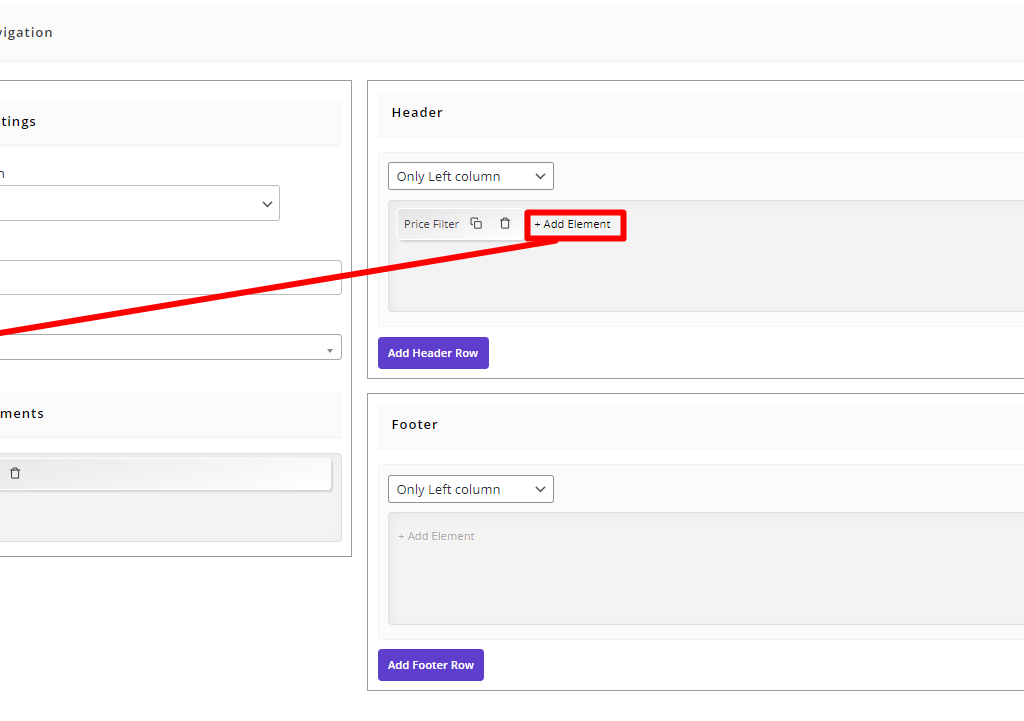
There are various filtering options available in the Elements list, like price filter, category filter, attribute filter, etc. You can add one or more of them to the navigation bars of your WooCommerce restaurant ordering system.
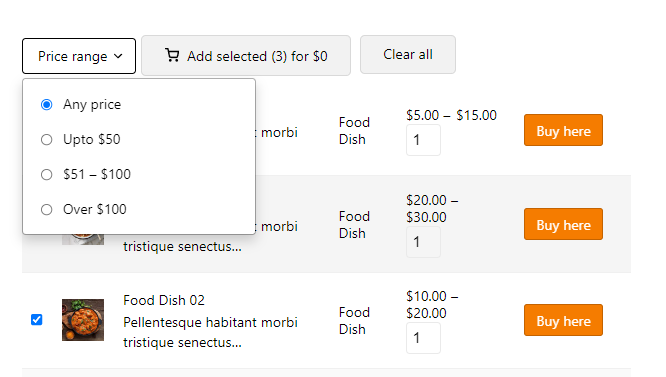
For example, we added a Price Filter to the Header as illustrated below:
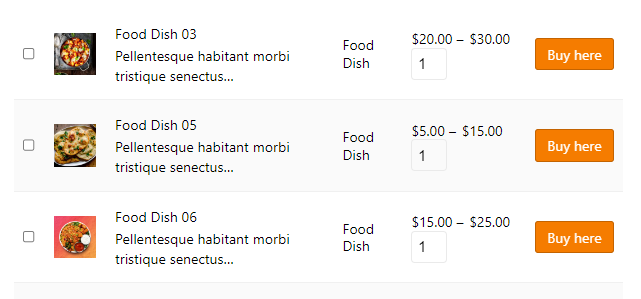
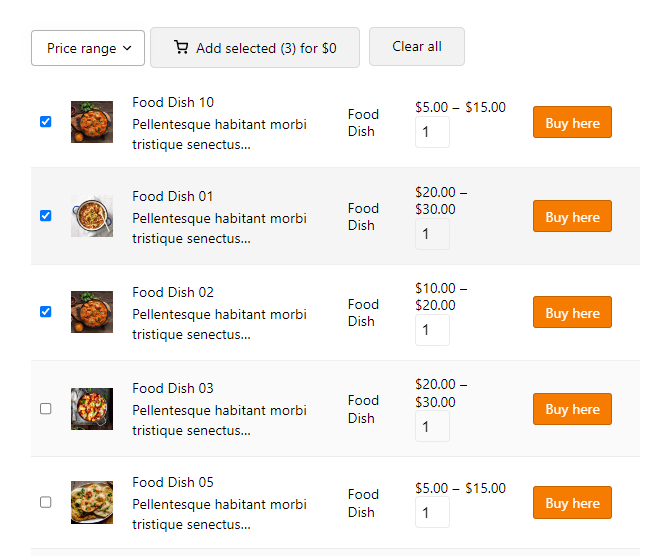
Add multi-add to cart to restaurant ordering form
Customers usually choose multiple items from the WooCommerce restaurant ordering system and expect to add them to their cart with one click. To meet your customer’s demand, you can easily choose the Add Selected to Cart element from the list and add it to one of the navigation bars.
As illustrated below, an Add selected button is displayed to your customers, and they can mark multiple items in the online menu and add them to their cart with just one click:
TABLEiT – Product Table for WooCommerce
The easy way to create a restaurant food ordering system with WooCommerce
Conclusion
A WooCommerce restaurant ordering system gives restaurants, cafés, bakeries, and food businesses a flexible way to accept online orders from their own WordPress website. You can add food items as WooCommerce products, organize them into categories, set prices, manage orders, and let customers pay online without relying only on external ordering platforms.
The key to a good restaurant ordering experience is speed and clarity. Customers should be able to find food items quickly, see prices, choose quantities, review their cart, and place an order with as few steps as possible. A table-based menu is especially useful because it keeps the ordering process simple and organized.
With TABLEiT – Product Table for WooCommerce, you can create a restaurant menu table with product images, descriptions, prices, quantity fields, filters, search, mini cart, and multi-add-to-cart options. This helps you build a smoother WooCommerce food ordering system that is easier for customers to use and easier for store owners to manage.
A fast menu can still fail if mobile controls or checkout steps create friction. See the complete resturant table workflow for a wider implementation view.
FAQ
1. Can WooCommerce be used for a restaurant ordering system?
Yes. WooCommerce can be used to build a restaurant ordering system by adding food items as products, setting prices, creating categories, enabling checkout, and managing orders from the WordPress dashboard.
2. How do I create a WooCommerce restaurant menu?
You can create a restaurant menu by adding each food item as a WooCommerce product, grouping items into categories such as starters, pizza, drinks, or desserts, and displaying them in a table-style menu.
3. What is the best layout for WooCommerce food ordering?
A product table layout is usually better than a standard product grid for food ordering. It lets customers view menu items, prices, quantities, and add-to-cart buttons in one place without opening every product page.
4. Can customers add multiple food items to cart at once?
Yes. With TABLEiT, customers can select multiple food items and add them to the cart together. This is useful for restaurant orders because customers usually buy several dishes in one order.
5. Can I add filters and search to a WooCommerce restaurant menu?
Yes. Filters and search help customers find food items faster, especially when your menu has many categories. You can add filters for category, price, attributes, or other product data.
6. Is WooCommerce good for food delivery websites?
WooCommerce can work well for food delivery websites when it is combined with the right menu layout, checkout settings, delivery options, and order management process. It gives restaurant owners more control over their online ordering system.
7. What is menu order in WooCommerce?
Menu order in WooCommerce is a setting that controls the manual display order of products. For a restaurant menu, it can help you arrange food items in the order you want customers to see them.
8. Do I need coding to build a WordPress restaurant ordering system?
No. You can create a WordPress restaurant ordering system without coding by using WooCommerce and TABLEiT to build a product table menu, add ordering options, and publish the menu with a shortcode.