Adding plugins on WordPress is an essential task, you need to do for building a professional website. There are thousands of free or premium plugins with various kinds of applications available for WordPress websites. This can make your choices very complicated.
To help you make a good decision about how to add plugins on WordPress, we provided a complete guide in this tutorial.
Before going further and start adding new plugins on your WordPress website, you need to consider following considerations:
WordPress Plugin Tips
Manage WordPress Plugins
Managing WordPress Plugins plays a crucial role in speeding up your website loading and also your website security. Because of that, it is recommended to manage your active and inactive plugins before adding a new one on your WordPress website.
To manage your plugins, you need to navigate to the below address:
WordPress Dashboard > Plugins > installed plugins
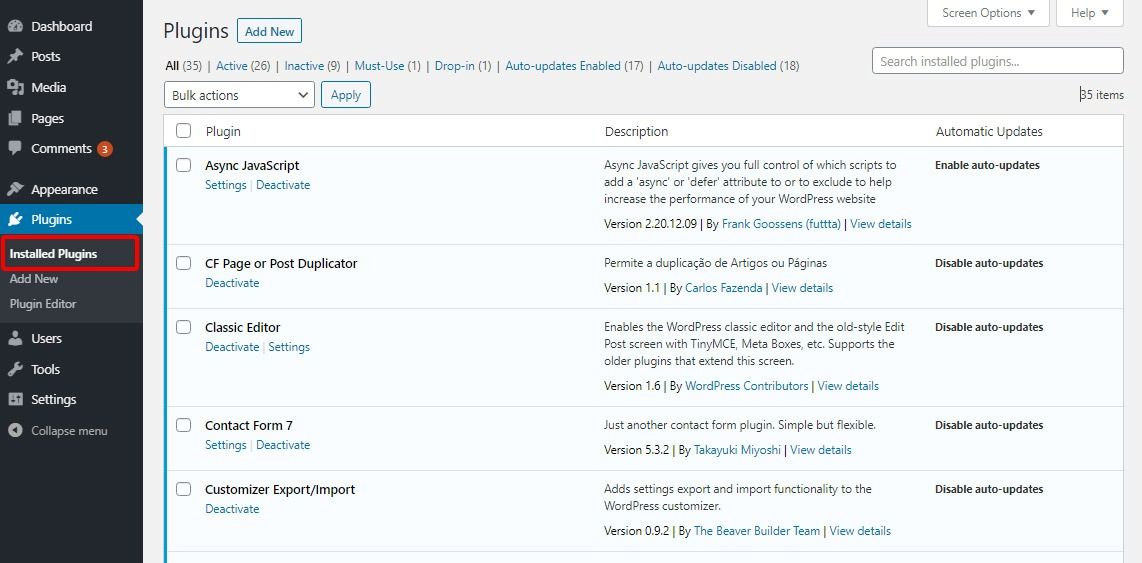
In this page, a list of all active and Inactive plugins displays to you, so, you have to check the following:
- Delete Inactive and unused plugins
- Update those plugins you are using regularly
- De-active those plugins which are not useful anymore and install them
After managing your installed plugins, you can try installing a new one. But, be careful about the plugins you decide to install. To find and add effective and suitable plugins on WordPress, remember following recommendations:
Install well-developed plugins
The well-developed plugins have no harmful effect on your WordPress website. This means they will not slow down the loading of your webpages or will not put your website at risk.
To make sure that you have installed a good performance plugin to your website, it is important to pay attention to the reputation of the developer, the last update date and also the feedback from other users.
Check out backend processing of the plugin
In a simple word, we can say that there are two groups of plugins available to be added on WordPress:
- Plugins with simple functionality
- Plugins with complex functionality
Installing various and unnecessary complex plugins cause many problems on your website such as slowing down the loading speed. These kinds of plugins must load a lot of scripts and other assets for doing their tasks. This means they always use a lot of resources from your website server.
To prevent those kinds of problems, it is better to find simple plugins and install them without any concerns. Another positive side of installing simple plugins is that you can add as many as plugins you need to your website. Even 20 or 30 simple plugins have no harm effect on your website.
Simple plugins are the extensions that
- Create no extra database queries to each page
- Query no huge amounts of data for a good performance
- Perform no remote requests
So, the number of installed plugins is not the important thing that you must consider but the quality and functionality.
It is also a good idea to deactivate the backend plugins when you don’t need them. It prevents them from creating extra data on your database.
Install premium plugins if they worth it
As you may notice, there are thousands of WordPress plugins available for installation. Most of them are free and some of them are premium. Although you may think that premium plugins are always a better option because you are paying for them and you expect to see no side-effect after installation of those plugins. Unfortunately, this is not true.
Actually, you must be very careful before purchasing a premium plugin. It is so important to check the Reviews, Ratings, Complains, Developer reputation, Last update date, etc. To ensure that you are paying for a plugin which is really helpful.
It is obvious that purchasing and adding some plugins in WordPress are essential but you have to be smart in finding and installing them.
It would be a great idea to look for a new premium plugin in a developer website that you trust. For example, if you have already added “Woocommerce bulk product editing plugin” and it is working well on your WordPress website, it makes sense to look for other plugins such as “Woocommerce product table plugin” designed by the same developer and install it.
By keeping those tips on mind, you can start adding plugins on WordPress by getting help from our following guide.
How to install a premium / paid WordPress plugin?
Installation of premium or paid plugins is almost the same as the free plugins. You can add premium/ paid plugin to your website in three ways:
- Adding from “WordPress plugin directory”
- Using” Upload” method of plugin on WordPress
- Using Upload” method of plugin via FTP / SFTP
Choosing one of these methods for adding a premium plugin to your WordPress website depends on how you search and find them which we are going to completely explain it for you in the following:
Method 1: Search and Find plugins from “Wordpress plugin directory”
It is obvious that searching and finding premium or paid plugins from the “WordPress plugin directory” is the easiest way.
However, the problem of using this method is the limitation of “WordPress plugin directory“. Actually, there are just free plugins or those plugins with free basic installation are available in this directory.
So, if you are looking for a premium plugin with special performance, “WordPress plugin directory” is not a good option. In fact, in this directory you can find the most essential free plugins for building your website such as “Woocommerce” or “SEO Yoast”.
To search a plugin in “WordPress plugin directory” and install it directly, you need to follow two easy steps:
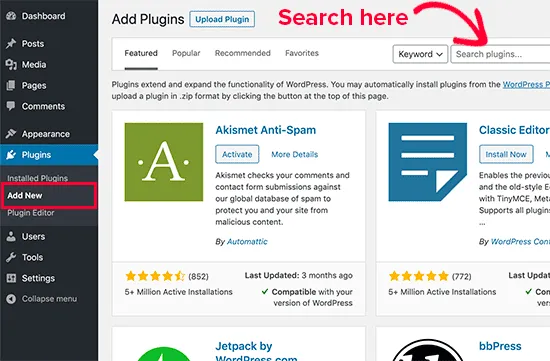
Step 1: Search a Plugin from the Plugin Directory
- Go to WordPress Dashboard > Plugins > Add New page
- Type the name of plugin on the “Search box”
- Look for your required plugin among the list of plugins displayed in the page
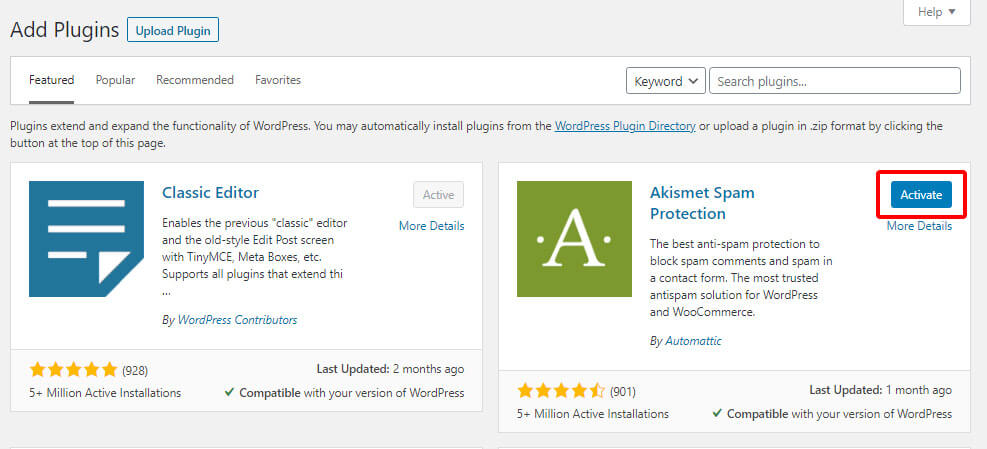
Step 2: Install a Plugin from the Plugin Directory
- When you find the right plugin, click on “install now”
- Finally, click on “Activate button”
As we mentioned before some plugins have promotions plans with special features that will be activated on your WordPress website after purchasing their premium plan.
Although installation of these plugins is free at first place, to use these special features you need to pay and go to their premium version.
Method 2: Search and Find Premium plugins from developers or marketplaces
If you can not find your preferred premium plugins in the “WordPress plugin directory”, you have to purchase them from their developers website or from a “Marketplace” such as “CodeCanyon”.
After purchasing the plugins from those websites, you can download a “ZIP file” of that plugin which means that you have not access to it directly from your “WordPress plugin directory”. So, it is not possible to use the first method for adding those plugins on WordPress. Instead, you need to add them to your website by using “Upload method” or “SFTP”.
It is also noticeable that the most important thing about adding premium plugins is activating them by their license. Usually, after installation and activation of that plugin, you may be asked to enter the license to the verification section. By confirming this verification, you can use all features of that plugin before expiry date on your WordPress website.
When the data of using that premium plugin is expired, you need to extend your current license or purchase another license and verify your permission again.
To make it clear for you, let’s try to add some premium plugins by using the mentioned methods.
Add WordPress plugin by Upload method
To use “Upload method”, you need to purchase a plugin and download the ZIP file from the developer website or a Marketplace.
Then by visiting below address on “WordPress Admin Panel”, you can add it on your website:
WordPress Dashboard > Plugins > Add New page
In this page you have to click on the “Upload Plugin” button on the top middle of the screen.
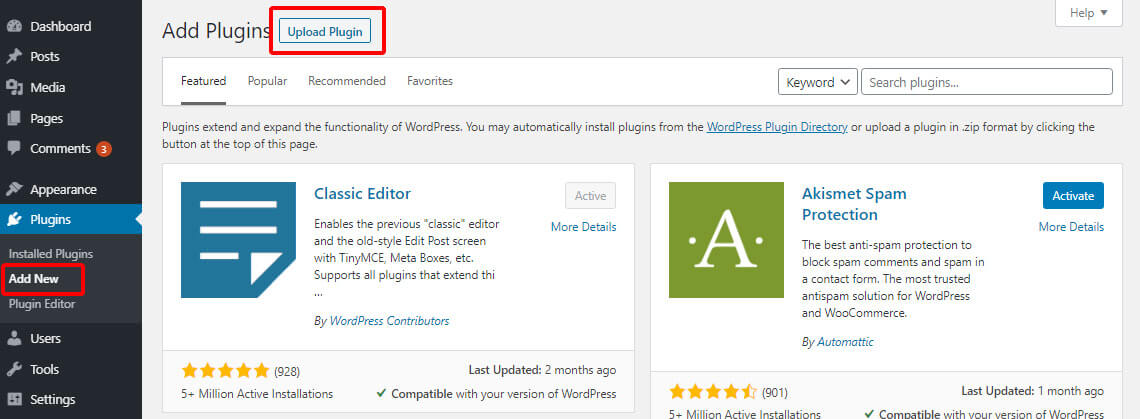
By clicking on “Upload button”, a new page will appear and you need to click on the “Choose File” button to select the downloaded Zip file from your device. Then click on “Install now“.

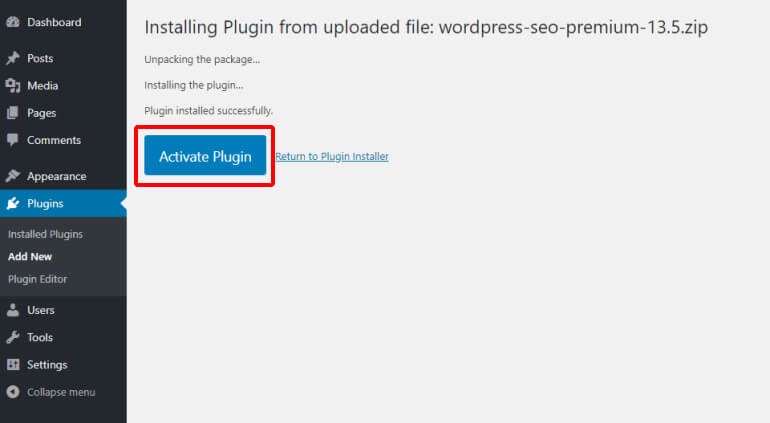
When WordPress finishes uploading the plugin file on your website a success message like below picture will be displayed.
The only thing you need to do is click on the “Activate Plugin” button and enjoy using your premium plugin on WordPress.
For the most premium plugins you need to add the purchased license information to get the permission for using that plugin on your WordPress website.
For example, let’s try to purchase, install and activate the license of “WordPress bulk product editing plugin” as one of the most useful premium plugins of WordPress especially for blog or news websites.
Installing and activating WordPress bulk Product editing plugin
To purchase “WordPress bulk post editing plugin“, you need to visit the plugin developer website.
You can easily purchase the plugin and download the ZIP file from the website.
When you download the ZIP file, you need to install and activate it via the “Upload plugin” button in the “Add new” plugin page of “WordPress Dashboard”.
After adding this plugin to your WordPress website, you can see the main options by going to the below address:
WordPress Dashboard > Pro bulk bundle > WP posts
As shown below, you will see the “Purchasing Verification” tab:
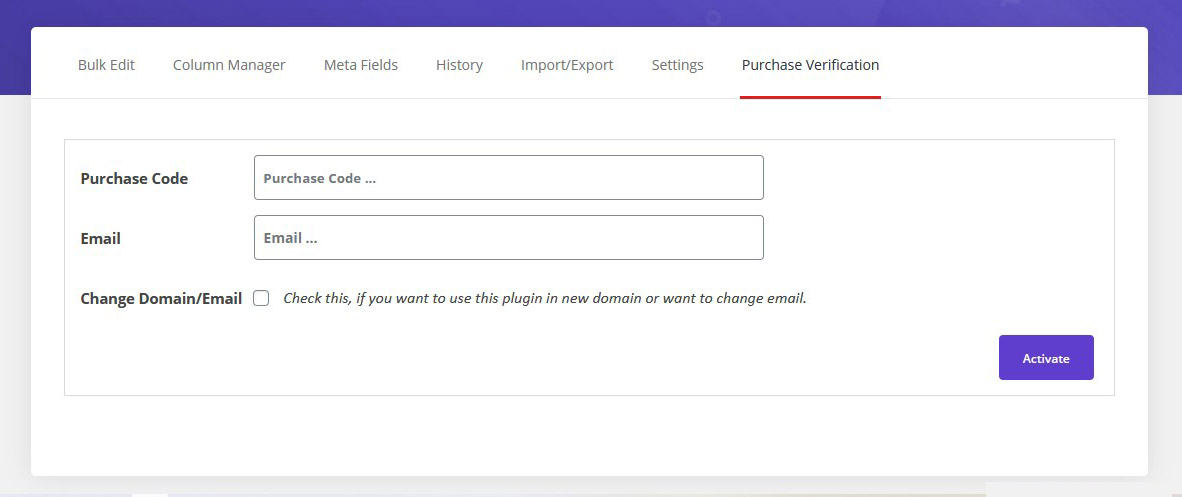
In the most premium plugins like this one, you need to type “Purchase Code” or “License number” with the “Email address” that you have defined for payment.
By adding that information and clicking on “Activate button”, the developer support team will check your purchase information and give you access to all features of premium plugin till the supported date.
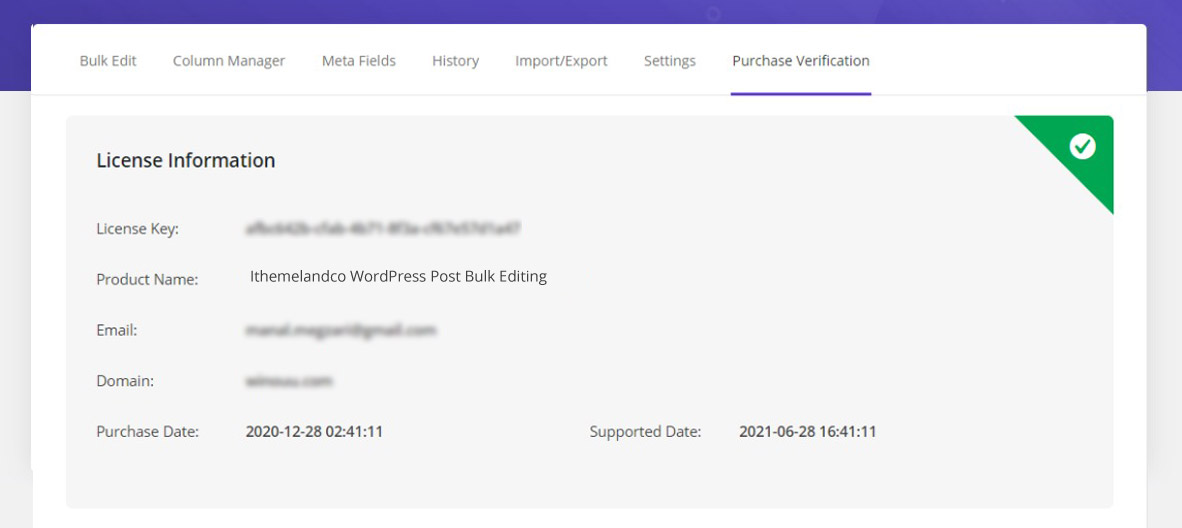
Usually, a license information will be displayed to you as below to inform you about the purchasing date and expiry date of that paid plugin:
Add WordPress plugin via FTP / SFTP upload
Adding WordPress plugin via “FTP / SFTP” is another way for installing the premium plugins on your website after downloading their ZIP file. SFTP is secure FTP and there is no difference between adding a Wordpress plugin via FTP or SFTP.
The installation of WordPress plugins via FTP on WordPress could be as following:
- Extracting the “ZIP file” of plugin on your device
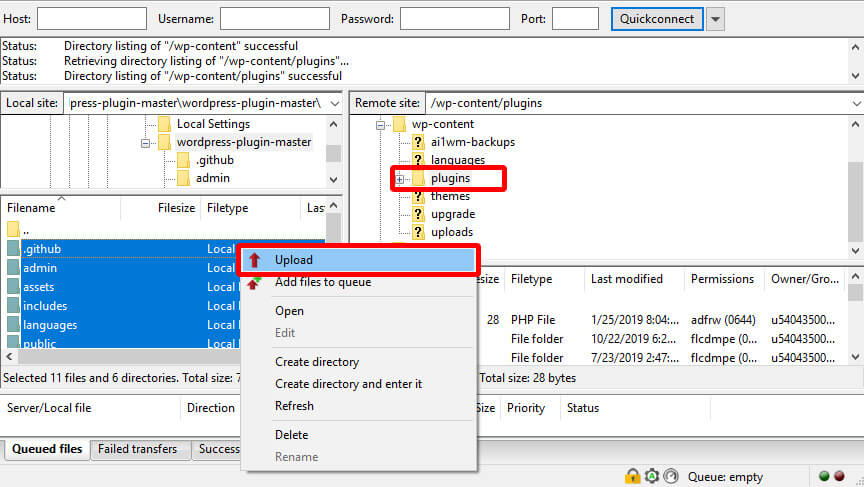
- Log in to your “FTP software” such as “Filezilla FTP client” and connect to your WordPress server
- Go to wp-content > plugins
- Find the extracted file in the local site and right click on that folder
- Click on “Upload” to add the plugin folder to your WordPress website server
- Go to WordPress Dashboard > Plugins > installed plugins
- Find the uploaded plugin and click on “Activate”
What is the most common Trouble with installing plugins?
Adding or installing plugins on WordPress is really an easy task, however you may encounter some popular problems which make you disappointed.
If your attempt to install a new plugin on your website was unsuccessful, we suggest you look for your problem in the following guide and try to solve it by our recommended solutions.
You can’t see the plugin menu on WordPress Dashboard
The most popular complaint about unsuccessful attempts for installing new plugins on WordPress is “Why can’t I see the plugin menu on my WordPress Dashboard?
Limitation of memory
Sometimes you can see “Plugin menu” on “WordPress Dashboard” but you will receive a failure notice when attempting to install a new plugin. This would be probably because of the “PHP script memory” limitation inside your “WordPress core”.
To resolve this problem and fix WordPress memory error, you need to add the below line to your “wp-config.php” file:
define('WP_MEMORY_LIMIT', '256M')Limitation of user access
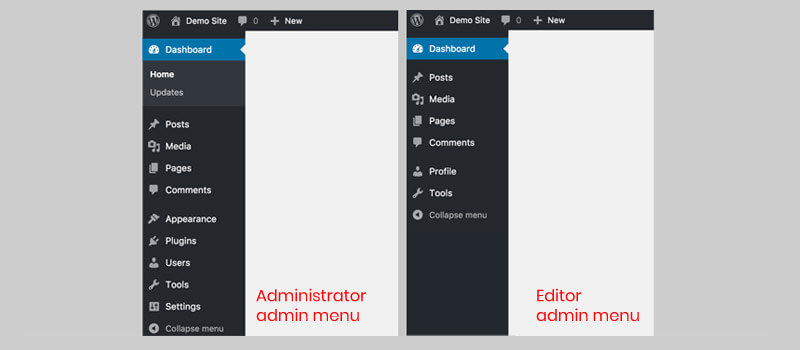
To add a plugin on WordPress from the dashboard you need to login to WordPress areas as an administrator. If you have just editor access to the WordPress website, you need to ask the admin of WordPress to give permission to you.
In some rare cases if you are working in “WordPress multisite network”, you are not able to add plugins on WordPress. The only way for installing a new plugin in this situation is asking your network administrator to add them.

Limitation of file format
To install WordPress plugin, you are limited to use “ZIP file format”. It means you are not able to add or install other files format to WordPress. Otherwise, you will receive an error and your installation will fail.
If you receive any error during plugin installation via FTP about “No valid plugin” even when you are uploading a ZIP file, it means that the ZIP file does not contain all necessary files for installing that plugin. To solve this problem, it is better to download the ZIP file of that plugin again or contact the developer and ask them to send you a validate file.
You may also see some “Syntax Error” or “Parse Error” which means there is some problem in the Code of that plugin. We recommend you not to install those plugins anymore. However, if you paid for adding that plugin on WordPress, you need to contact the developer and ask them to fix the problem.
What is the reason to uninstall plugins?
Uninstalling a plugin is a decision that you should make precisely. Before removing active or inactive plugins on WordPress specially when you are going to delete their folders via “FTP software”, it’s important to make sure that you really don’t need that plugin anymore and removing those plugins will not affect your website performances.
Usually, we recommend you to uninstall the plugins if they meet one of the below conditions:
- You have deactivated them a long time ago and they remained useless on your server
- Plugins that are out of date and their developer have not published any new update for them
- They have harm effect on your website
- They are putting your website at risk
- Their license date is expired and you are not willing to pay for extend it anymore
How to uninstall plugins manually?
Uninstall plugins are much easier than installing them which can be done directly from the WordPress admin panel or via FTP.
Follow our below guide to get familiar with uninstalling plugins from “WordPress Dashboard” or via “FTP client server’.
Uninstall plugins Manually from WordPress Dashboard
To uninstall a plugin directly from the “WordPress admin area”, it must be deactivated first. To deactivate the plugin, you need to:
- Log in to “WordPress admin panel”
- Navigate to WordPress Dashboard > Plugins > installed plugins
- Find the plugin you want to be uninstalled
- Click on “Deactivate”
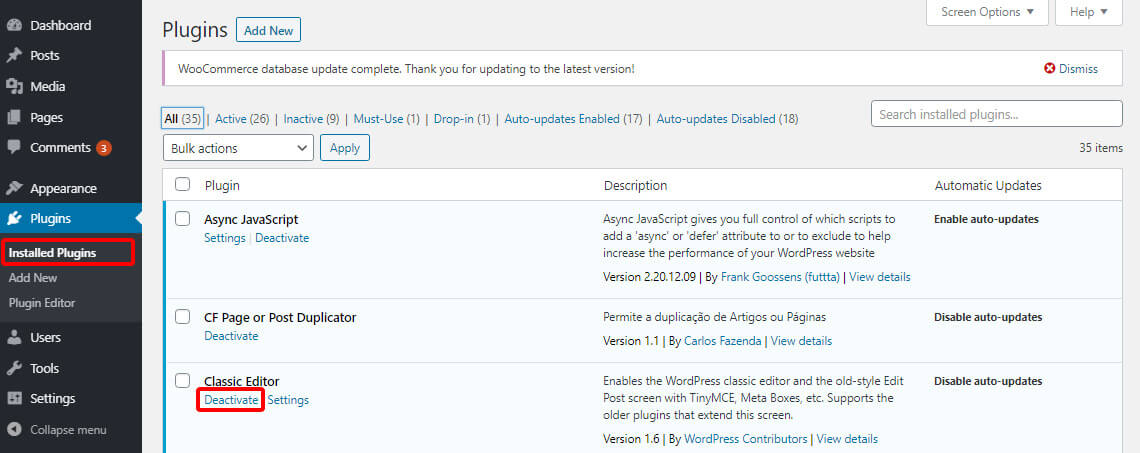
It is important to know that by deactivating a plugin, it will not remove from your server which means there is no need to download it again if you want to activate it later. However, if you delete a plugin, it will be completely removed from your website server. So, if you need to use it later, you have to download and install it again.
After uninstalling the plugin, you may need to remove some remained files from your website including:
- Extra files added by the Plugin on your server
- Unused Shortcodes in WordPress pages
- Created tables in WordPress Database
Follow us to show you how to remove those remaining files and shortcodes from your website.
Uninstalling plugin and removing extra files via FTP
To make sure that the plugin with all related files is removed from your website, we recommend you to uninstall the plugin via “FTP client server” instead of using “Delete” option in “WordPress Dashboard” as follow:
- Open “FTP client program” such as “Filezilla”
- Connect to your WordPress website by username and password getting from your host server
- Go to wp-content/plugins
- Find all folders with the name of the plugin you want to uninstall
- Right click on them one by one and choose “Delete” option
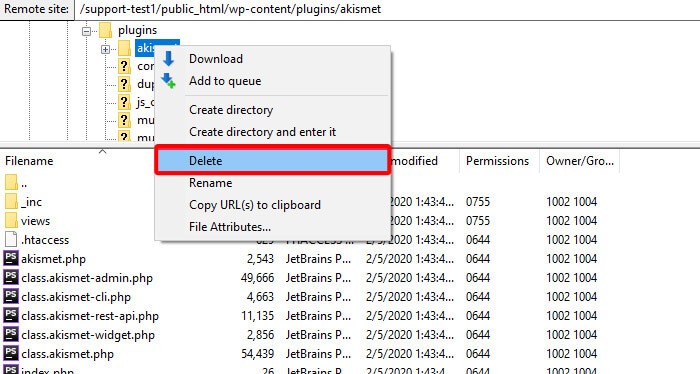
Some plugins create extra folders outside of the plugins folder on your server host. Look for any folder starting with the name of that plugin and delete them.
Removing remained Shortcodes in WordPress
The Shortcodes remained after uninstalling plugins can not be deleted neither by uninstalling plugin from wordPress nor via FTP.
If you are still seeing those shortcodes on your web pages or posts, you need to add the below code to “functions.php” file of you theme:
add_shortcode( ‘pluginshortcode’, ‘__return_false’ );Note: “pluginshortcode” must be replaced by the original plugins shortcode tag.
Clean Up WordPress Database
After uninstalling a plugin, it is better to get rid of all extra data that may be left on your WordPress database. To do this, you have to use “phpMyAdmin” to login to your database.
Then you need to find those tables contain the date of that removed plugin and delete them from your database.
As this is an irreversible process, we recommend you to ask an expert to do it for you or at least create a backup from your data before going ahead.
Conclusion
WordPress plugins are the most interesting and effective features of this platform which can help you to design, manage or improve the functionality of your website.
However, to make a good decision in choosing the best plugins for adding on your WordPress website and the way of their installation, you may need some help which is totally usual because of the diversity of WordPress plugins.
The good news is that choosing and adding plugins on WordPress is not a complicated task. You can easily try to choose and install them by keeping in mind our above-mentioned recommendations and solutions and customize your website just as your requirements.


