
Managing taxes correctly is one of the most important responsibilities for every WooCommerce store owner. Whether you are running a small online shop or a large ecommerce business, tracking WooCommerce sales tax accurately is essential for financial reporting, tax filing, and legal compliance.
A WooCommerce tax report provides valuable insight into the total tax collected from your orders, helping you understand how much tax has been applied to products, shipping, and transactions over time. By reviewing these reports, store managers can reconcile their tax records, monitor tax rates across different locations, and prepare accurate accounting reports.
WooCommerce includes some built-in reporting tools that allow you to review tax data by code or date. However, these default reports often lack advanced filtering, automation, and detailed analysis features required by growing online stores. Because of this limitation, many businesses rely on WooCommerce sales tax plugins or reporting tools like REPORTiT to generate more detailed reports and export tax data in formats such as CSV or Excel.In this guide, we will explore several practical methods to get tax reports in WooCommerce, including the built-in reporting tools, SQL queries for advanced users, and professional WooCommerce reporting plugins that allow you to generate detailed tax reports with just a few clicks.
Tax data is easier to manage when it is part of a consistent reporting routine. WooCommerce analytics overview shows how the main report types work together.
Quick Answer:
WooCommerce tax reports can be generated from the default WooCommerce reporting tools. Go to WordPress Dashboard > WooCommerce > Reports > Taxes and choose Taxes by code or Taxes by date. Then select the required date range and export the result as a CSV file. You can also use WooCommerce > Analytics > Taxes to review tax data with date filters and search options.
Advanced users can also create tax reports with SQL queries through phpMyAdmin. To use this method, open your hosting control panel, go to phpMyAdmin, select the WordPress database, open the SQL tab, and run the proper query for WooCommerce tax data. Since this method reads directly from the database, it should only be used by users who understand WooCommerce tables and have a full backup.
For a faster reporting workflow, use REPORTiT – Advanced WooCommerce Reporting. After installing the plugin, go to WordPress Dashboard > iThemeland > REPORTiT, open the Tax report, click the Search icon, and filter the report by date, country, state, tax group, or order status. Then click Search and use Download to export the report in formats such as Excel, CSV, or PDF.
Method1: Generating WooCommerce sales tax report without plugin
As many websites still use the old version and many others installed the new version of WooCommerce, we provide a step-by-step guide for both.
How to find built-in tax reports in WooCommerce?
In the old version of WooCommerce, you must open the Reports page in the WordPress dashboard by navigating to the address below:
WordPress dashboard > WooCommerce > Reports

You can find the Taxes tab at the top of the screen on this page. By clicking on this tab, two subsections are shown:
- Taxes by code: In this report, you can find a list of information like the number of orders, tax rate, tax amount, etc., based on the tax code.
- Taxes by date: This report lists all taxes categorized based on monthly periods.
To generate the WooCommerce sales tax report, you need to choose one of the sub-sections and then select one of the time filters at the top of the table, which are:
- Year,
- Last month,
- This month,
- Custom
A button for exporting the WooCommerce tax report as a CSV file also exists.
Now, let’s take a closer look at each tax report.
WooCommerce sales tax report by code
When adding a new tax rate to WooCommerce, a unique ID or a tax code is assigned. So, this tax code is used for generating this report.
As you can see in the below picture, the tax code is displayed in the first column of the report, and the other information is listed in other columns.
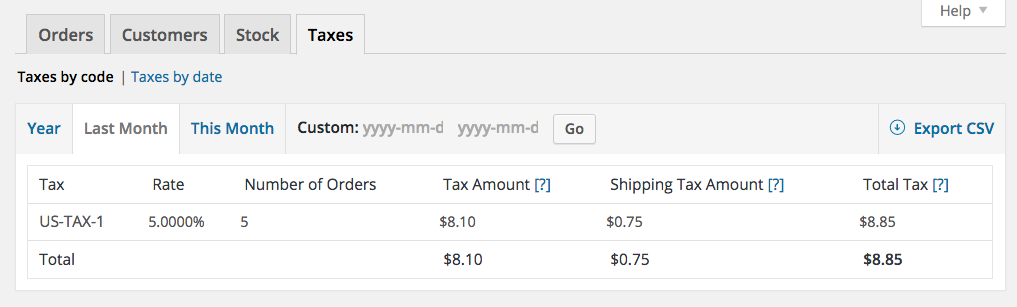
The information in the columns of this report is:
- Tax: Tax code name assigned to each tax rate in WooCommerce.
- Rate: The actual tax rate.
- Number of orders: The total number of orders received on the specified tax.
- Tax Amount: The total tax amount of received orders.
- Shipping Tax Amount: The tax rates that are applied to shipping.
- Total Tax: The sum of the tax amount and shipping tax amount.
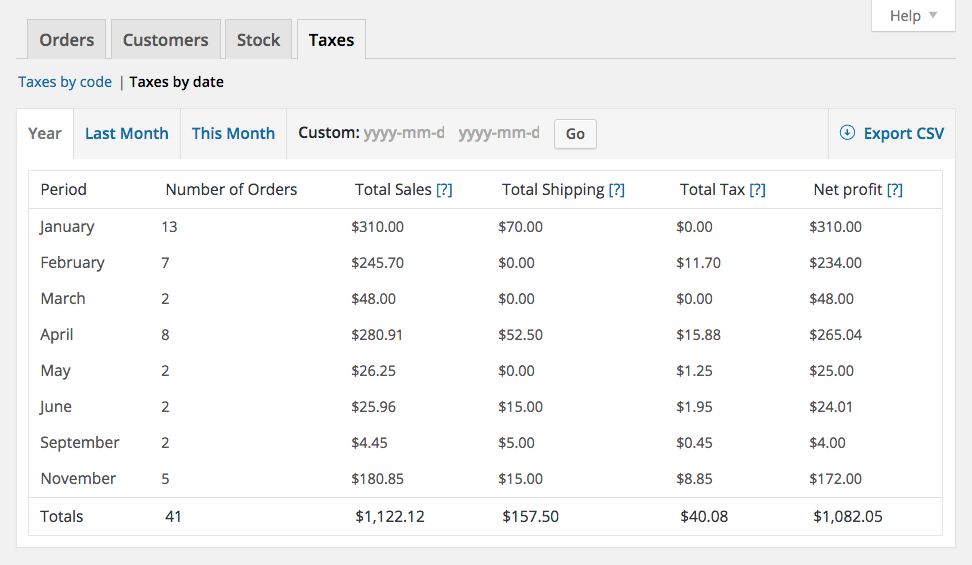
WooCommerce sales tax report by date
This report categorizes and lists all taxes based on different periods in the specified date.
The columns of this report include:
- Period: The exact date on which tax was applied.
- Number of orders: The total number of orders received in each period
- Total Sales: The total sales amount of received orders
- Total Shipping: The total amount of orders charged for shipping
- Total Tax: The total amount of tax applied to all orders in each period
- Net Profit: The subtraction of Total Sales from Total Tax.
Read more: How to Get a WooCommerce Profit Report and Track Store Profit
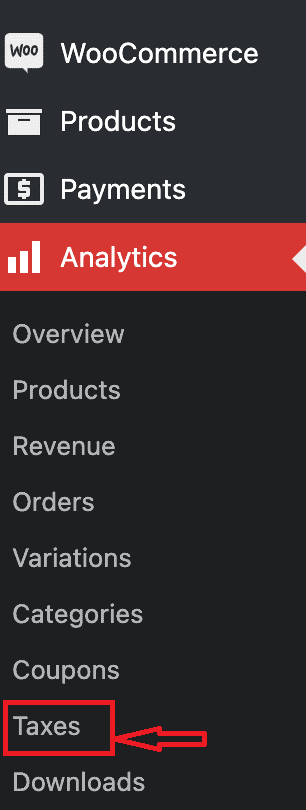
Get WooCommerce sales tax report using WooCommerce analytics
To get tax reports using WooCommerce analytics, you need to open the Analytics tab of WooCommerce in the WordPress dashboard. Then, choose taxes from the list as illustrated below:
On the tax report page of WooCommerce, you can find some filter options, including:
- Date Range: In this box, you can choose a date range to receive the tax report accordingly.
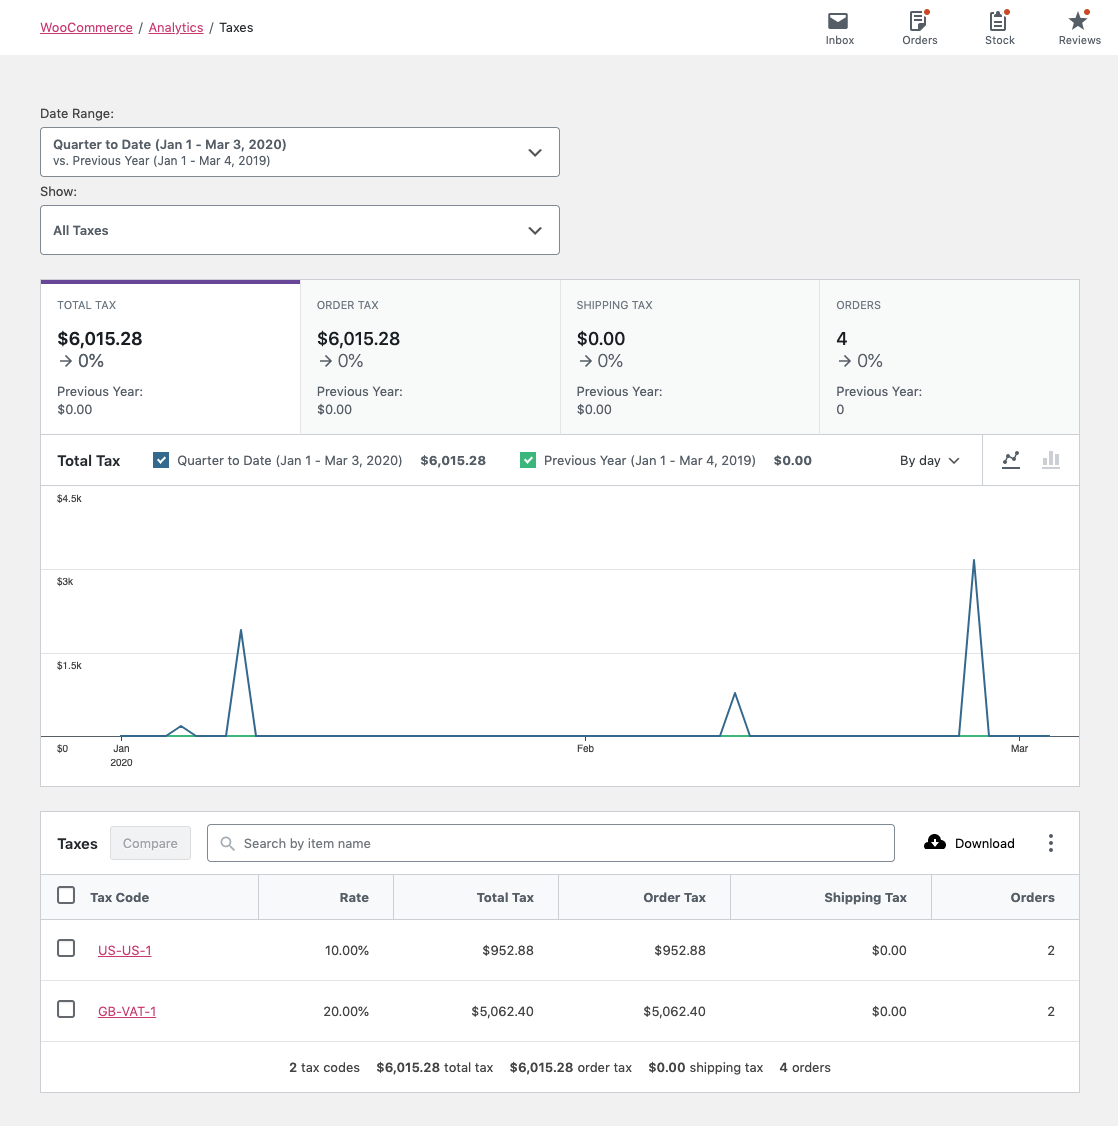
- Show: Two options are available in this box:
- All taxes: Provide a list of all taxes in the report based on the specified date.
- Comparison: You can choose multiple tax codes in the Search box to compare their data in the report.
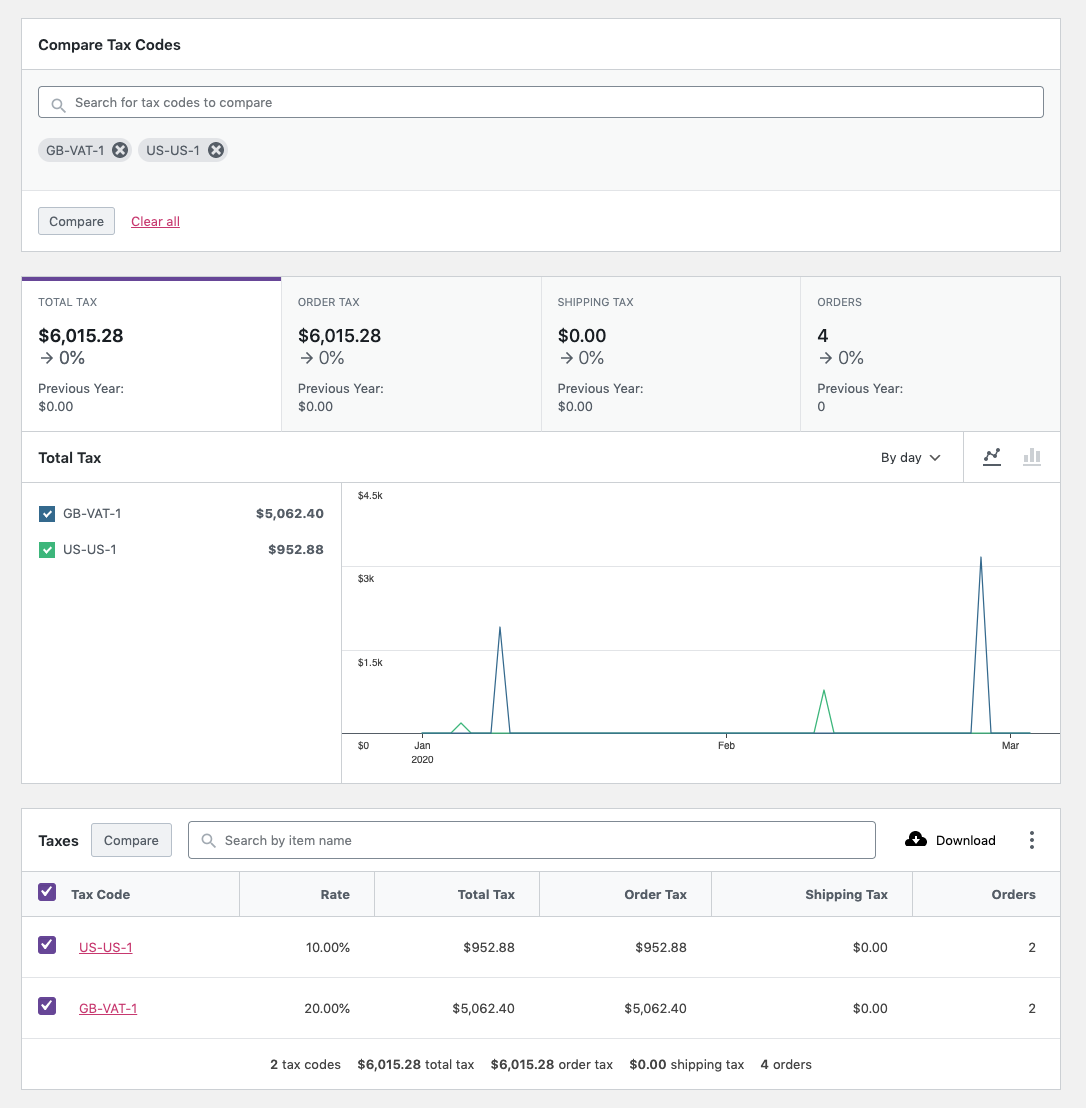
It is also possible to mark multiple tax codes in the report table and click on the Compare button next to the Search box to see the comparison report.
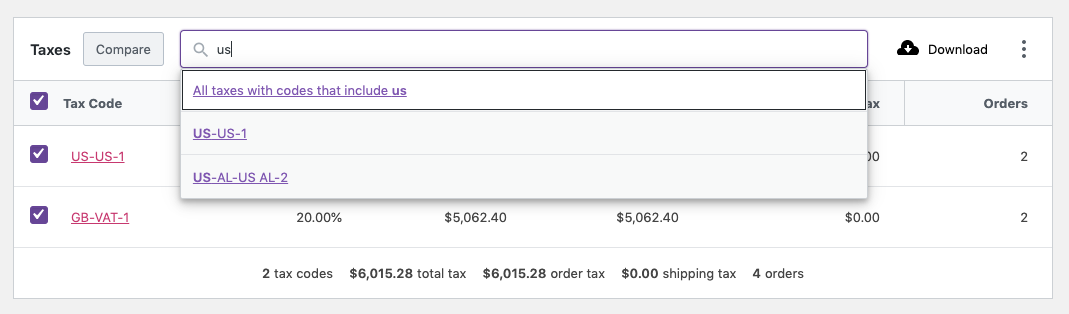
- Search box: A search box at the top of the table is used for filtering the report based on specific tax codes.
Get Tax Reports in WooCommerce by running SQL queries
Running SQL queries in the PhpMyAdmin is another way to generate WooCommerce sales tax reports.
If you open the SQL tab in the PhpMyAdmin, then paste the below code to its box and click on the Go button, the WooCommerce tax report is available on the WordPress website.
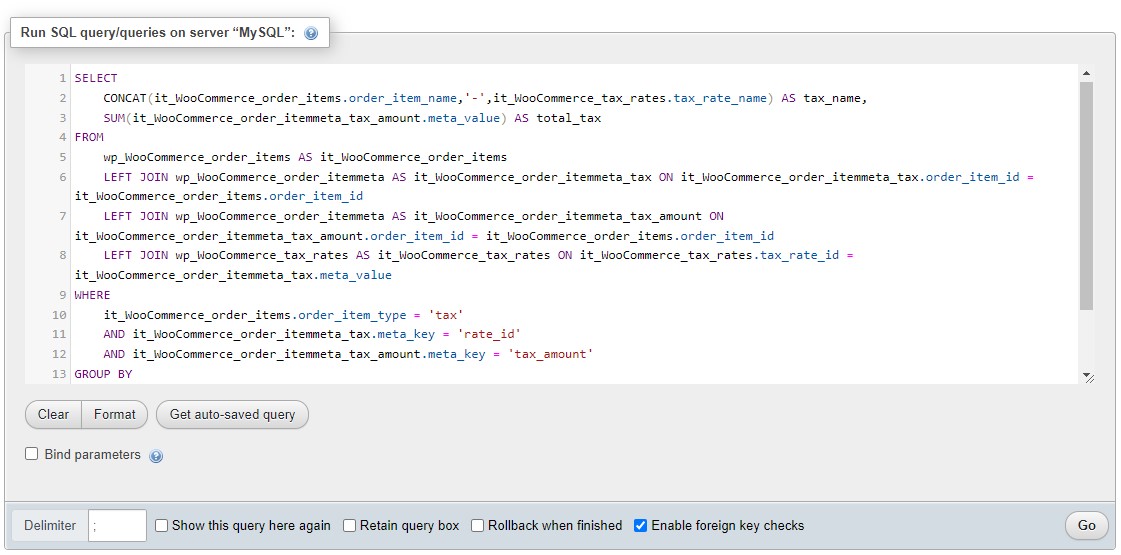
SELECT
     CONCAT(it_WooCommerce_order_items.order_item_name,'-',it_WooCommerce_tax_rates.tax_rate_name) AS tax_name,
     SUM(it_WooCommerce_order_itemmeta_tax_amount.meta_value) AS total_tax
FROM
     wp_WooCommerce_order_items AS it_WooCommerce_order_items
     LEFT JOIN wp_WooCommerce_order_itemmeta AS it_WooCommerce_order_itemmeta_tax ON
it_WooCommerce_order_itemmeta_tax.order_item_id = it_WooCommerce_order_items.order_item_id
     LEFT JOIN wp_WooCommerce_order_itemmeta AS it_WooCommerce_order_itemmeta_tax_amount ON it_WooCommerce_order_itemmeta_tax_amount.order_item_id = it_WooCommerce_order_items.order_item_id
     LEFT JOIN wp_WooCommerce_tax_rates AS it_WooCommerce_tax_rates ON it_WooCommerce_tax_rates.tax_rate_id = it_WooCommerce_order_itemmeta_tax.meta_value
WHERE
     it_WooCommerce_order_items.order_item_type = 'tax'
    AND it_WooCommerce_order_itemmeta_tax.meta_key = 'rate_id'
    AND it_WooCommerce_order_itemmeta_tax_amount.meta_key = 'tax_amount'
GROUP BY
    tax_name
ORDER BY
    total_tax DESC;
The output of this SQL code is a report by below columns:
- Tax name: The Tax code assigned to each tax rate in the WooCommerce,
- Total tax: The sum of all taxes in all orders received in your online store.

What are the best plugins for generating detailed tax reports in WooCommerce?
If you need to get tax reports in WooCommerce, these five plugins can help you generate detailed and accurate tax reports, making it easier to manage your store’s financial compliance:
WooCommerce Report Plugin

The WooCommerce Report Plugin is a powerful tool designed to help store owners gain deep insights into their WooCommerce store’s performance. This plugin provides comprehensive WooCommerce reporting and analytics, making tracking sales, monitoring customer behavior, and optimizing your store’s operations easier. With its user-friendly interface and advanced features, this plugin is an excellent choice for businesses looking to make data-driven decisions.
Key Features
- Advanced WooCommerce Sales Reports: The plugin offers detailed sales reports, including total sales, refunds, and net sales. You can filter data by date range, product, category, or customer, allowing you to analyze trends and identify top-performing products.
- Customer Insights: Gain valuable insights into customer behavior with reports on customer orders, lifetime value, and purchase history. This helps you understand your audience better and tailor your marketing strategies accordingly.
- Tax and Shipping Reports: Generate detailed tax and shipping reports to ensure compliance and manage costs effectively. The plugin supports multiple tax rates and provides summaries that can be exported for accounting purposes.
- Customizable Dashboards: Create personalized dashboards with the metrics that matter most to your business. The drag-and-drop interface makes it easy to customize reports and visualize data in charts and graphs.
- Export and Share Reports: Export reports in CSV, PDF, or Excel formats for further analysis or sharing with your team. This feature is particularly useful for accountants or stakeholders who need access to financial data.
- Product Performance Analysis: Track the performance of individual products or categories with detailed reports on sales, stock levels, and profitability. This helps you identify bestsellers and optimize inventory management.
Sales Tax Reports For WooCommerce

The sales tax reports for WooCommerce plugin simplify tax reporting by generating detailed tax summaries directly from your WooCommerce store. It allows you to filter reports by date range, tax class, and location, making it ideal for stores that need to comply with regional tax regulations. The reports can be exported in CSV format for further analysis or accounting purposes.
PDF Invoices & Packing Slips for WooCommerce

While primarily designed for creating invoices, PDF Invoices & Packing Slips for WooCommerce plugin also include tax reporting features. It generates detailed tax summaries for orders, which can be exported or printed. The plugin supports multiple tax rates and integrates seamlessly with WooCommerce, making it a versatile tool for managing taxes.
Advanced WooCommerce Reporting

Advanced WooCommerce Reporting plugin offers advanced reporting capabilities, including detailed tax reports. You can get tax reports in WooCommerce by filtering data based on dates, products, or categories. It also provides visual charts and graphs for better insights into your tax liabilities and sales performance.
Generate WooCommerce sales tax report using the WooCommerce report plugin
The fastest and easiest way to generate tax reports in WooCommerce is getting help from the WooCommerce report plugin.
More than 50 types of reports are available in this plugin with just one click.
REPORTiT – Advanced WooCommerce Reporting
The easy way to get tax reports in WooCommerce
However, to receive WooCommerce sales tax reports in this plugin, you must open the Tax tab in the main menu.
As illustrated below, there are two types of tax reports available in this plugin:
- Tax report
- Tax reports

Let’s review the information you can analyze in each report briefly.
Tax report
The Tax report is a simple report providing the information below in the columns of the table:
- Tax name: The tax code specified as a unique ID by WooCommerce.
- Tax rate: The tax rate you have assigned to WooCommerce.
- Order count: The number of orders that each tax applied to.
- Shipping amount: The total shipping amount of the orders.
- Net amount: The total amount of orders minus all taxes and shipping.
- Shipping tax: The total tax amount applied to shipping.
- Order tax: Total amount of tax applied to the orders.
- Total tax: Total amount of shipping and order taxes.
To generate this report, you need to follow the below steps:
- Open the Search form on the Tax report page.
- Specify the Date from and Date to by using the built-in calendar – for example, we set the date below to receive last year’s tax report.
- Click on the Search button.
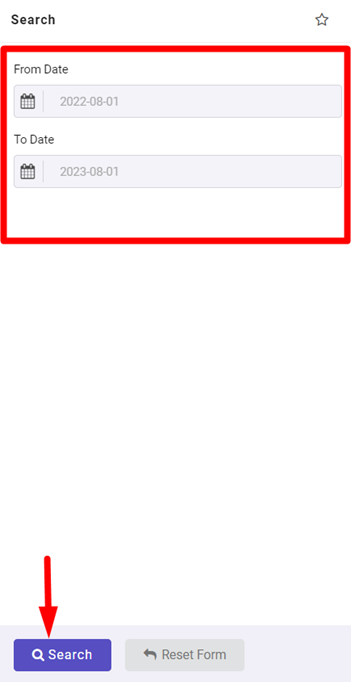
Now, you can see the result in the report table:

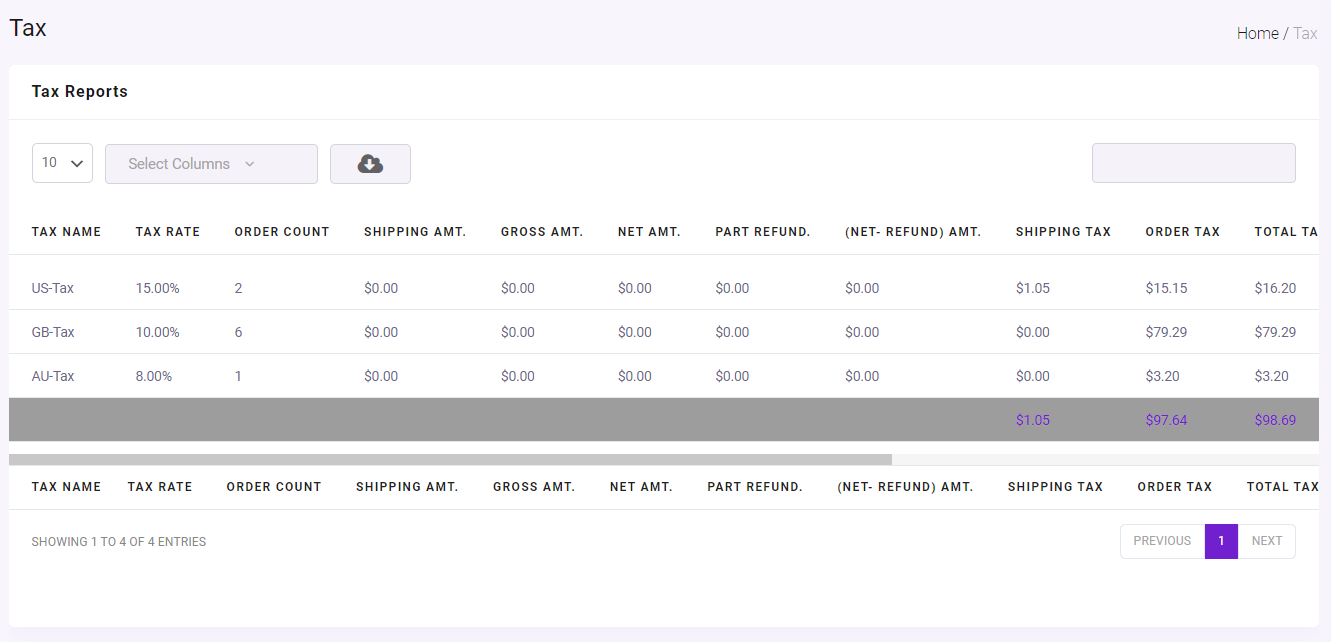
Tax reports
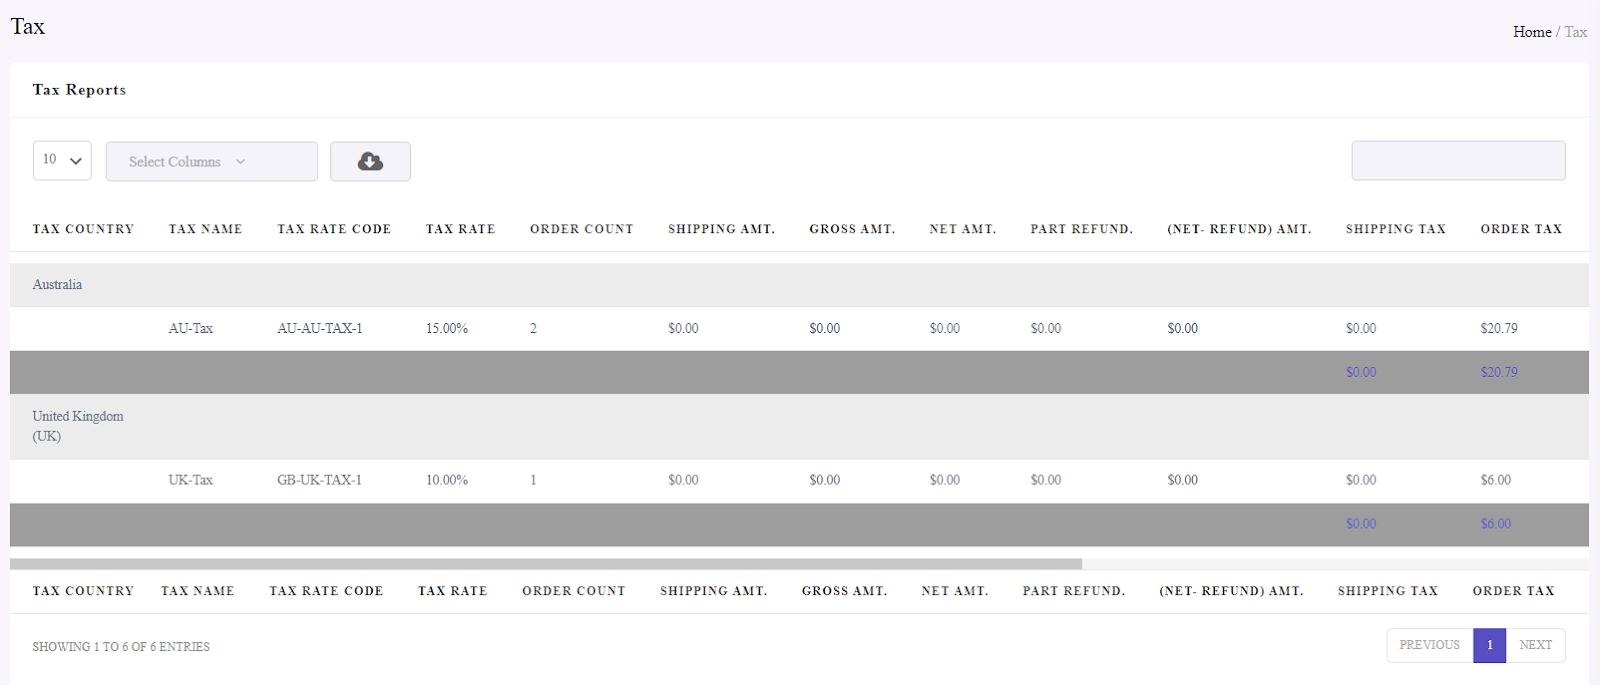
Tax reports provide more data about the orders and taxes in your online store. By generating this report, you can see the below information in the table columns:
- Tax country/state: The country/state that the tax rate was applied to.
- Tax name: The name you have assigned to the tax in WooCommerce.
- Tax rate code: the unique code that WooCommerce assigned to each tax.
- Tax rate: The amount of tax you have set in WooCommerce.
- Order count: The number of orders that the tax is applied to.
- Shipping amount: The shipping amount of the orders.
- Gross amount: The total amount of orders including product amount, shipping, and tax
- Net amount: The total amount of the order minus shipping and taxes.
- Part refund amount: The total amount of orders that are refunded.
- Net refund amount: The total amount of orders that are refunded minus the tax amount.
- Shipping tax: The tax applied on shipping amount.
- Order tax: The tax applied to the orders.
- Total tax: The total amount of order tax and shipping tax.
- Net total tax: The total amount of money you have left after subtracting taxes.
- Refund tax: The tax applied on the refunded orders.
- Refund shipping tax: The tax applied on the shipping of refunded orders.
- Total tax refund: The total amount of refund tax and shipping tax.
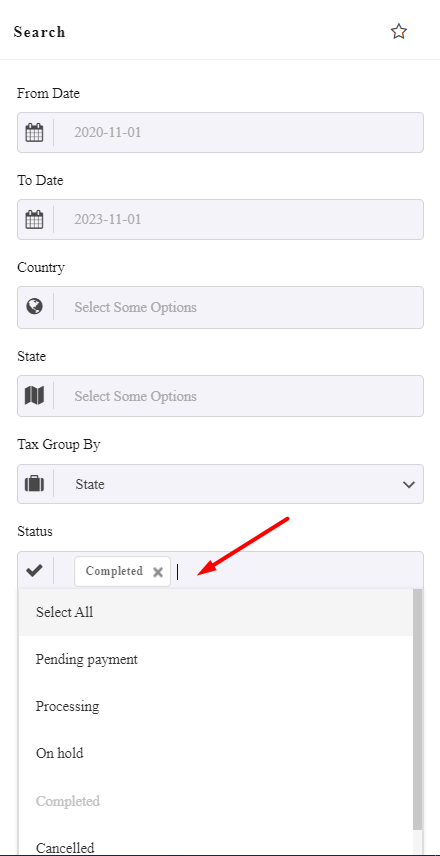
How to filter tax reports by country, state, or product?
As mentioned in the previous part, to generate the tax reports in the WooCommerce report plugin, you must set a date range in the Search form.
There are also some options available in the Search form to filter your report based on including:
- Country/State: You can filter the country or state in this field to see the tax report related to that specific country or state.
- Tax Group by: The manager can categorize the taxes based on the items listed in this field which are city, state, country, zip code, tax name, etc.
- Status: You can use this field to see the tax report of one specific order status like completed, refunded, etc.
Read More: How to Get WooCommerce Order Status Reports With 3 Easy Methods?
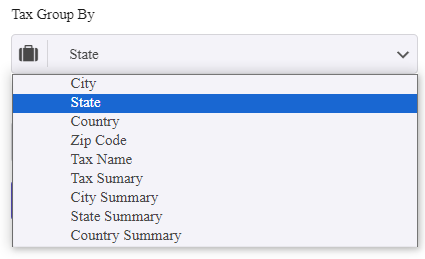
For example, we set the date to receive the tax report for the last 5 years and the below filters:
- Tax Group By: Country.
Read more: How to analyze WooCommerce sales by country
- Status: Completed.

So, as you can see in below picture the tax report of the complete orders is displayed in the table which is categorized by country:
For example, if you want to see WooCommerce US tax rates, you can easily open the Filter Form and choose US from the country list.
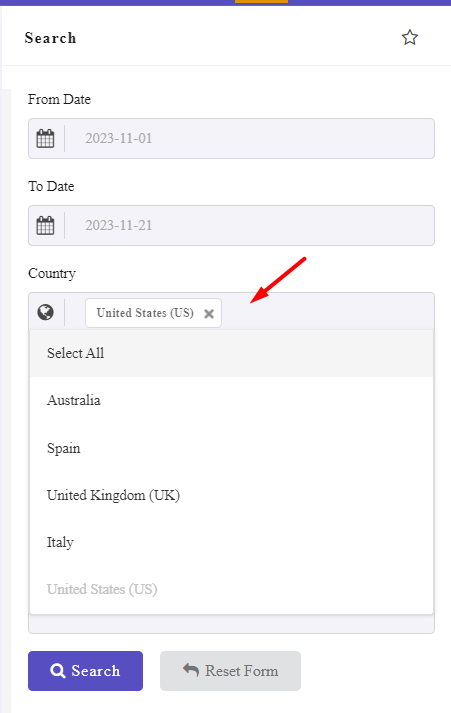
By clicking on the Search button, the report is generated and you can also download the WooCommerce US tax rates CSV file by pressing the Download button on the top of the table.
Get WooCommerce sales tax report by order status
To generate a WooCommerce tax status of orders report, follow the below instructions:
- In the Tax Reports page, Open the filter form by pressing the Search button
- Open the list of Order statuses under the Status field in the form and choose one of them like Completed
- Press Search button
As illustrated below, the WooCommerce sales tax report related to the Complete orders is easily generated:
How to reconcile WooCommerce tax reports with payment records?
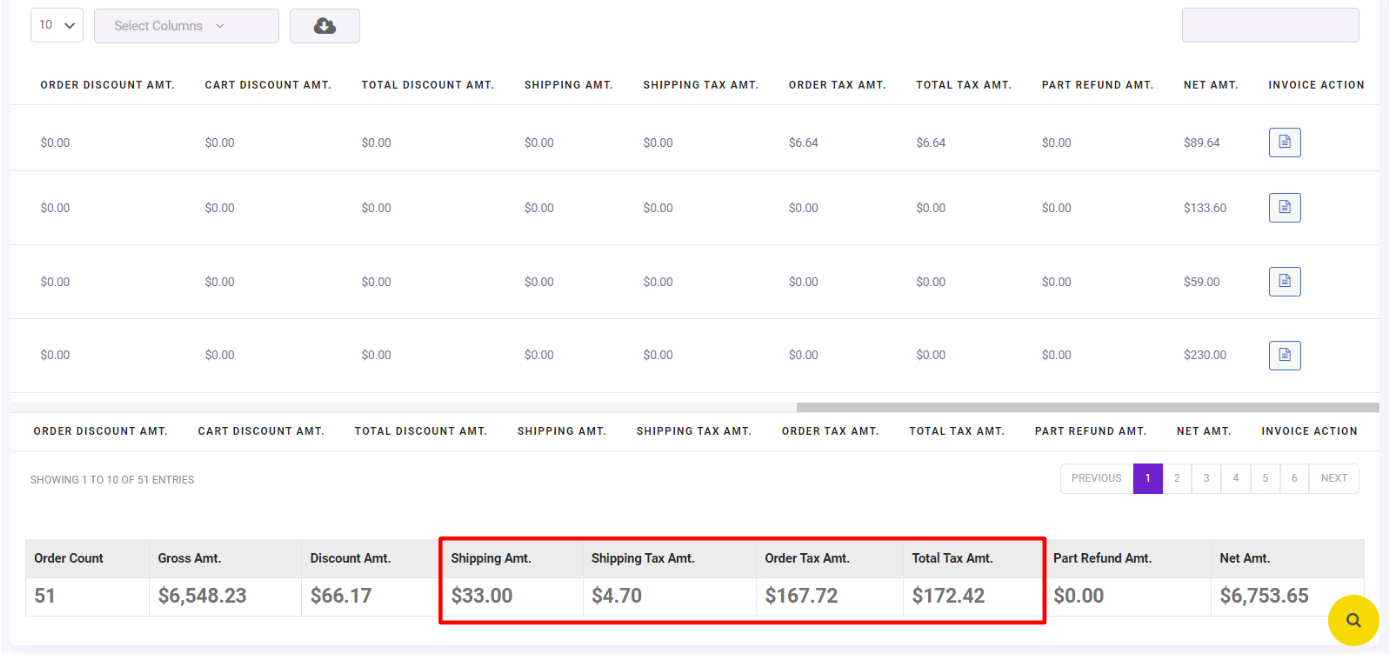
If you want to get WooCommerce tax rate report for all orders, following the below steps are required:
- Go to Order > All Orders.
- Open the Filter Form by pressing the Search button.
- Scroll down to find Show Order Item Details and Unmark it.
- Press the Search button to see three new columns in the WooCommerce sales tax:
- WooCommerce shipping tax amount.
- WooCommerce order tax amount.
- WooCommerce total tax amount.
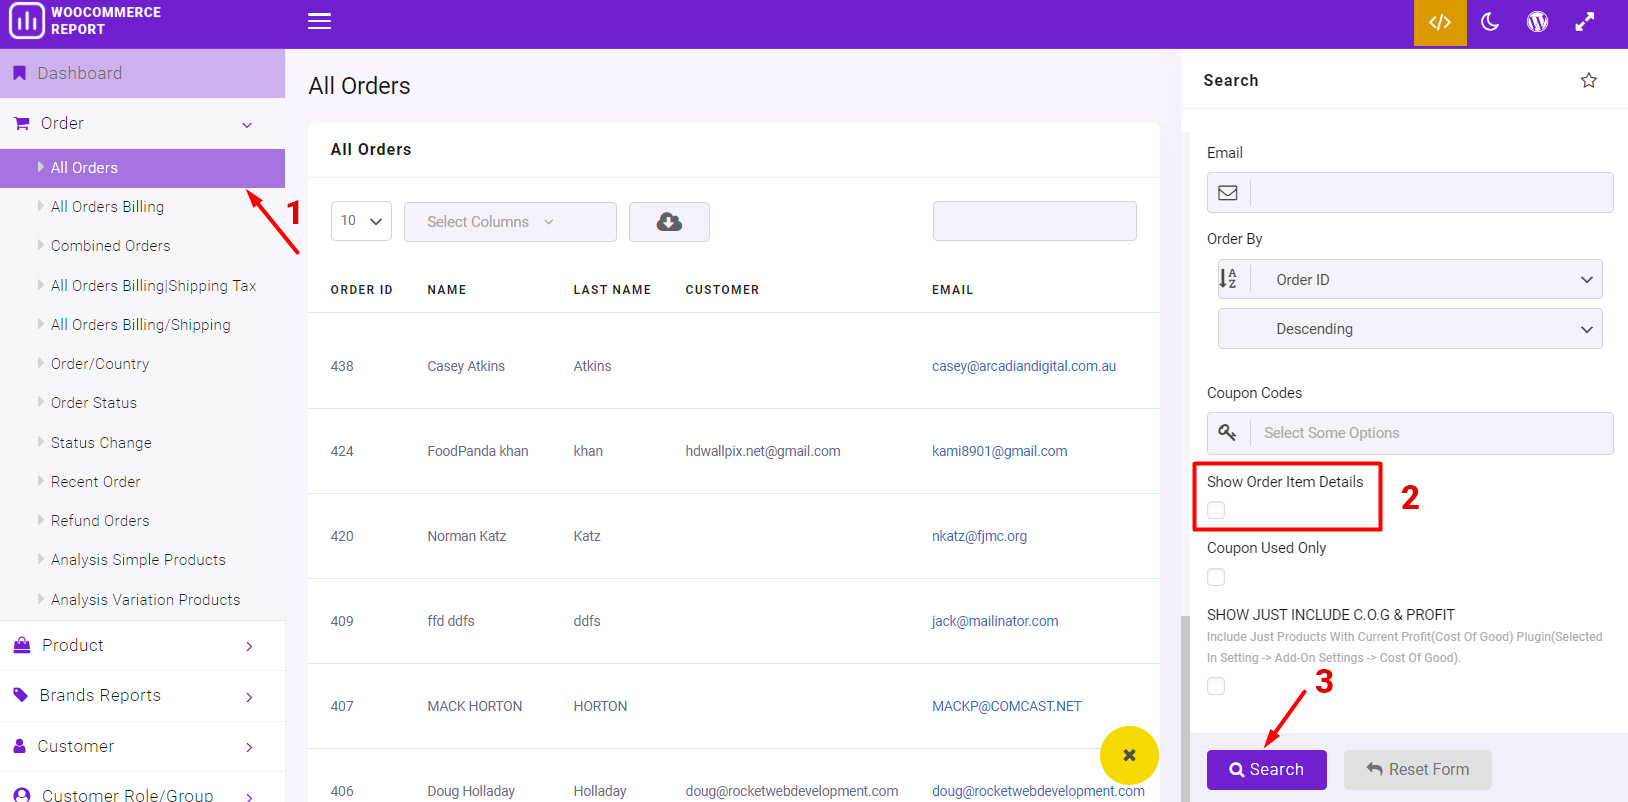
There is also a summary report at the bottom of the table, reporting the total WooCommerce shipping and tax as well as the WooCommerce tax rate amount of all orders.
By pressing the Download icon on the top of the table and choosing CSV format, WooCommerce tax rates CSV download is possible.
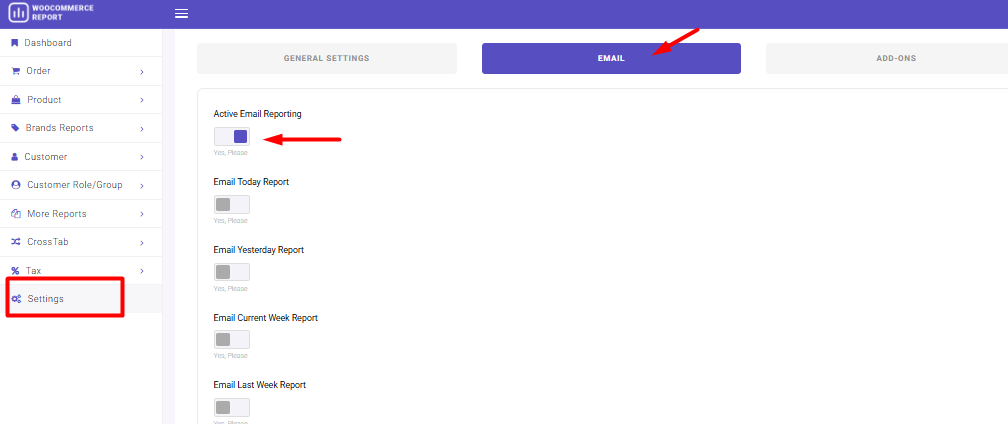
Can I automate tax report generation in WooCommerce?
You can automate tax report generation in WooCommerce by activating the Email reporting in the WooCommerce report plugin. This plugin allows you to schedule and automatically send tax reports to your email or any specified address. You can configure the frequency (daily, weekly, monthly) and customize the report format to suit your accounting needs. This eliminates manual work and ensures timely compliance with tax regulations.
Read more: How to schedule WooCommerce reports by email
How to export WooCommerce tax reports for accounting?
To export the tax report in the WooCommerce report plugin, first, you can choose the columns of the report table in the list of Select Columns. You can mark/unmark the columns you need in the list. (1)
Then, click the Download button at the top of the tax report table. (2)
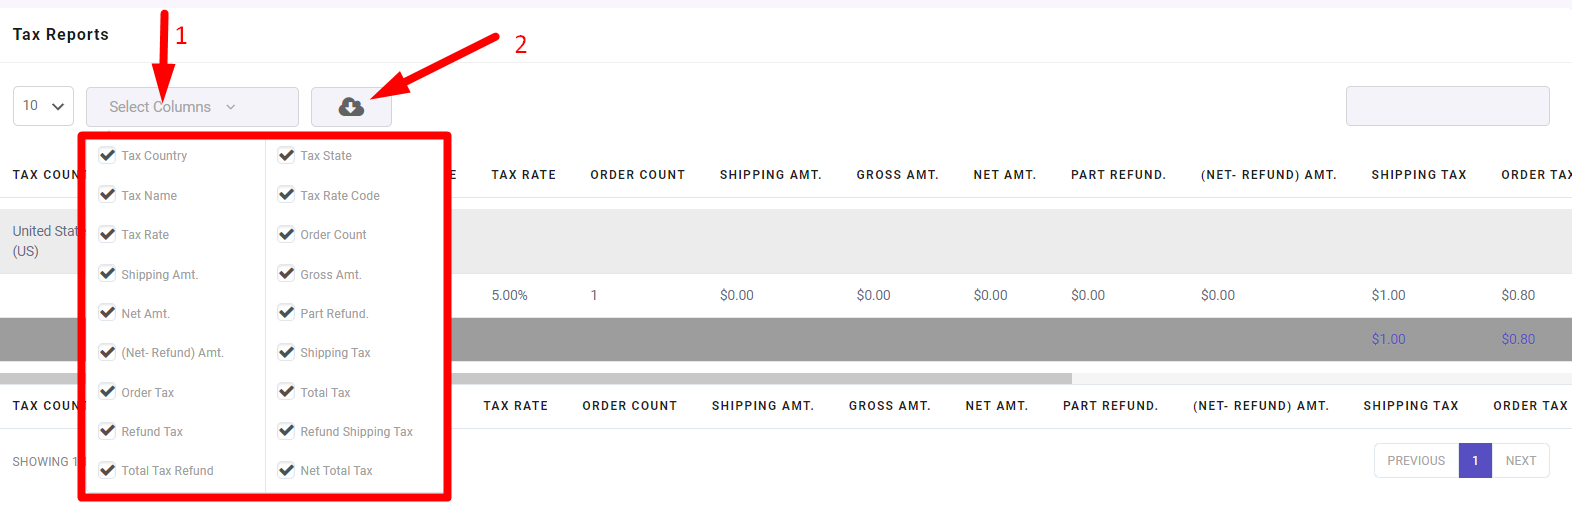
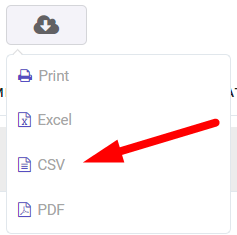
You can choose to download the report as one of the below file formats:
- Excel
- CSV
It is also possible to directly print the report by choosing the Print option.
What are the best third-party tools for WooCommerce tax reports?
To get tax reports in WooCommerce, several third-party tools can help streamline the process and ensure accuracy. Tools like QuickBooks, Xero, and TaxJar are popular choices for generating detailed tax reports. These tools integrate seamlessly with WooCommerce, automating tax calculations and providing comprehensive reports that can be used for filing returns.
For example, TaxJar offers real-time sales tax calculations and detailed reports for multi-state or international sales, making it ideal for businesses with complex tax requirements. Similarly, QuickBooks and Xero provide advanced financial reporting features, including tax summaries, profit and loss statements, and VAT reports.
By using these tools, you can get tax reports in WooCommerce that are accurate, compliant, and easy to understand.
How to fix common tax reporting errors in WooCommerce?
When trying to get tax reports in WooCommerce, you may encounter common errors such as incorrect tax calculations, missing data, or mismatched totals. To fix these issues, start by ensuring that your tax settings in WooCommerce are configured correctly.
Go to WooCommerce > Settings > Tax and verify that the correct tax rates, classes, and rules are applied. If discrepancies persist, check for plugin conflicts by disabling other plugins temporarily. Additionally, use tools like Sales Tax Reports For WooCommerce By mystyleplatform or Advanced WooCommerce Reporting to identify and correct errors in your tax data.
Regularly updating WooCommerce and your tax plugins can also prevent errors caused by outdated software. By addressing these issues proactively, you can ensure accurate and reliable tax reports.
How to stay compliant with tax laws using WooCommerce reports?”
Staying compliant with tax laws is crucial for any WooCommerce store, and using the right tools to get tax reports in WooCommerce can make this process easier. Plugins like WooCommerce EU VAT Compliance or TaxJar help you generate detailed tax reports that align with regional and international tax regulations.
These tools automatically calculate taxes based on customer location, ensuring compliance with VAT, GST, or sales tax laws. Additionally, regularly reviewing and exporting tax reports allows you to maintain accurate records for audits or filings.
By leveraging WooCommerce’s built-in reporting features or third-party tools, you can stay compliant with tax laws, avoid penalties, and focus on growing your business.
Why is it important to generate tax reports in WooCommerce?
Business owners should carefully track the tax amounts of their stores to specify their tax status and evaluate their net profit. As sales increase, sales tax tracking and analyzing the total tax of received orders in different states or countries becomes more difficult. In this situation, the sales tax report provides this important information to store managers and helps them to have a better insight into it.
A sales tax report is also important for calculating the total taxes on product sales.
REPORTiT – Advanced WooCommerce Reporting
The easy way to get tax reports in WooCommerce
Conclusion
Tracking taxes accurately is a critical part of managing a WooCommerce store. Tax reports help store owners understand how much tax has been collected from orders, monitor tax rates applied to products and shipping, and prepare financial reports for accounting or tax filing.
WooCommerce offers basic built-in tax reporting features that allow store managers to review taxes by date or tax code. While these options can work for small stores, larger ecommerce businesses often require more advanced tools for filtering, exporting, and analyzing tax data.
By using advanced REPORTiT plugin, store owners can generate detailed tax reports, export them to CSV or Excel files, and analyze tax performance across countries, states, or order statuses. These insights help businesses maintain accurate financial records and ensure compliance with tax regulations.
Choosing the right method for generating WooCommerce tax reports ultimately depends on the size of your store and the level of reporting detail you need.
To review taxes alongside revenue, refunds, and shipping, continue with the complete reporting framework.
FAQ
What is a WooCommerce tax report?
A WooCommerce tax report shows the total taxes collected from orders in your online store. It usually includes information such as tax rates, number of orders, total tax amount, shipping tax, and total sales for a selected time period.
How do I generate a sales tax report in WooCommerce?
You can generate a WooCommerce sales tax report using the built-in reporting tools available in WooCommerce. These reports can be accessed from the Reports or Analytics section of the WooCommerce dashboard, where you can filter tax data by date range or tax code.
Can WooCommerce export tax reports to CSV?
Yes. WooCommerce allows store managers to export certain tax reports as CSV files. This feature is useful for sharing tax data with accountants or importing it into financial software for further analysis.
Does WooCommerce calculate sales tax automatically?
WooCommerce can calculate sales tax automatically if tax rates are configured correctly in the tax settings. Store owners can define tax rules based on location, product type, or shipping destination.
What is the best WooCommerce sales tax plugin?
Several plugins can help generate detailed WooCommerce tax reports and automate tax calculations. REPORTiT plugin, accounting integrations, and specialized tax tools can provide advanced reporting features and help store owners stay compliant with tax regulations.
How can I export WooCommerce tax rates CSV?
WooCommerce tax data can be exported using built-in export tools or reporting plugins. These tools allow you to download tax reports in CSV format so the data can be used for accounting, tax filing, or financial analysis.