
A WooCommerce pricing table helps customers compare products, prices, variations, and features in a fast and user-friendly layout. Instead of opening multiple product pages, shoppers can review everything in one organized product pricing table and add items directly to their cart. This improves the shopping experience, reduces browsing time, and can significantly increase conversions in your WooCommerce store.
Although WooCommerce does not provide a built-in pricing table feature, you can easily create responsive and customizable product tables using a WooCommerce pricing table plugin.
In this guide, you will learn how to build a professional WooCommerce price table with filters, quantity selectors, product variations, pagination, and quick view functionality by using TABLEiT – Product Table for WooCommerce.
Pricing tables work best when they are part of a clear product-discovery system.See the broader table-layout strategy for guidance on columns, filters, and buying workflows.
Quick Answer:
The most practical way to make a WooCommerce product pricing table is using TABLEiT – Product Table for WooCommerce. WooCommerce does not provide a complete pricing table layout by default, so a product table plugin helps you display products, prices, variations, quantity fields, and add-to-cart buttons in a structured table.
After installing the plugin, go to WordPress Dashboard > iThemeland > TABLEiT and create a new table. Use the Query tab to choose which products or categories should appear, then use the Columns tab to add fields such as product title, image, price, SKU, variation, quantity selector, and add-to-cart button.
Next, configure search, filters, sorting, pagination, and responsive behavior from the Navigation and Style tabs. Save the table and place its shortcode on the pricing page. TABLEiT is useful because it lets customers compare products and place orders faster from one clear pricing layout.
What is a product pricing table?
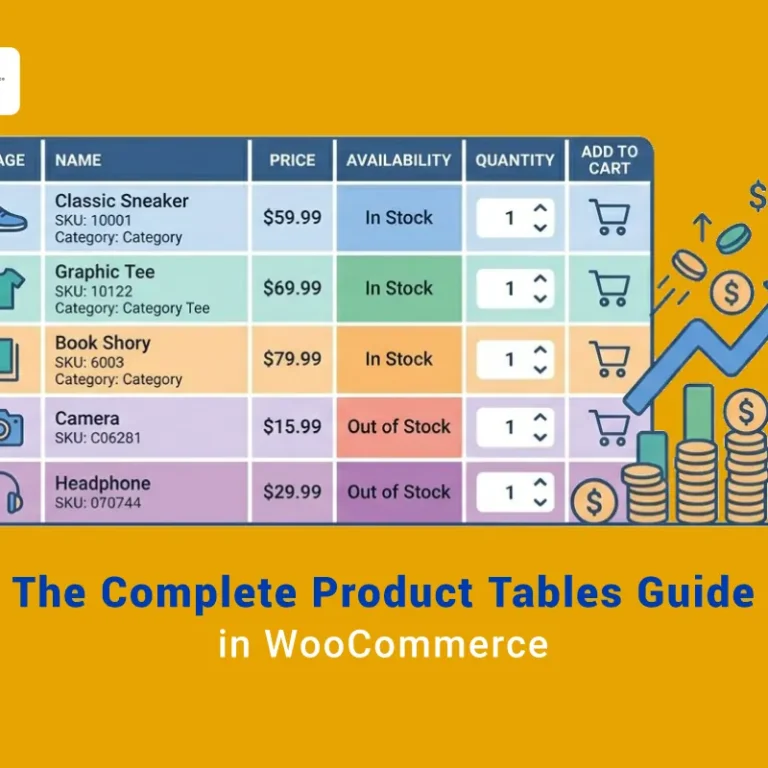
A WooCommerce pricing table is a list of products along with other useful information displayed in different columns to the customers. The WooCommerce price list usually has a simple interface allowing customers to quickly review the most important features of the products with their prices at one glance.
The most common columns in this table are the product price, product title, variations, and add to cart button. However, store managers can customize the table columns based on their needs.
Continue reading to learn how to create a customized WooCommerce pricing table with the WooCommerce product table plugin.
How to add pricing table in WordPress websites by using WooCommerce product table plugin?
The WooCommerce product table plugin is one of the WordPress price list table plugins that provides all the necessary advanced features to create eye-catching and responsive tables. This plugin has an easy and intuitive user interface to create any product table easily.
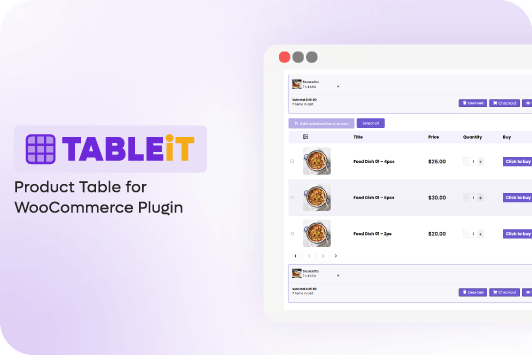
TABLEiT – Product Table for WooCommerce
The easy way to make a product pricing table in WooCommerce
Here, we will teach you how to create a WooCommerce pricing table in 4 simple steps with this plugin:
Step 1: Create a WooCommerce product pricing table
In the WooCommerce product table plugin, we provide an easy interface allowing you to add as many columns as you need by following the below instructions:
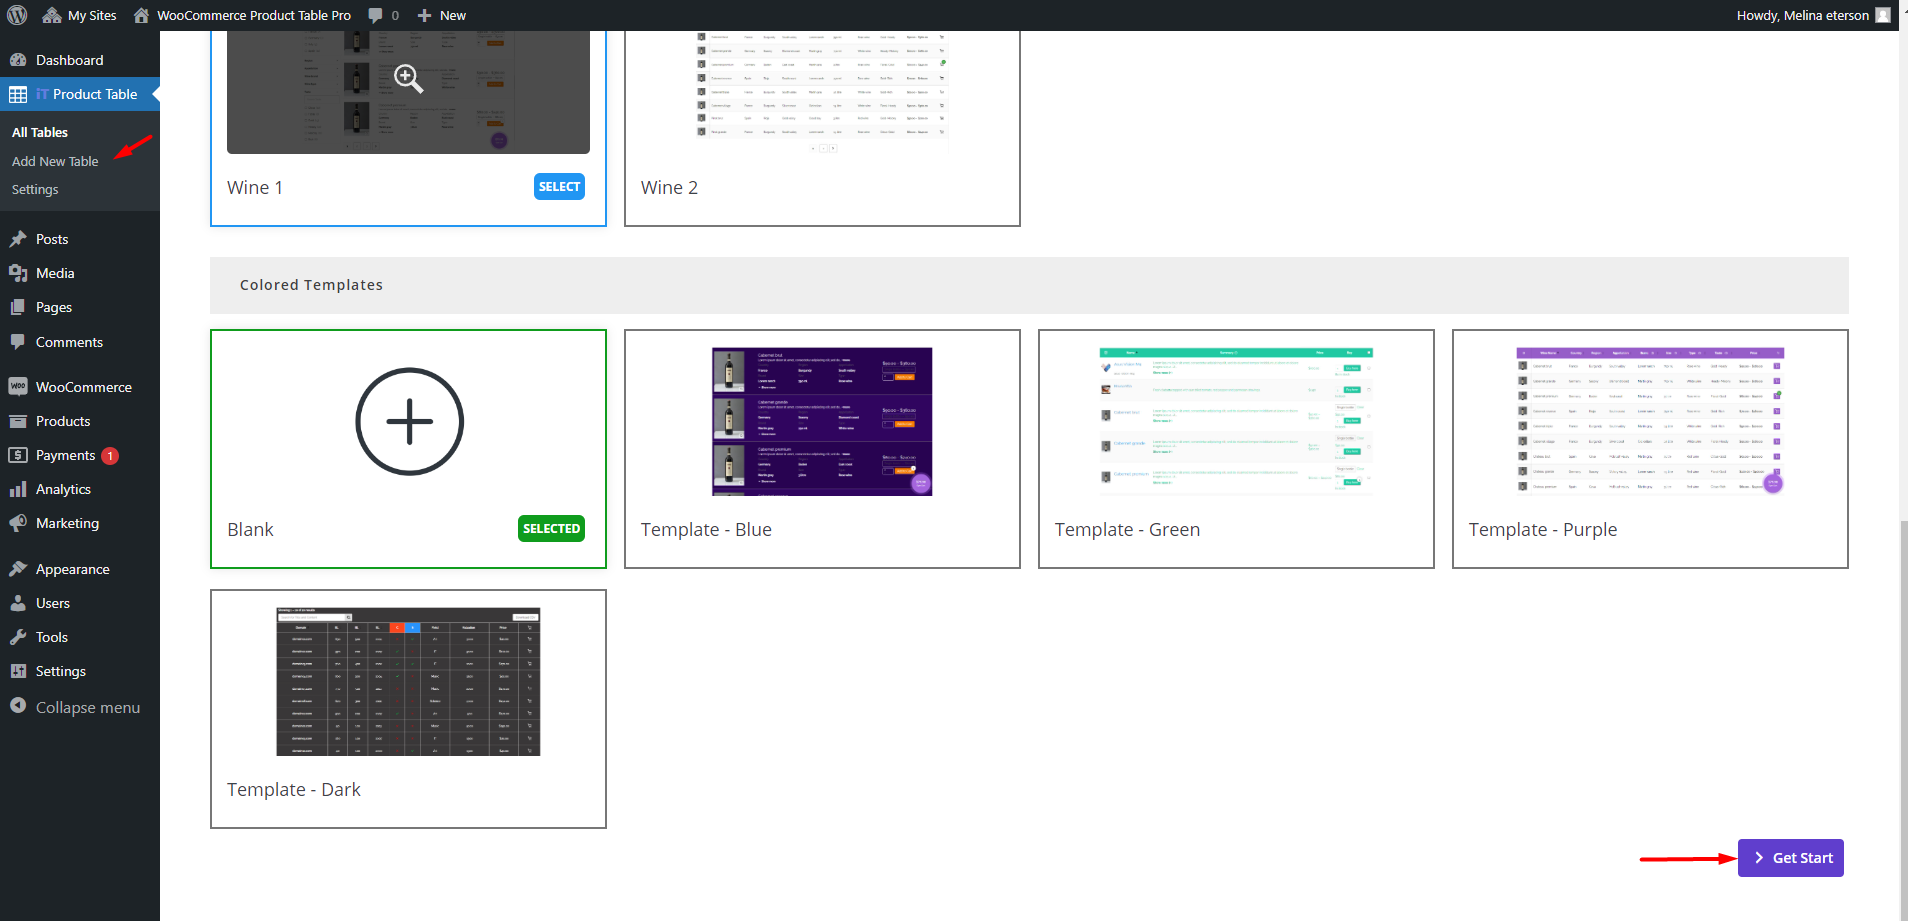
- Install and activate the plugin, then go to WordPress > iT Product Table > Add new table
- On the new page, scroll down and press the Get Start button.
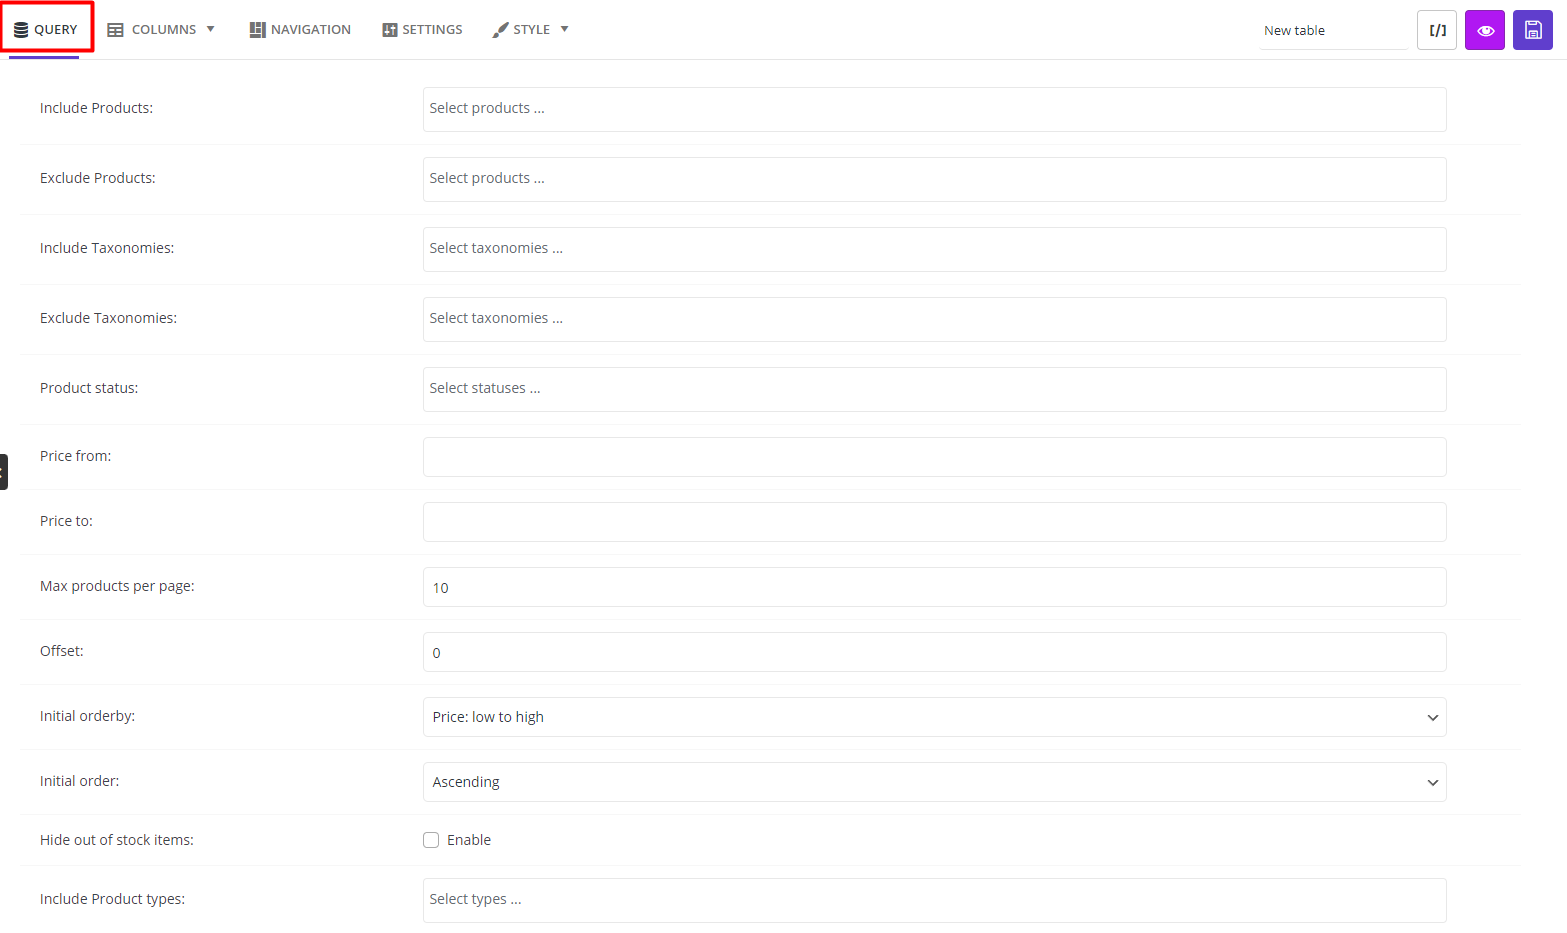
- The plugin will automatically import all of your products to the table; however, you can instruct the plugin to show some of them by making a query in the Query tab.
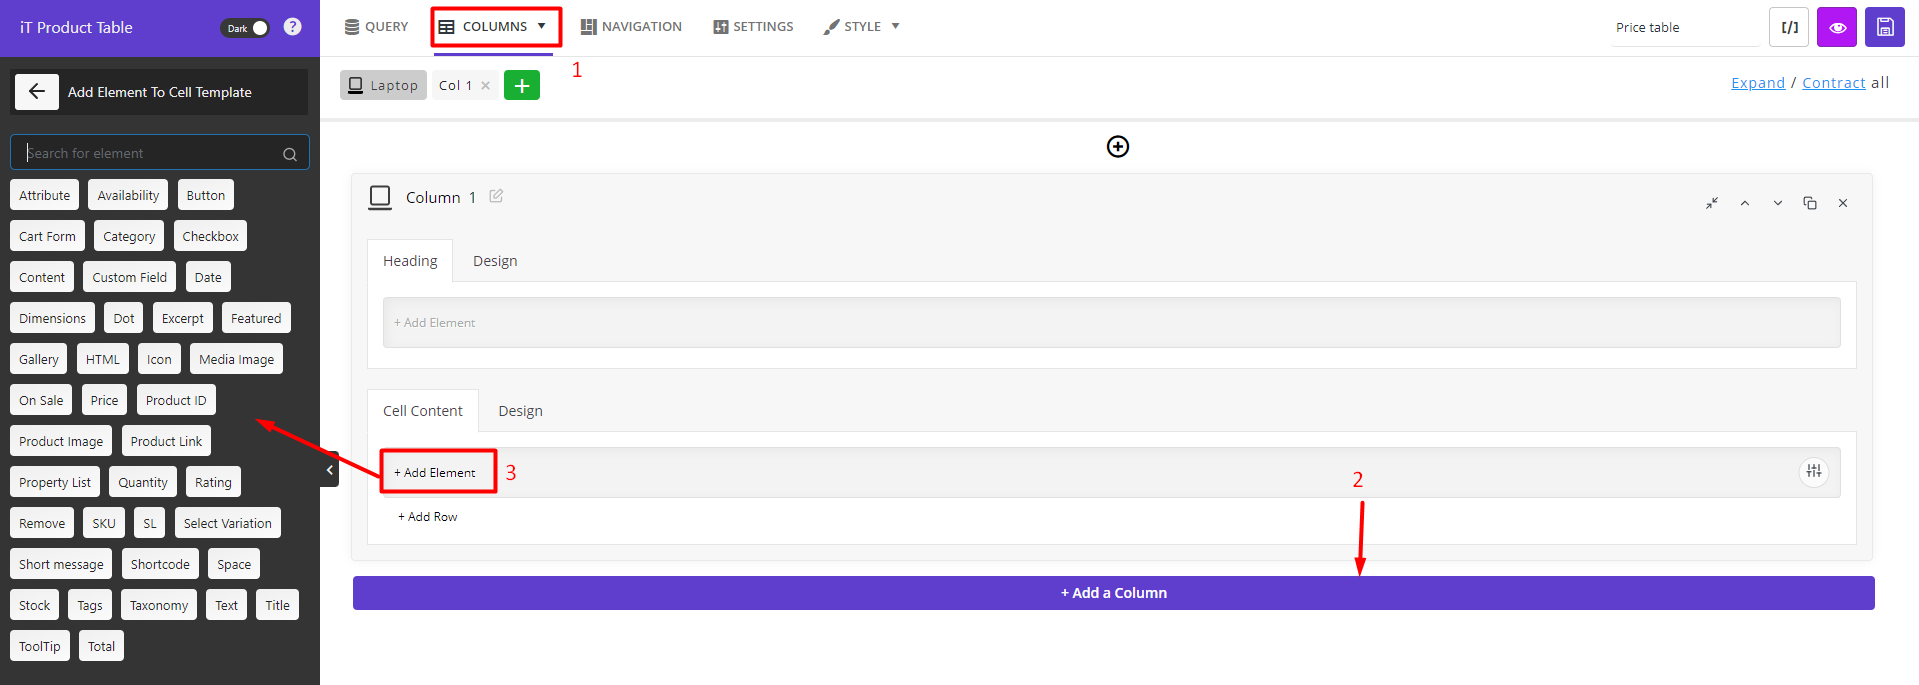
- Now, you can add columns to your table by opening the Columns page. (1)
- Click the Add a new Column on this page to create the first column. (2) As you may notice in the below picture, after adding any column, you can see a box with two sections: the Heading and Cell content.
- In each section, you can assign an element by pressing the Add element option and choosing one element from the list appearing in the Left panel. (3) It is possible to tweak the appearance by customizing the options in the Design tab.
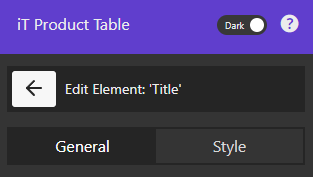
- After adding each element, you can access the General and Style tabs in the Element setting panel. The configuration settings designed in these tabs allow you to customize the content and appearance of each element in the table.
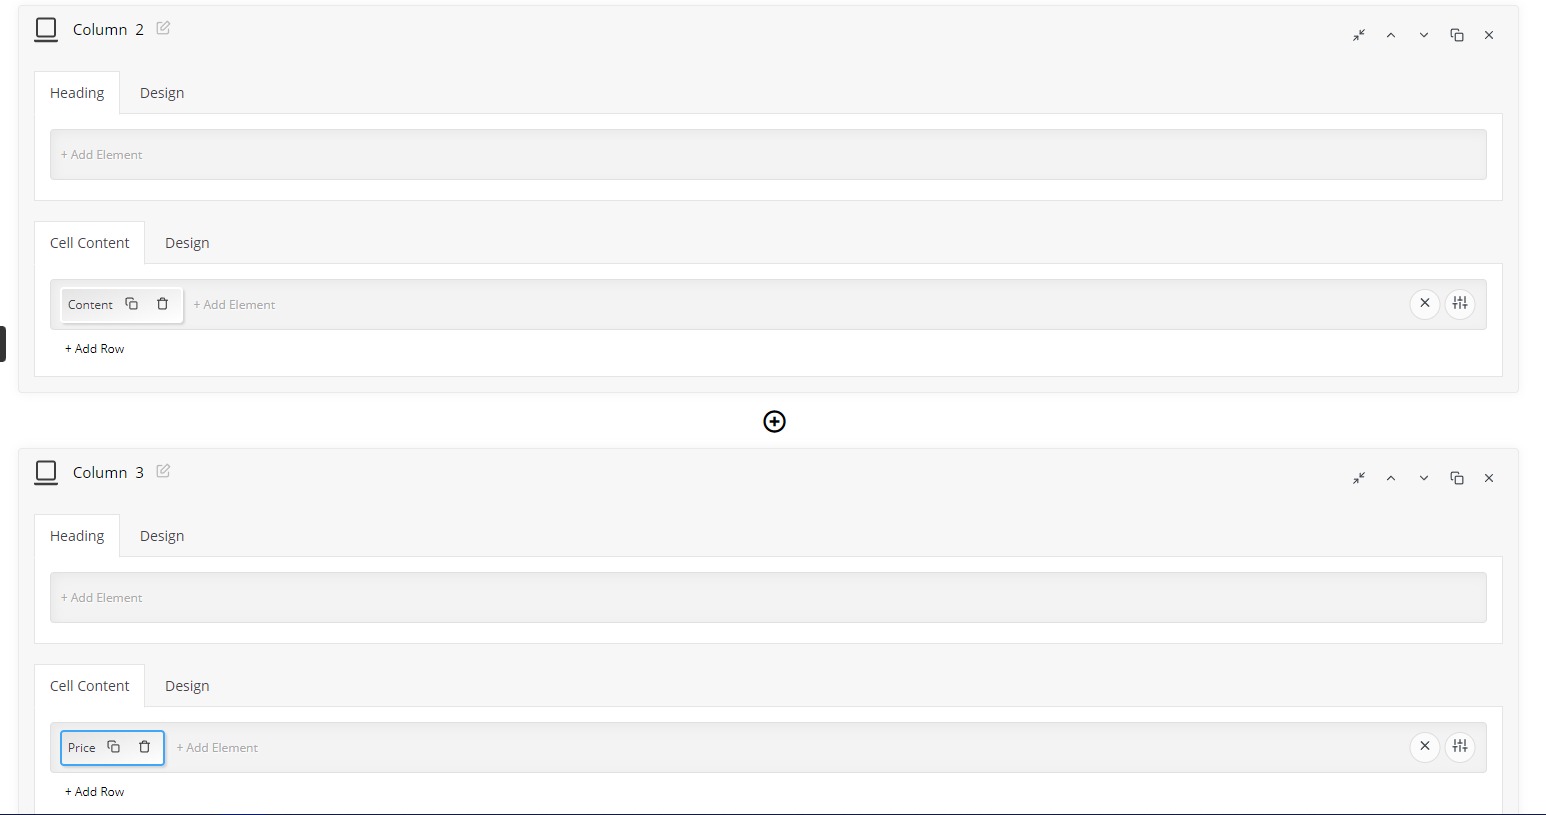
Now, to make the simplest WooCommerce pricing table, it is essential to add the three columns and assign the below elements to the Cell content section:
- Title: To show product name to the customers
- Content: To inform customers about the product description.
- Price: to show regular or sale prices to the customers.
When you add the essential columns to create the WooCommerce pricing table, it is time to make it more efficient for your customers.
Step 2: Customize the WooCommerce price table
Customizing the WooCommerce pricing table depends on your strategies for making a better shopping experience for your customers. In the following, we review the most popular formats of pricing tables, although you can personalize them based on your needs.
Method 1: Display each product in separate rows with the price range
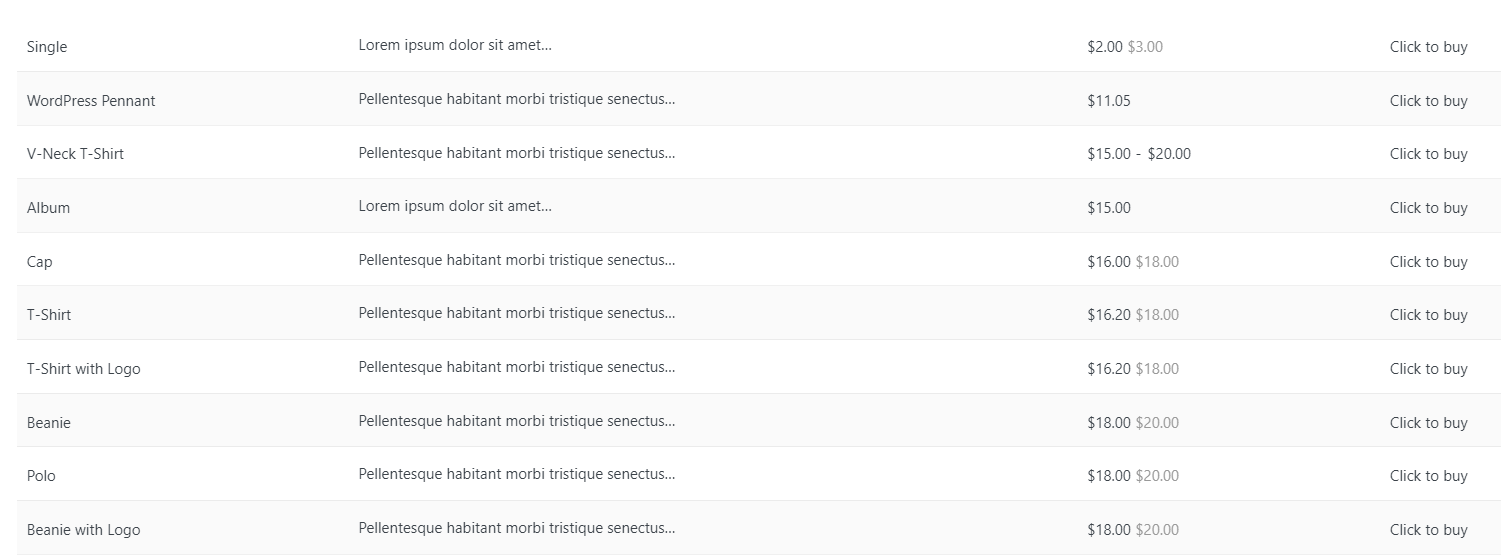
To add Product Link to your pricing table WooCommerce, follow the mentioned steps (1 to 3), then choose Product Link element from the left panel.
To add a Product Link to your table, follow the mentioned steps (1 to 3), then choose the Product Link element from the left panel.
Adding this element lets your customers click on the product link in the table and visit the page to get more information and order it.
There are some customization options in this element’s General and Style tabs. For example, you can show any text as the product link label by adding a Text element in the Content field as shown below:

Finally, the result of making the pricing table in this format is like below:
Method 2: Display each product variation in individual rows with its price
The previous format is not an ideal way to satisfy your customers if you have so many variable products in your store. To make the product table more attractive, it is better to show all variations in separate rows of the table and let the customers add the products to their carts directly from the table.
To make this happen, you need to follow two steps:
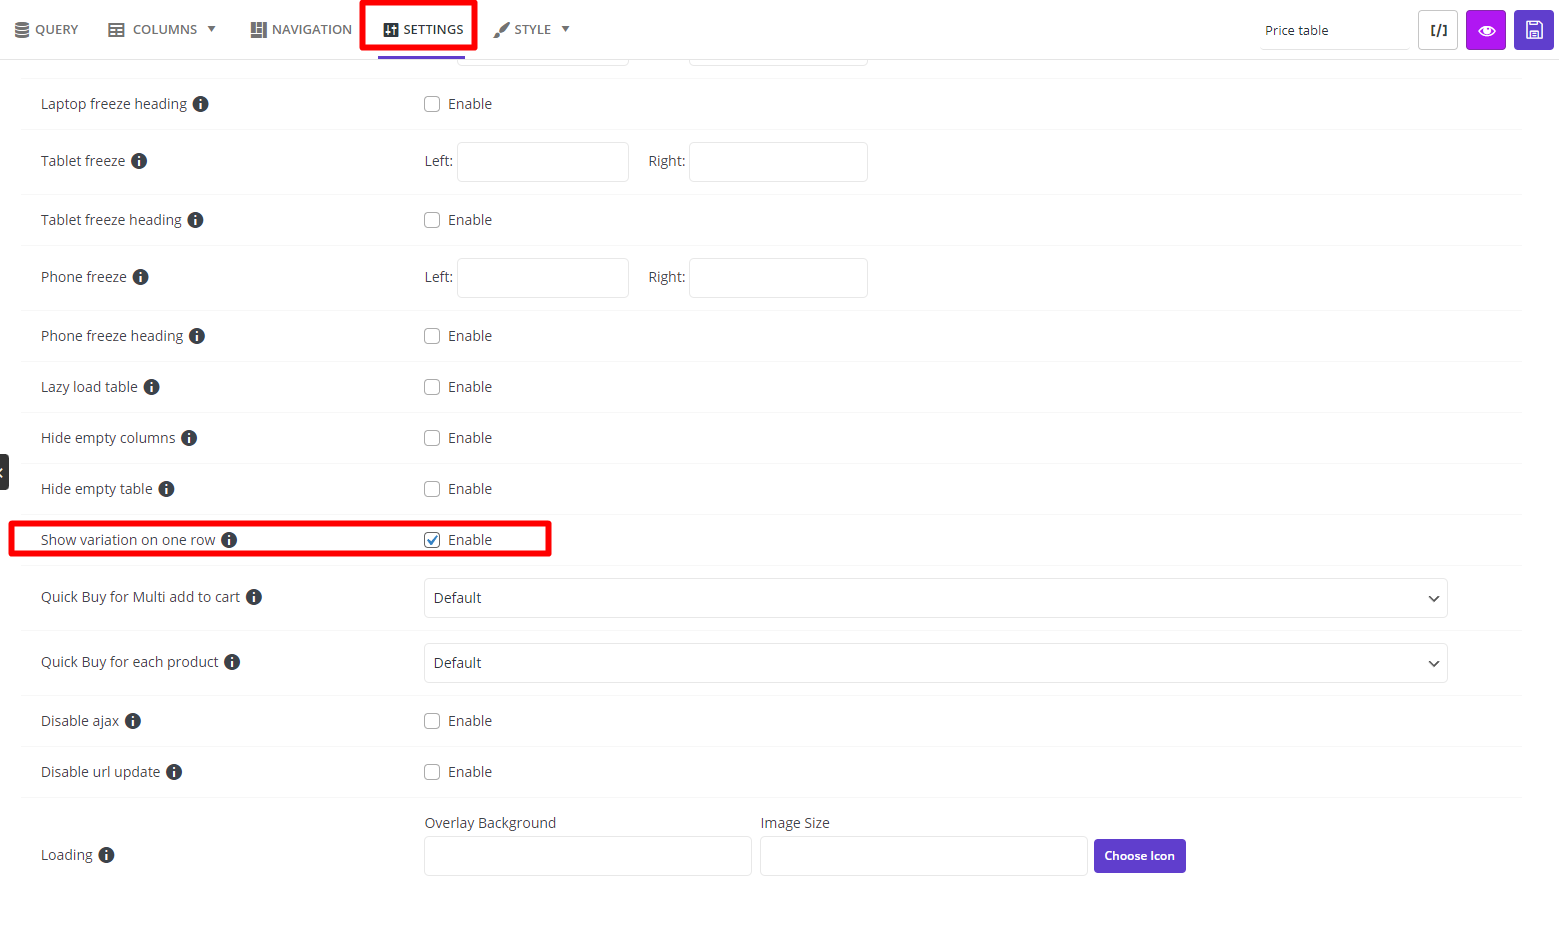
Step 1: instruct the plugin to show product variations in separate rows
This is simply possible by going to the Settings tab and enabling the item specified in the below picture:
Step 2: Add product pricing table columns
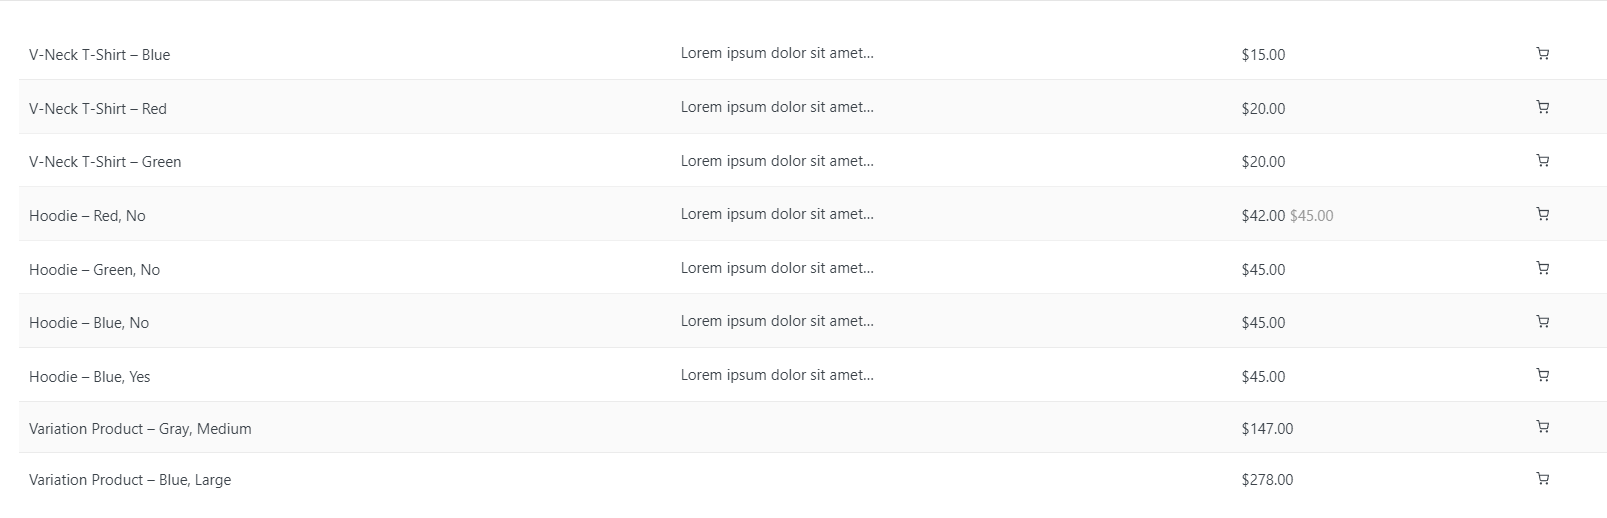
In the next step, add a new column and assign an add-to-cart button.
You can find a complete guide for displaying add to cart button in the table, here:
Read more: The best WooCommerce bulk add to cart plugin: How to add multiple products to cart?
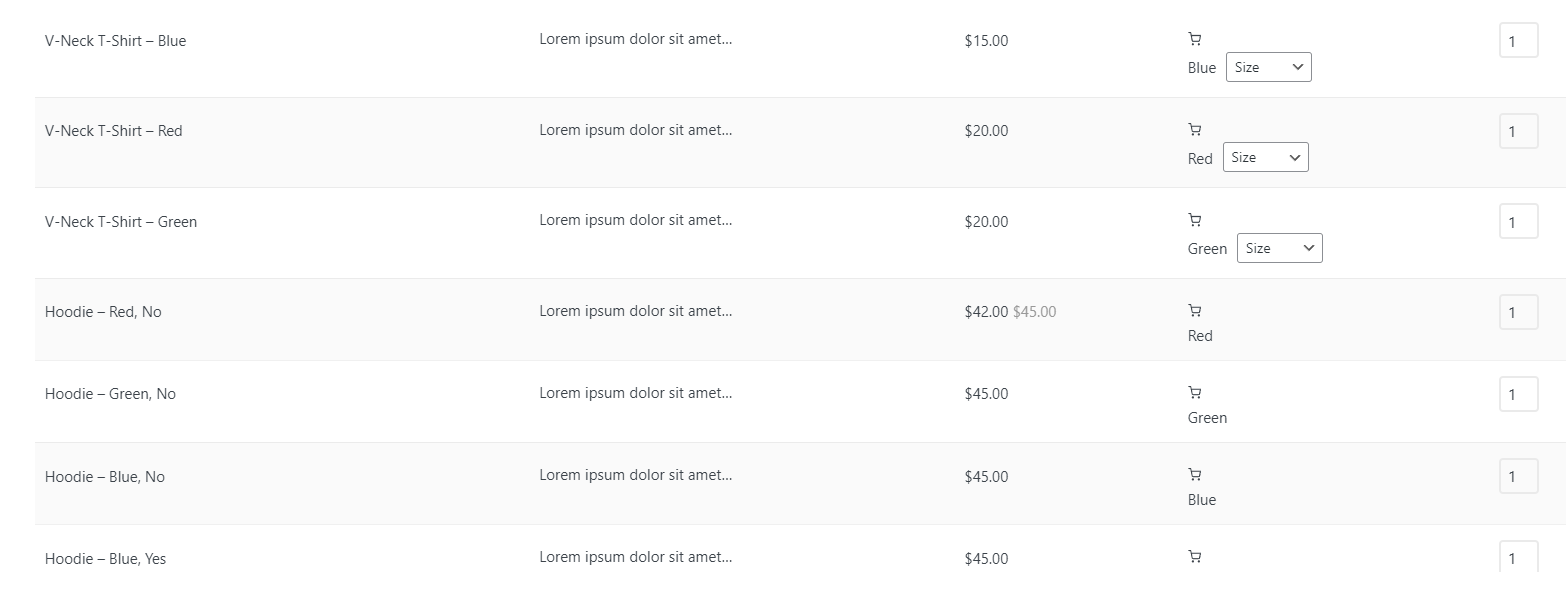
The final result of making the WooCommerce pricing table in this format is illustrated below:
Step 3: Add extra options to WooCommerce price list
The WooCommerce product table plugin provides flexible options for adding various features to your product table. The most useful tools you may need to improve the customer experience when reviewing your pricing table include quantity, filters, search boxes, and pagination. Let’s see how easy it is to enhance the efficiency of your product table by adding these features to the WooCommerce product table plugin.
Product pricing table with quantity column
The steps to add a Quantity box to your pricing table is exactly like other elements we have described before.
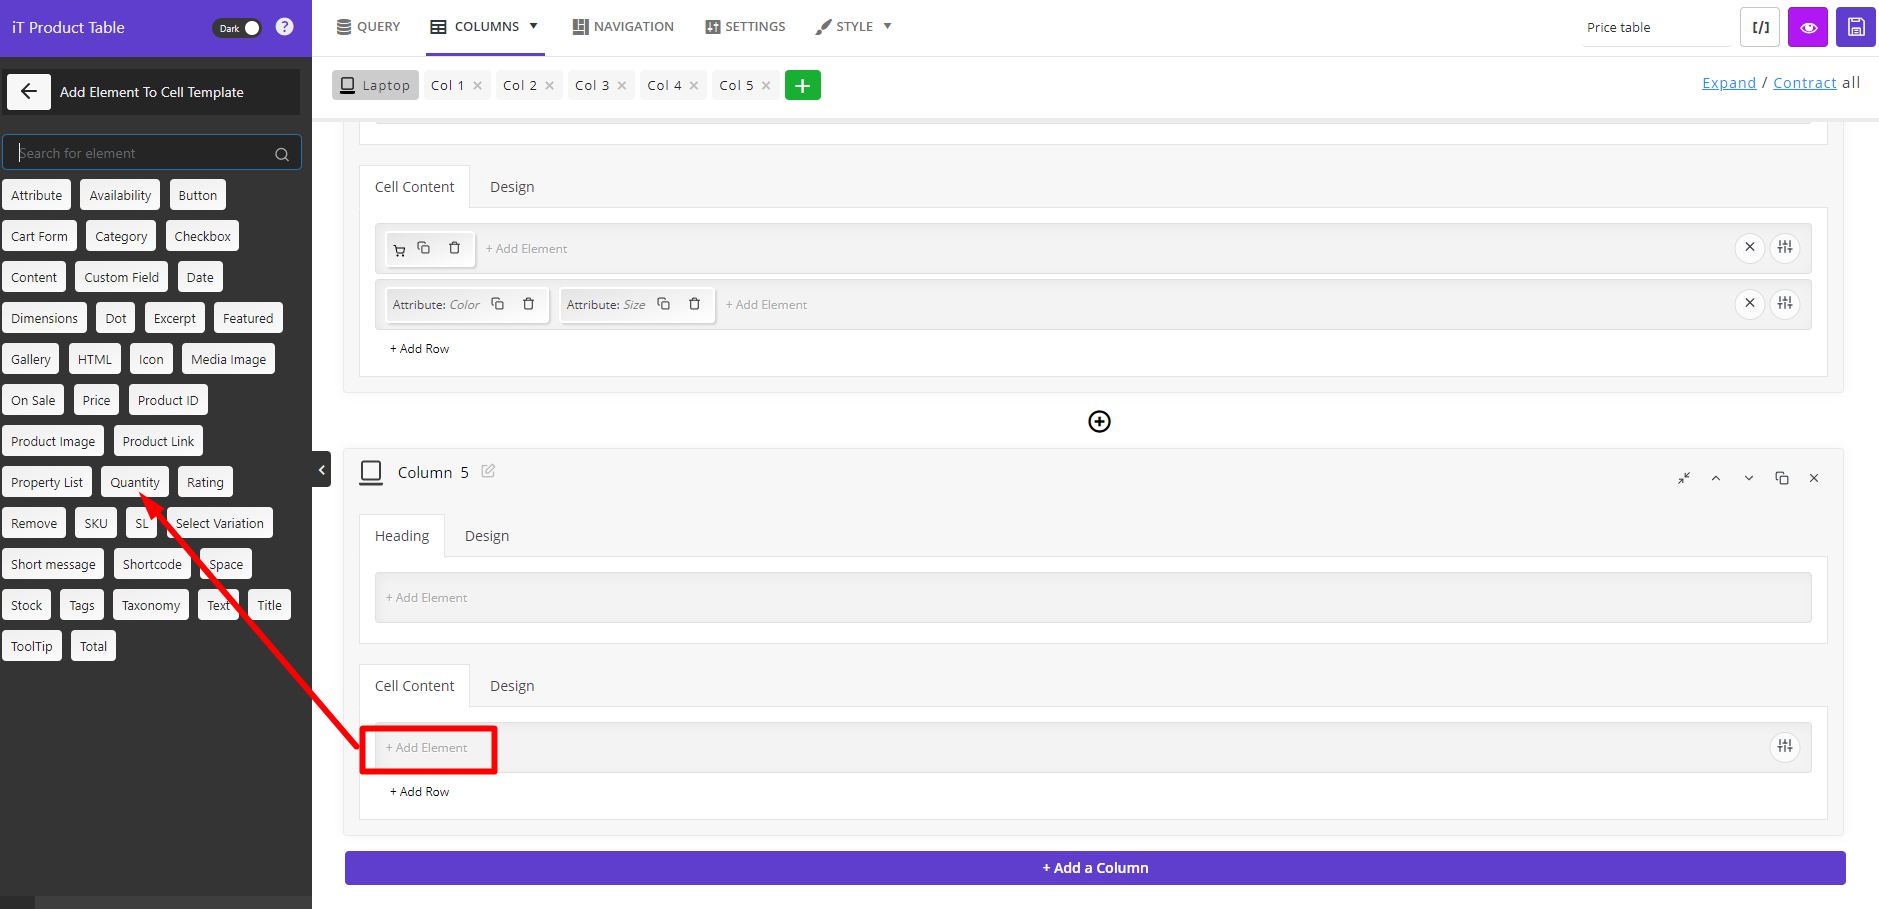
After adding a new column, you can add the Quantity element to the Cell content and customize its features by editing the items in the General and Style tabs.
As you can see in the below image, we added the Quantity box to the last column of the table. So customers can order multiple products at once.

Add price filter to product price table
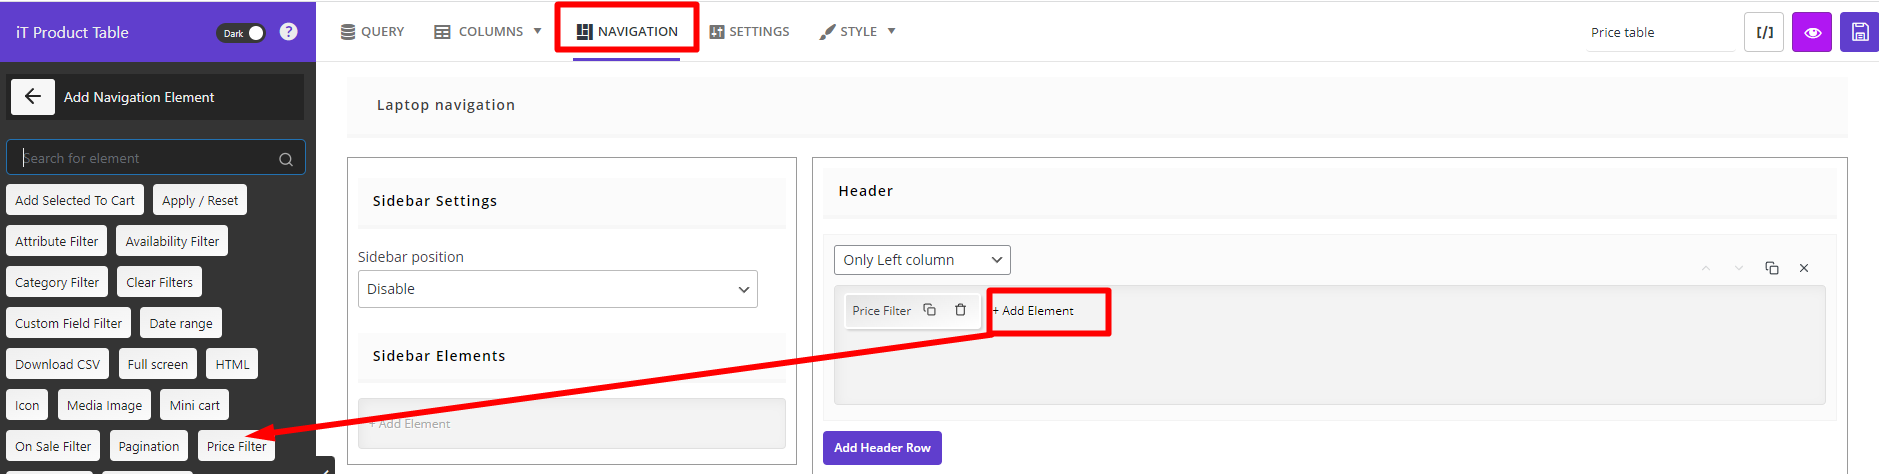
Filters are the most useful options that help customers to find their required products quickly and easily. In the WooCommerce product table plugin, you can set different types of filters and search boxes to the navigations of your table by following the below instructions:
- Go to the Navigation tab.
- Choose one of the Navigation bars, including the Sidebar, Header, and Footer.
- In the chosen navigation bar, click the Add Element option and select one of the Elements from the left panel to add the filter.
For example, we tried to add a price filter to the Header, as illustrated below:
After adding the Price filter element, you can customize its content in the Element Settings panel. By default, the price range is divided into 3 categories including:
- Up to $50
- $51-$100
- Over $100
However, you can change these ranges by editing the min and max price in each filter option and setting any label you want.

When you add this filter, the customers can choose one of the price ranges to filter the products based on their budgets.
Add products category filter on pricing table
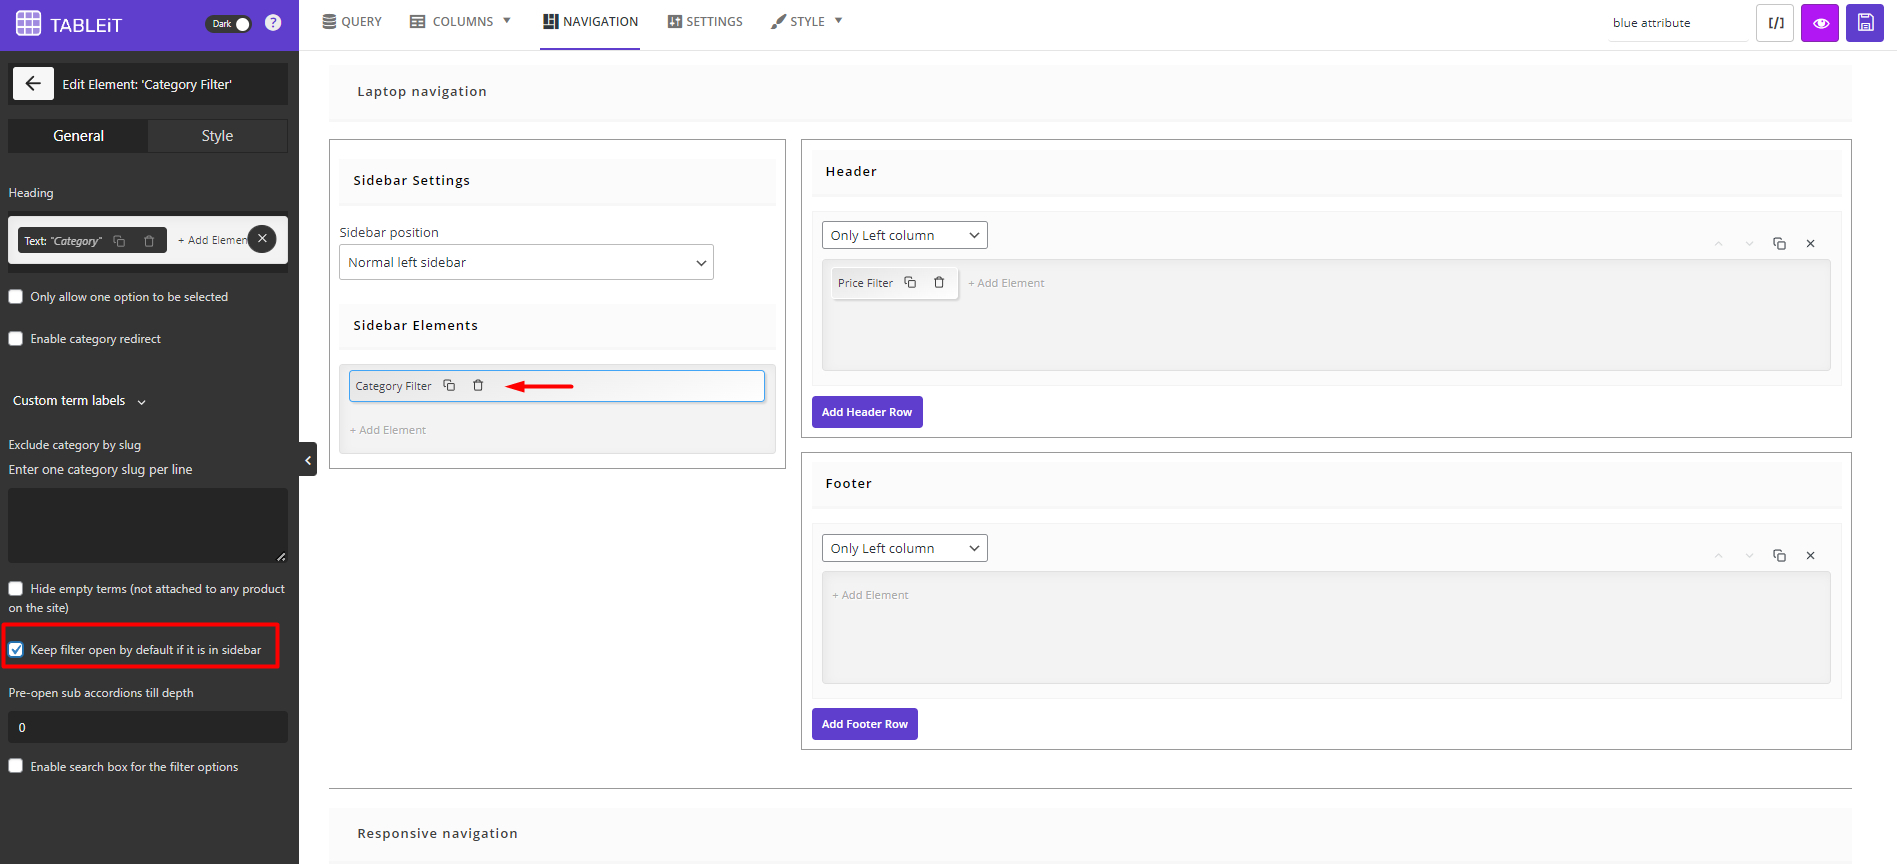
You can also add product category filter to the WooCommerce price list to let customers quickly find the products in one or more categories.
To show category filter, try to:
- Press Add Element in one of the navigation areas like sidebar.
- Choose Category filter element from the list of elements.
- Customize the items in the General tab. For example, if you want to always display a list of categories in the side bar of your WooCommerce price table, mark the “Keep Filter Open …” as illustrated below:
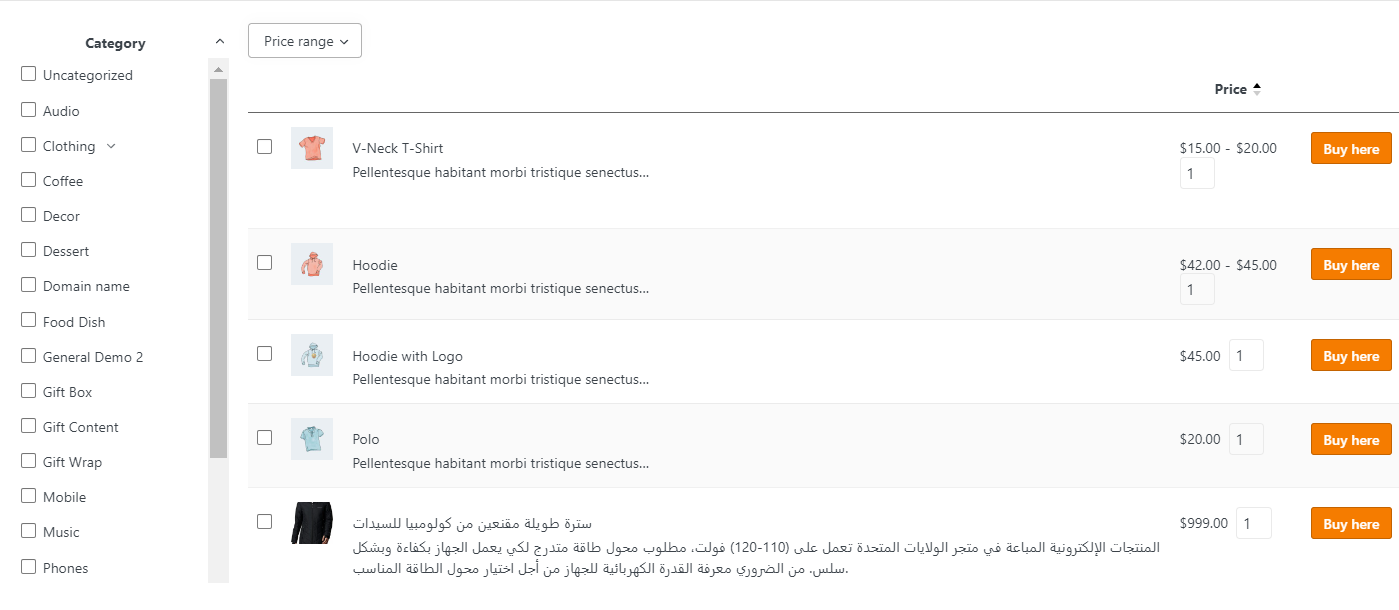
This is how the category filter is shown to the customers in theWooCommerce pricing table:
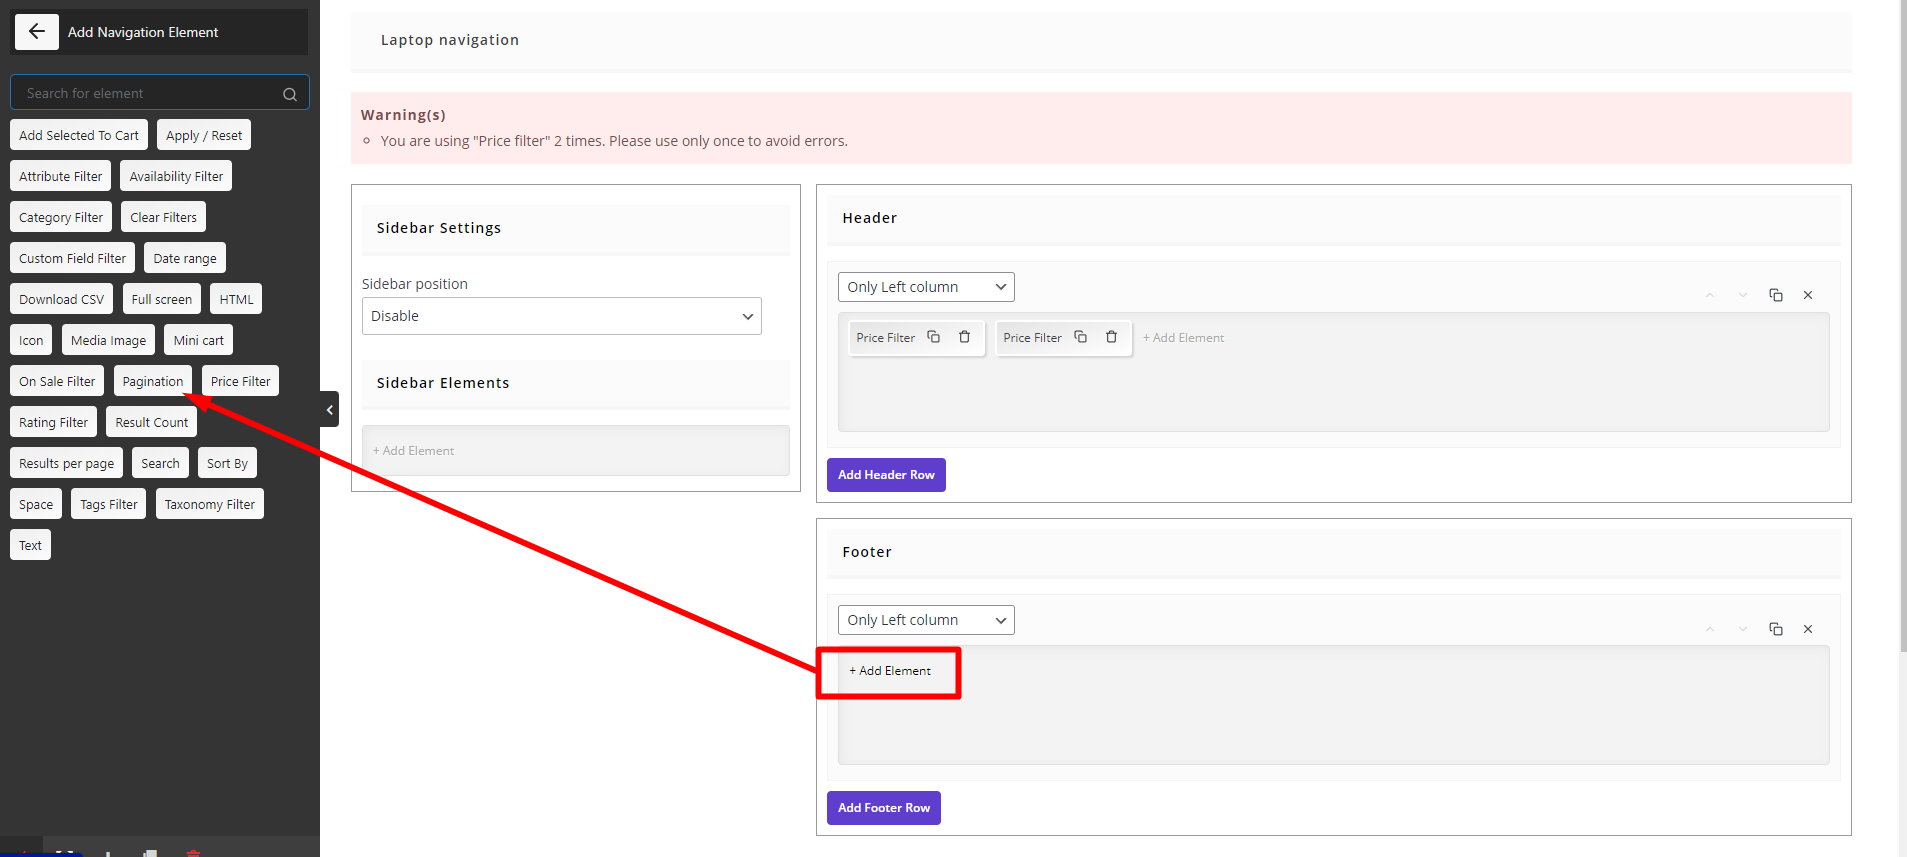
Pagination
Pagination is another practical option you can add to the navigation bar. As mentioned above, you can add pagination in the navigation bars like Footer by choosing the Add Element option and selecting Pagination from the list.
Now, by clicking on the Eye icon at the top of the table, you can preview your product table with all the extra options.
If the preview of your product table looks perfect, follow the next step to replace the shopping page of WooCommerce with this pricing table.
Show product quick view into the product pricing list
Product quick view is a customer friendly feature allows visitors to review a brief information about the product in the WooCommerce pricing tables. By adding this features, there is no need for customers to leave the shop page and visit the product page.
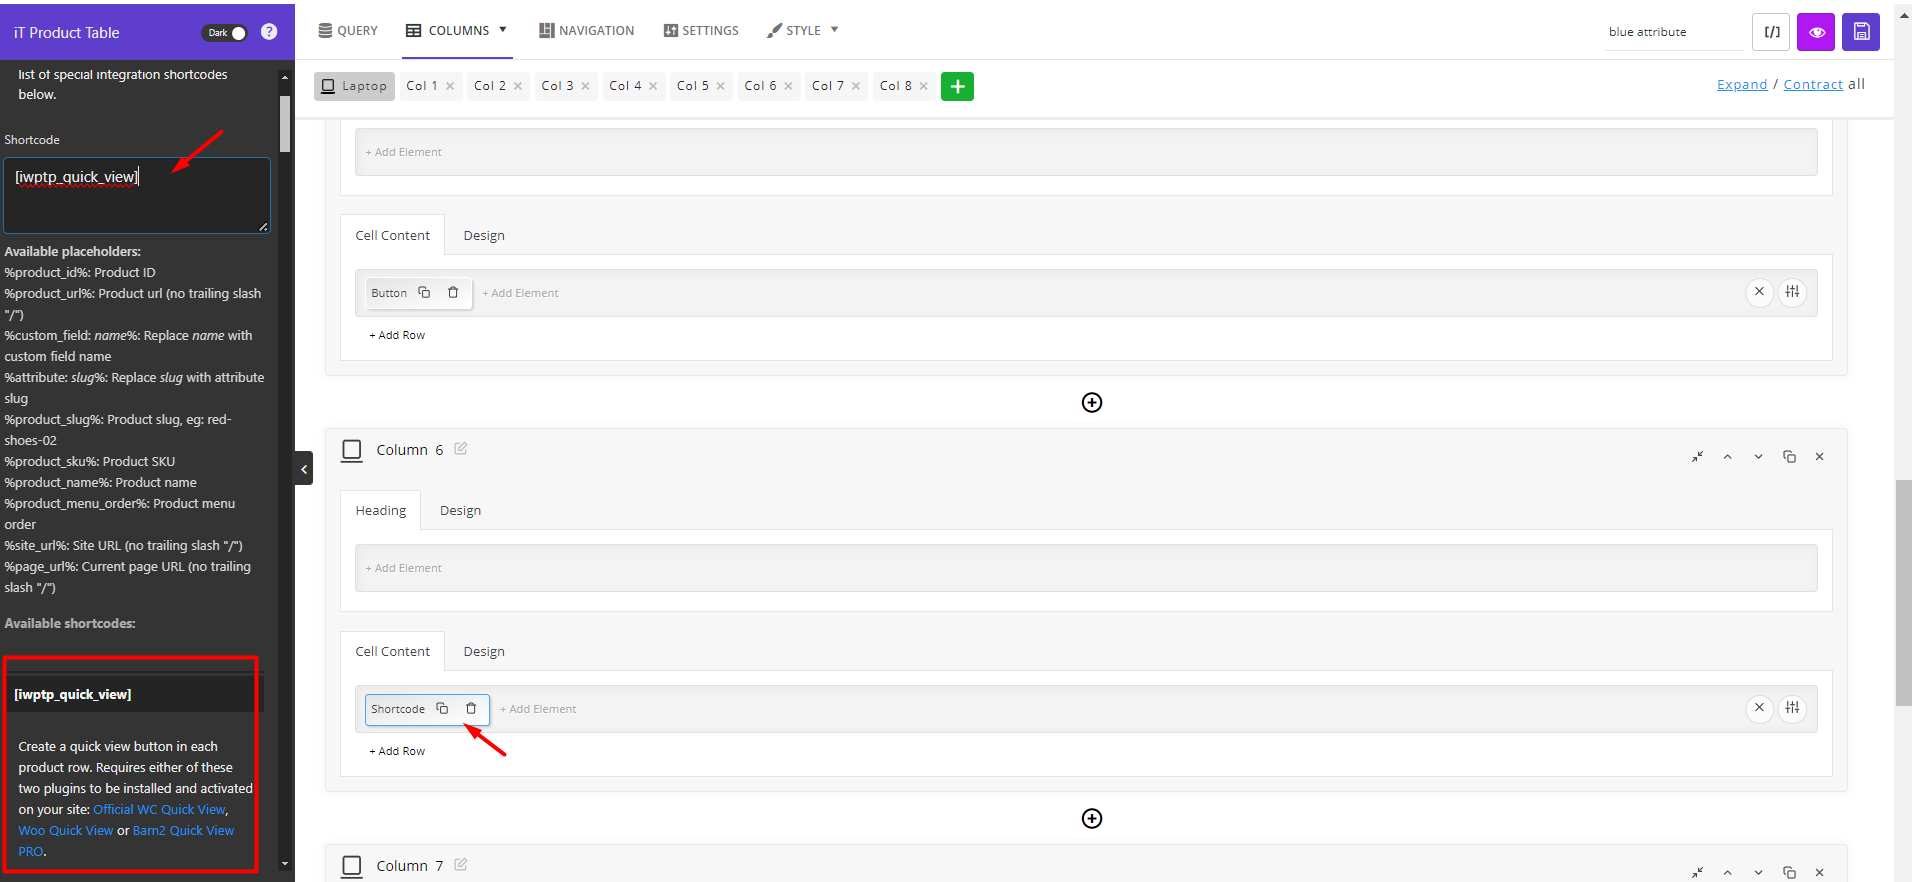
Our plugin is compatible with the most popular quick view plugins like Yith quick view. So, after installation one of the plugins, adding quick view option in WooCommerce pricing table plugin is easily possible by following the below steps:
- Add a new table column and choose Shortcode element from the left panel in the Cell Content area.
- Insert the Shortcode of your quick view plugin in the Shortcode field.
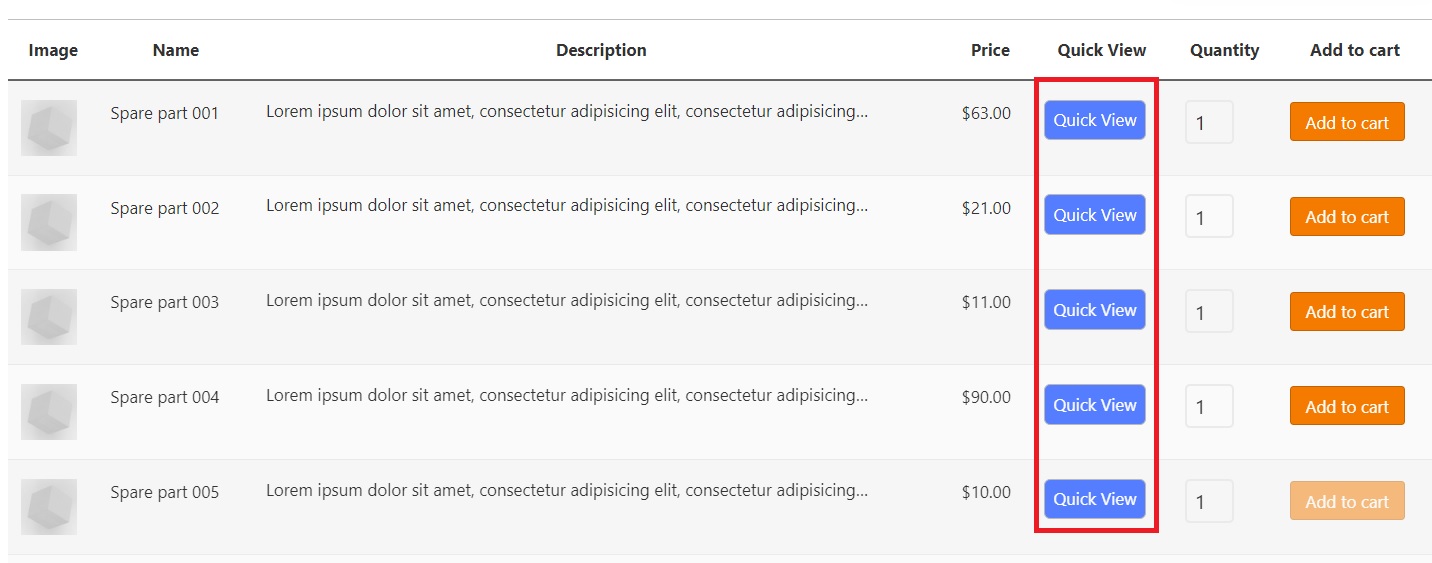
Now, the customers will see the Quick View button in the Woo Commerce pricing table in front of each product.
Step 4: Show the product price table to the customer by inserting Shortcode
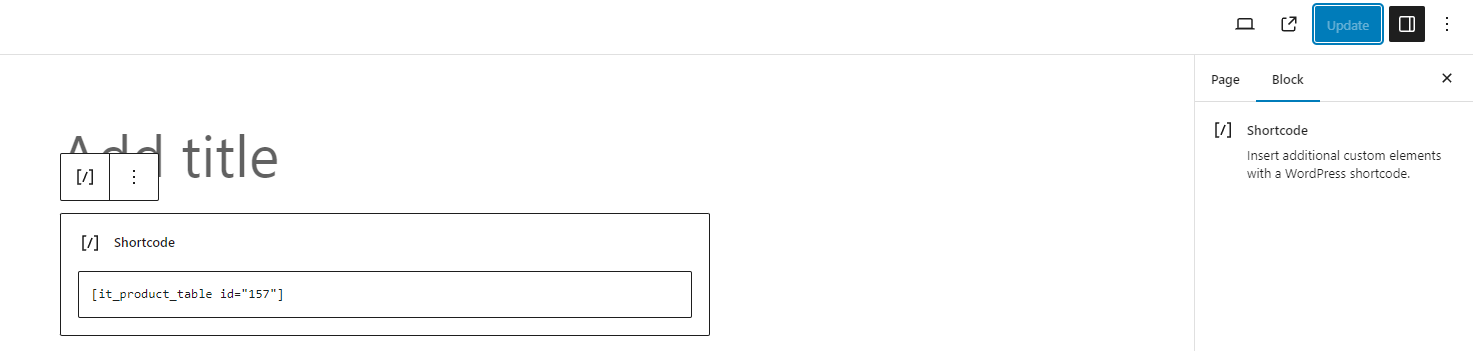
To show the product table to the customers, you can write a name in the text box at the top of the page and then copy its short code by clicking the Short code icon.
Then you just need to paste this short code to a new page of your WordPress site.
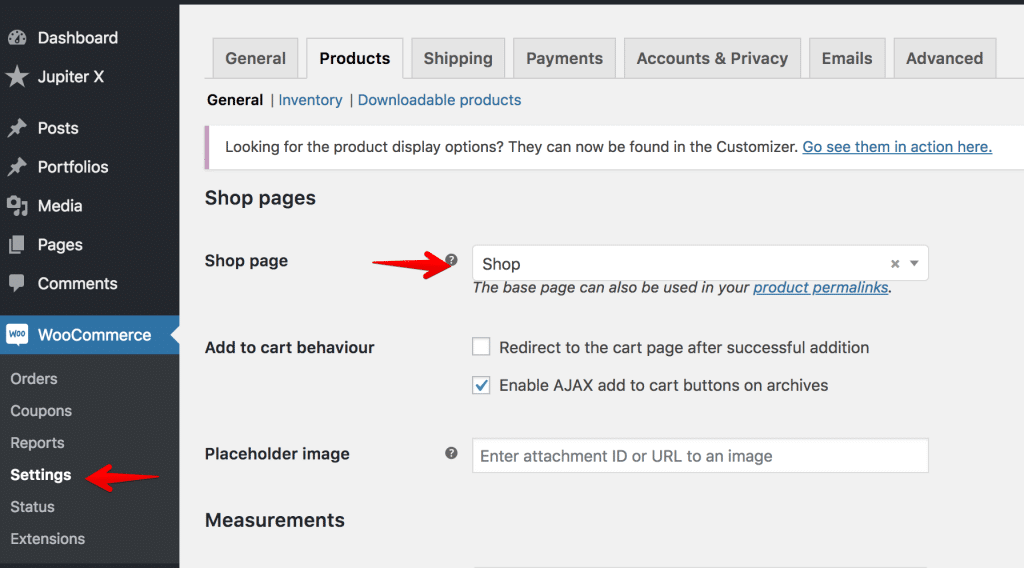
Finally, go to the WooCommerce settings and replace the shopping page of WooCommerce with this new page as illustrated below:
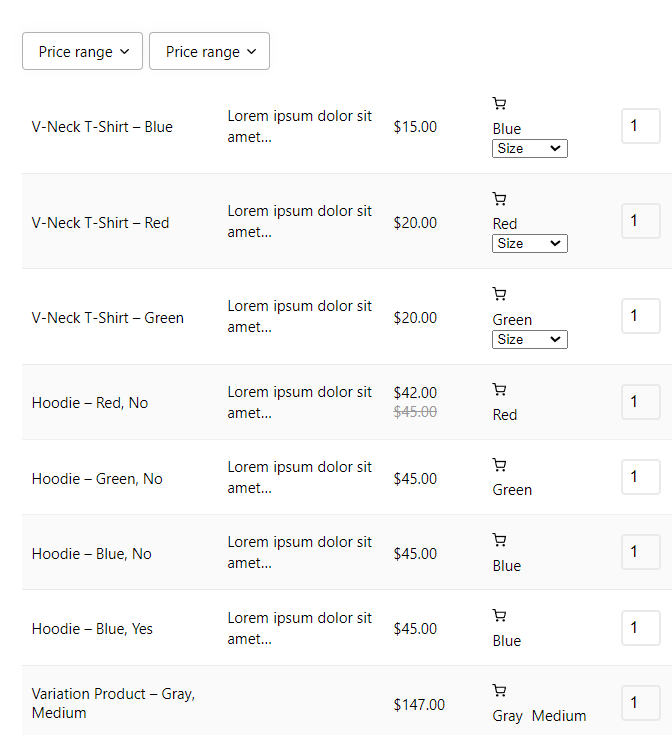
The final result which is displayed to the customers when they visit your shopping page is like this:
What are the Advantages of showing the WooCommerce pricing table to the customers?
WooCommerce pricing table can be used to display and share information such as product names, variations, and prices to customers. Displaying the price list of products is very important for some online stores such as stores that selling e-books, software, and music albums or for offering restaurant menus.
The most important advantage of displaying the product price table is that it significantly reduces the customer’s shopping time. Other advantages of WooCommerce price table include the following:
- Showcase your products or services at a competitive price.
- Let customers compare the features and prices of your products.
- Allow customers to decide which variations can meet their needs easily.
- Help customers to add products directly to their carts.
In addition, a well-designed pricing table helps consumers make shopping decisions faster and avoid browsing other websites. An attractive and professional pricing table will attract more consumers, thus increasing your overall sales.
Why showing pricing table WooCommerce is important on shopping page?
A shopping page is one of the vital pages of your online store. When a customer visits this page, they have already decided to buy and want to know the price of your products.
That is why a professionally designed pricing table helps customers to have complete information about your product, price, and variations.
The main purpose of the pricing table is to help customers choose the product they want at the most suitable price and in the shortest possible time.
TABLEiT – Product Table for WooCommerce
The easy way to make a product pricing table in WooCommerce
Conclusion
Creating a professional WooCommerce pricing table is one of the best ways to improve product visibility and simplify the shopping process for your customers. A well-designed product pricing table allows shoppers to compare products, check prices, select variations, and add products to the cart without leaving the page.
With TABLEiT – Product Table for WooCommerce, you can build fully customizable WooCommerce price tables without coding. The plugin gives you complete control over table columns, filters, quick view options, pagination, product variations, and navigation tools to create a faster and more engaging shopping experience. Whether you sell software, digital products, restaurant menus, wholesale items, or variable products, using a WooCommerce pricing table plugin can help increase customer satisfaction and boost overall sales.
After creating the pricing layout, test whether customers can compare and order without unnecessary clicks. Read more about the complete table experience.
FAQ
What is a WooCommerce pricing table?
A WooCommerce pricing table is a structured table layout that displays products, prices, variations, descriptions, and add to cart options in rows and columns. It helps customers compare products quickly and place orders faster.
Why should I use a WooCommerce pricing table plugin?
WooCommerce does not include a built-in feature for displaying products in table format. TABLEiT – Product Table for WooCommerce allows you to create responsive and customizable product tables with filters, quantity boxes, variation support, pagination, and quick view functionality.
Can I show product variations in separate rows?
Yes. TABLEiT – Product Table for WooCommerce allows you to display each product variation in individual rows so customers can easily compare variation prices and add them directly to the cart.
Is it possible to add filters to a WooCommerce price table?
Yes. TABLEiT – Product Table for WooCommerce supports advanced filters such as category filters, price filters, search boxes, and navigation tools to help customers find products faster.
Can I replace the default WooCommerce shop page with a pricing table?
Yes. After creating your pricing table in TABLEiT – Product Table for WooCommerce, you can insert the shortcode into a new page and set it as the default WooCommerce shop page.
Does the WooCommerce pricing table support mobile devices?
Yes. TABLEiT – Product Table for WooCommerce is designed to create responsive pricing tables that work smoothly on desktops, tablets, and mobile devices.
Can I add an add to cart button inside the pricing table?
Yes. TABLEiT – Product Table for WooCommerce lets you add add-to-cart buttons, quantity selectors, and quick purchase options directly inside the table for a faster checkout experience.
Who should use a WooCommerce product pricing table?
WooCommerce pricing tables are especially useful for stores selling software, digital downloads, restaurant menus, wholesale products, music, eBooks, or stores with many product variations and categories.