
A price filter is one of the most useful features for any WooCommerce store with multiple products. When customers can filter products by price, they can quickly find items that match their budget instead of browsing long product lists or leaving the shop page too early.
WooCommerce includes basic price filter options, such as the Filter by Price block and the price filter widget. These options can work for simple shop pages, but they may feel limited when you want to display products in a table, add custom price ranges, show product details in columns, or create a faster shopping experience.
In this step-by-step guide, you’ll learn how to create a WooCommerce product table with a price range slider filter using TABLEiT – Product Table for WooCommerce. We’ll show you how to add product columns, display prices clearly, create price range filters, and help customers find the right products faster from one clean table layout.
A price slider is most useful when it complements search, categories, and attributes. Review the broader filtering strategy before building the final navigation system.
Quick Answer:
A price range slider filter helps customers narrow WooCommerce products by budget directly inside a product table. Instead of browsing every item manually, shoppers can move the slider to show only products within their preferred price range. The best way to add this feature without coding is using TABLEiT – Product Table for WooCommerce.
After installing the plugin, go to WordPress Dashboard > iThemeland > TABLEiT and create or edit your product table. In the table builder, configure the Query and Columns sections first, then open the navigation or filter settings and add a Price Range Slider filter. Set its position, display style, and relation with other filters, then publish the table on the shop page using the generated shortcode.
This feature is useful when customers compare products by price, especially in stores with many similar items. TABLEiT plugin makes the process more flexible than a default WooCommerce filter because the price slider can work together with table columns, search, sorting, category filters, attribute filters, and direct add-to-cart actions.
Why do WooCommerce online stores need a product price filter?
WooCommerce price filter is a guiding feature, helping customers find their ideal choices among a vast range of products. Considering the fact that most customers have little interest in performing manual searches to locate their required products on your online shop, it is very important to provide them price filter slider to give them no excuse for leaving your store. In addition to customer satisfaction, price filter WooCommerce has more advantages including:
Improve customer buying experience
Filters are a key tool for any WooCommerce site, as customers can simply get tired of combing through numerous website pages searching for the product they need, and filters make this task much easier. The price filter makes it easier to find products by allowing users to select products by WooCommerce price range, which significantly speeds up the time it takes to find the desired option.
Show your respect to customers
When customers see multifunctional filters like filter by price on your online shop, they understand that respect their requirements. Such feelings convince them to have a positive reaction and order goods from your site.
Improve conversions rate
Providing WooCommerce filter by price, and other fields like category, attributes, etc. facilitates the purchasing journey for customers and makes the process hassle-free and less time-consuming. Enhancing customer satisfaction and giving the ability to the customers to find exactly what they are looking for, result in increasing conversion rates and boosting your sales.
Creating price range slider filter by HTML code
If you want to have a list of products manually and display the price range slider to customers so that they can filter the desired products based on the price of the rows in the table, you can use the following code.
Using HTML, CSS, and JavaScript, This code creates a list of your products and also displays a price range slider filter.
<!DOCTYPE html>
<html>
<head>
<style>
table {
width: 100%;
}
th, td {
border: 1px solid #ddd;
padding: 8px;
text-align: center;
}
th {
background-color: #f2f2f2;
}
input[type="range"] {
width: 100%;
}
#price-range {
margin-top: 10px;
}
</style>
</head>
<body>
<h2>Product Table with Price Range Filter</h2>
<input type="range" id="price-range" min="0" max="100" step="1" value="0">
<p>Price Range: <span id="price-value">0</span></p>
<table>
<thead>
<tr>
<th>Product Name</th>
<th>Price ($)</th>
</tr>
</thead>
<tbody id="product-table">
<tr>
<td>Product 1</td>
<td>50</td>
</tr>
<tr>
<td>Product 2</td>
<td>75</td>
</tr>
<tr>
<td>Product 3</td>
<td>30</td>
</tr>
<tr>
<td>Product 4</td>
<td>90</td>
</tr>
</tbody>
</table>
<script>
const priceRange = document.getElementById('price-range');
const priceValue = document.getElementById('price-value');
const productTable = document.getElementById('product-table');
priceRange.addEventListener('input', () => {
priceValue.textContent = priceRange.value;
filterProductsByPrice(priceRange.value);
});
function filterProductsByPrice(maxPrice) {
const rows = productTable.getElementsByTagName('tr');
for (let i = 1; i < rows.length; i++) {
const cell = rows[i].getElementsByTagName('td')[1];
if (cell) {
const price = parseInt(cell.textContent);
if (price <= maxPrice) {
rows[i].style.display = '';
} else {
rows[i].style.display = 'none';
}
}
}
}
</script>
</body>
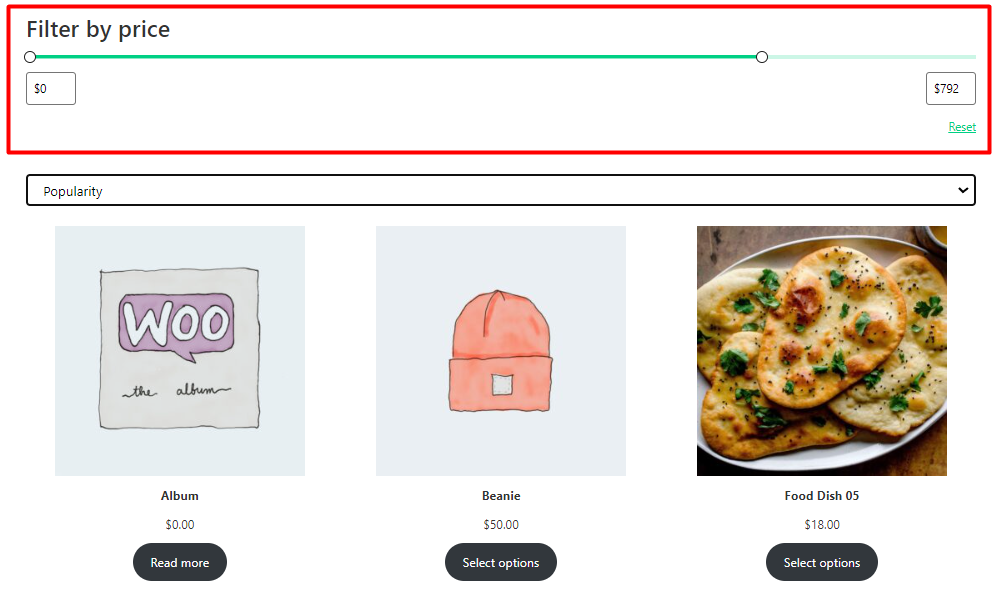
</html>Add the default WooCommerce price filter widget to your shop page
WooCommerce price filter lets you display a price filter slider on the shop page and enables customers to set low and high prices to filter the list of products. In this way, they can quickly find products within their budget.
WooCommerce price slider can appear either by WordPress block editor or WordPress Widgets. Continue reading to learn how to add product price filters in WooCommerce with both methods.
Method #1: Insert WooCommerce price slider by block editor (Gutenberg)
To add a WooCommerce price range filter by block editor, you need to use WooCommerce in conjunction with Gutenberg (Block Editor). Let’s review how to use blocks for displaying the WooCommerce price filter in 3 simple steps:
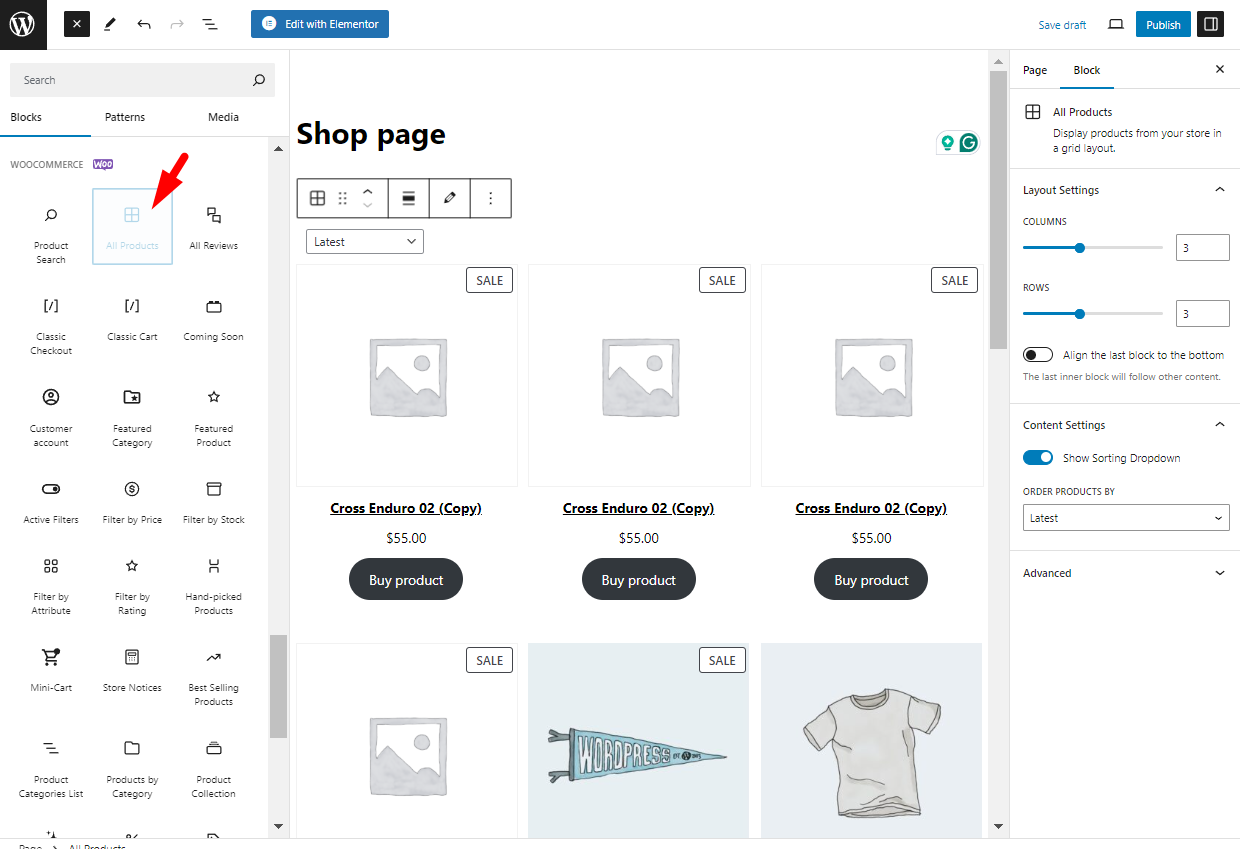
Step 1: Insert All Products block
The filter by price in the WooCommerce block only works when you have added the All Products WooCommerce block to your shop page. Otherwise, the filtering feature won’t work.
So, your first task is to open the Block Editor and click on the All Products block under the WooCommerce section.
Adding this block results in listing all products in a grid view which is designed with a 3×3 layout. However, you can set how many rows and columns that grid list includes, and configure the order in which products display.
Step 2: Add WooCommerce price filter block
Once you add the All Products block, it is time to add the filter by price WooCommerce block on top of the product grid:

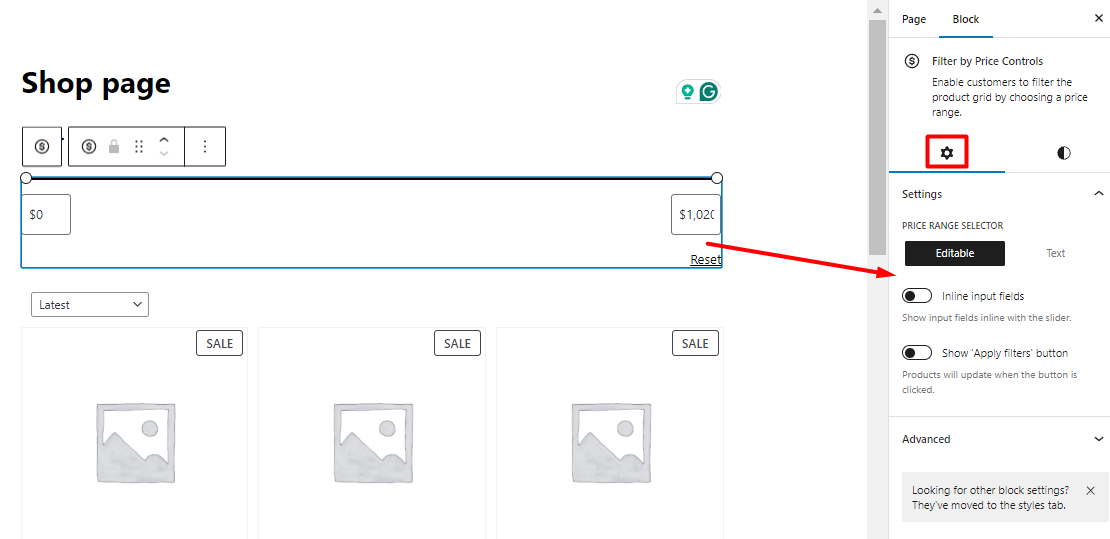
You can search Filter on the search box and then select Filter by Price to place this block on the shop page. Then use the Up and Down arrows to bring it above the list:

The element automatically sets the lowest and highest price range for the slider. You can change these prices by inserting your preferred price in the low and high textboxes.
There are also some configuration settings available in the right panel allowing you to configure how the WooCommerce price slider looks and works.
Step 3: Configure WooCommerce price slider block settings
After adding the filter by price WooCommerce block, you can customize it as follows:
In the Setting panel (the gear icon), you have access to the below configuration:
- Choose either Editable or Text price options. If you choose the Text option, customers can only use the slider to filter products. Otherwise, the Editable option enables them to insert the price manually in the text boxes.
- Enable/disable show input fields inline with the slider.
- Enable/disable showing the “Apply Filter Button”. Enabling this option means users need to confirm the price range they set by pressing the Apply Filter button.
- In the Color panel, you can choose one of the preset colors to set for the slider and text of the price filter:
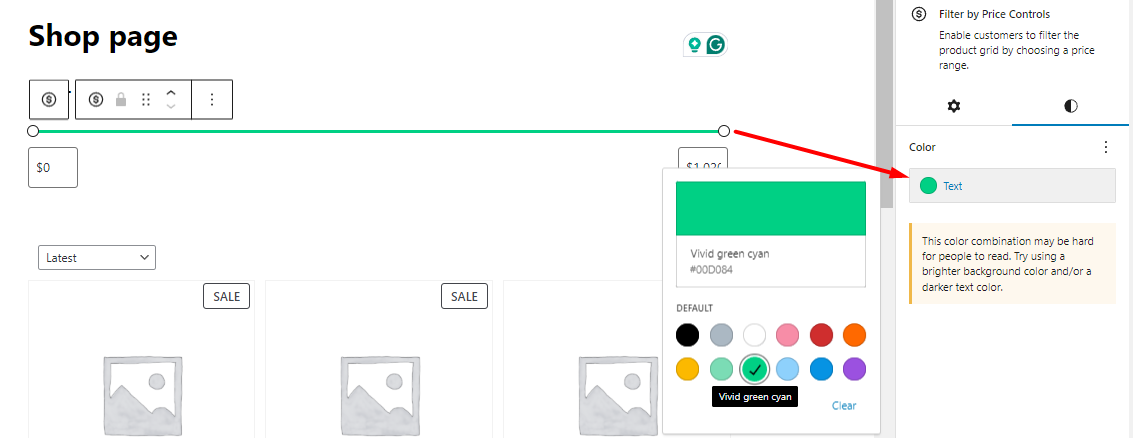
- Finally, you can change the heading of the WooCommerce price filter by clicking on the heading and customizing the configuration items in the right panel like Color, Font, size, etc.:
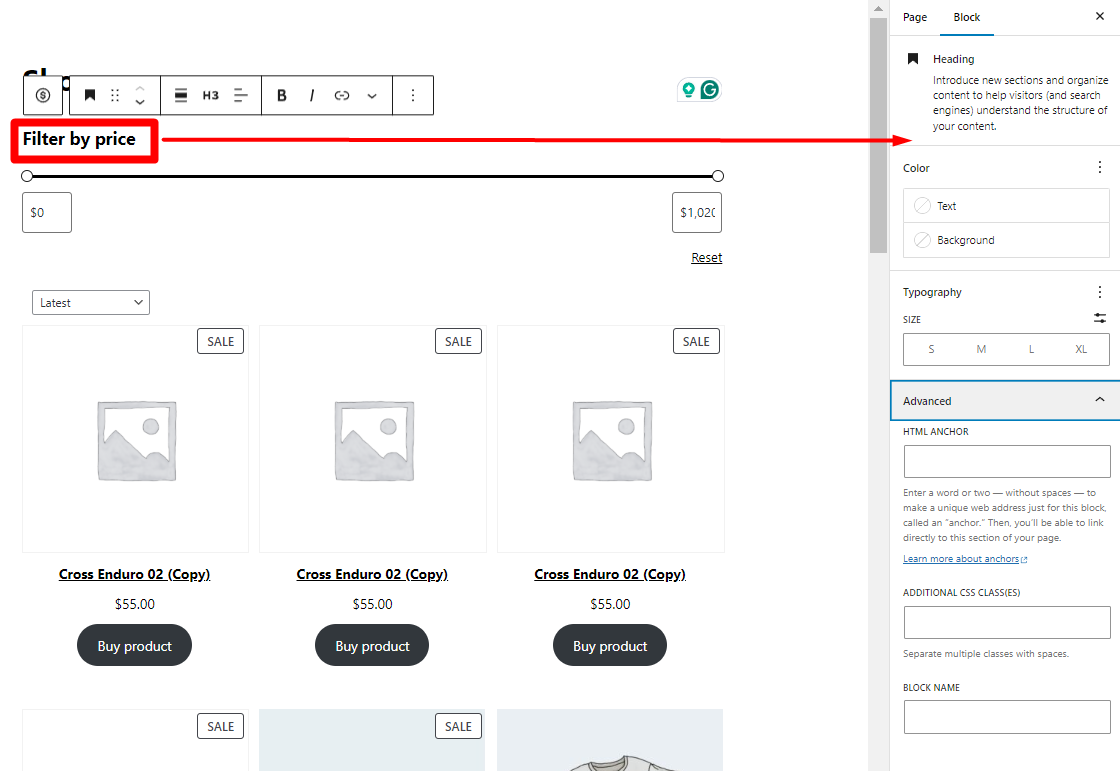
The final result looks like below:
Method #2: Use the Widget to add a filter by price in WooCommerce
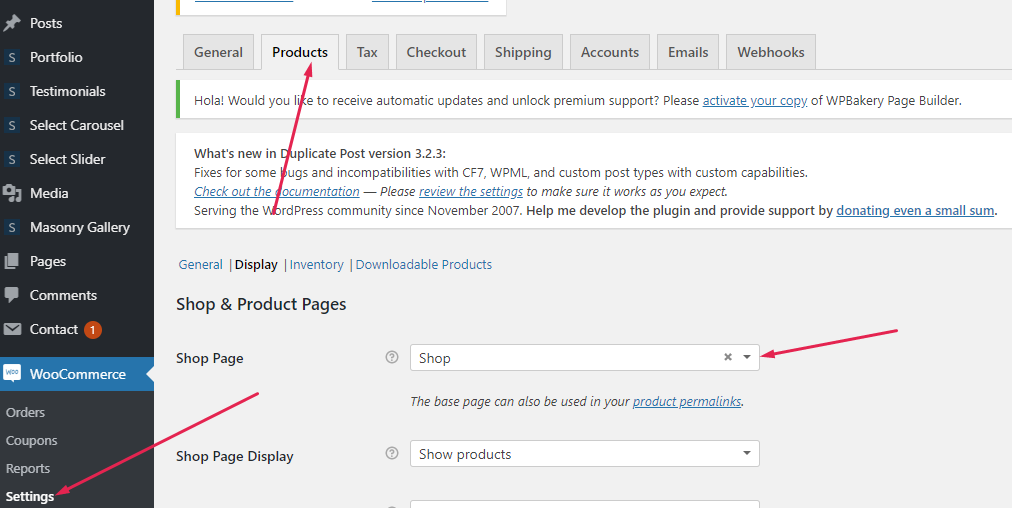
The Price Filter widget is a simple way to add a price filter slider to the sidebar of the default WooCommerce shop page. Once you install and activate WooCommerce, the WooCommerce shop pages will be added to your website automatically. However, you can set another page as the WooCommerce shop page by navigating to the address below:
WordPress Dashboard > WooCommerce > Settings > Products
Then you can open the Shop Page field dropdown list and choose one of the published pages in your website as the default shop page.
Now, you are ready to add a WooCommerce price filter to the sidebar by following the below steps:
Step 1: Choose the right widget area in the sidebar
To enable the right widget area in the sidebar, first, you need to go to the WordPress Dashboard > Pages > All pages.
Then find the default WooCommerce shop page, hover over it, and press Edit bottom.
According to the WordPress theme you are using, you can change the template of this page in such a way that the sidebar is displayed on the page. This is done in two ways:
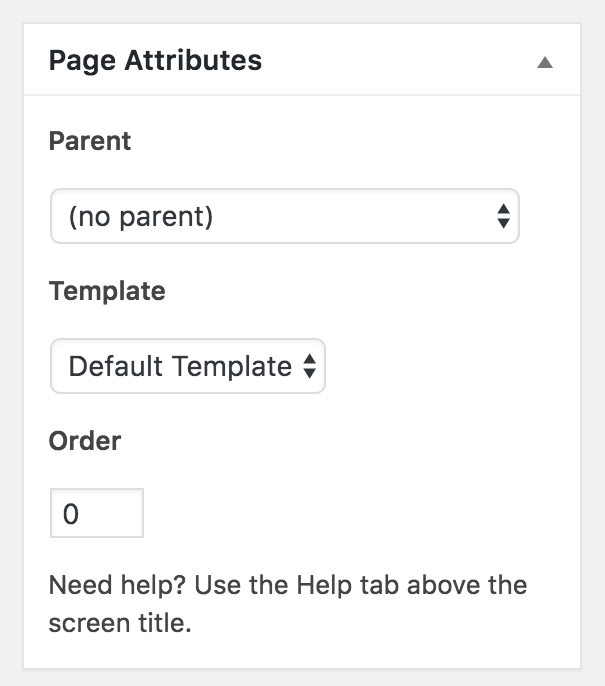
- If a special template is defined in your theme for pages that have a sidebar, you can select it from the Page Attribute meta box. For this navigate to the Page Attribute meta box, find the Template field, and finally select Sidebar Template from available options.
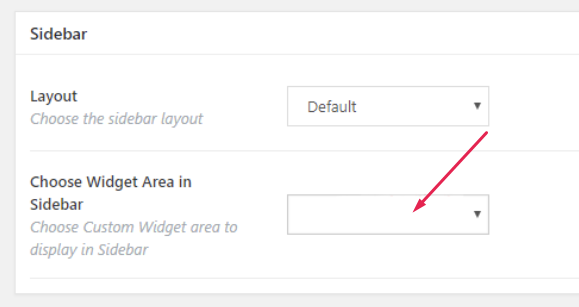
- In some WordPress themes, there are settings for each page that you can define the widget area you want for the sidebar. If your template has this possibility, use it to define the sidebar and the widget area displayed in the sidebar.
Step 2: Enable the WooCommerce price filter widget
The next step is adding the WooCommerce price filter to the Widget area in the sidebar by following these steps:
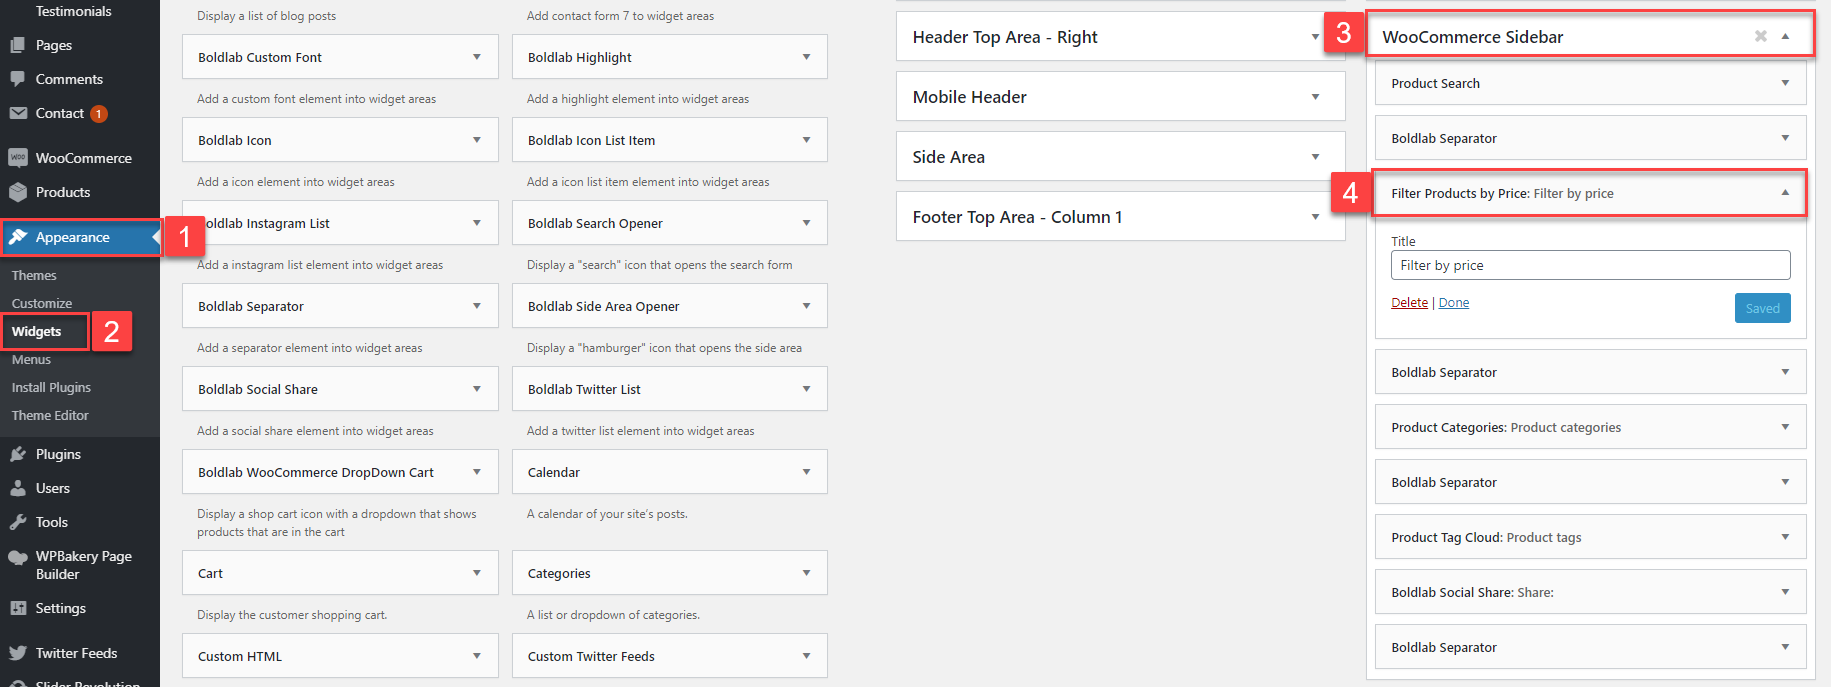
- navigating to WordPress Dashboard > Appearance (1) > Widgets (2).
- Open your desire widget area. WooCommerce sidebar in this example (3).
- Drag the Filter Products by Price widget and drop it into the widget area that you selected in the previous step (4).
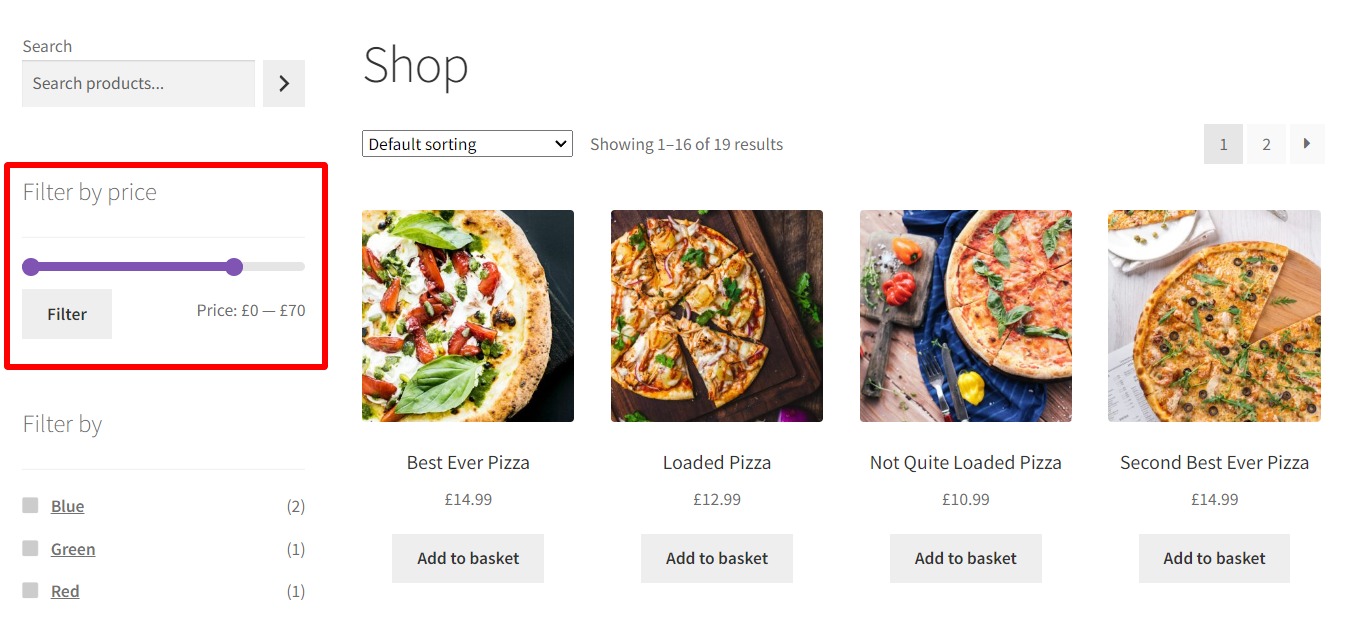
The price filter WooCommerce has no special configurations and the WooCommerce price filter widget will be displayed on the shop page based on your Theme configurations. It may look like a sidebar slider like below :
Limitations of WooCommerce price slider filter
The WooCommerce price slider can be used as a basic option for improving the appearance and functionality of your shop page. However, it has some limitations that make you use a WooCommerce price filter plugin, including:
- Slow loading: The filter by price WooCommerce widget doesn’t use AJAX. So, customers must wait to reload the page every time they set a new price.
- Limited customization option: The configuration settings available for the WooCommerce price filter widget need to be more flexible. You are not able to modify the size or tweak other features to make the filtering feature more attractive.
- It’s rather tricky to use: From a technical perspective, the WooCommerce price widget lacks intuitiveness. The price slider does not display boxes showing the price ranges selected by shoppers, making the ranges less visually accessible and diminishing the overall filtering experience.
For all of these reasons, It makes sense to think about using the WooCommerce price filter plugin allowing you to create a great experience for your customers when ordering from your shop.
In the next part, we want to introduce the WooCommerce product table plugin as one of the best solutions for creating eye-catching and efficient WooCommerce stores. The tools and options available in this plugin allow you to show all of your products in a table view and add as many filters as you need to different navigation bars.
Creating a product table with a price range slider filter by using WooCommerce product table plugin
The WooCommerce product table plugin is one of the most powerful WooCommerce plugins for creating a product table and adding various features like a price filter slider. Using the WooCommerce product table pro plugin, you can add all the filters needed for the store to the product table.
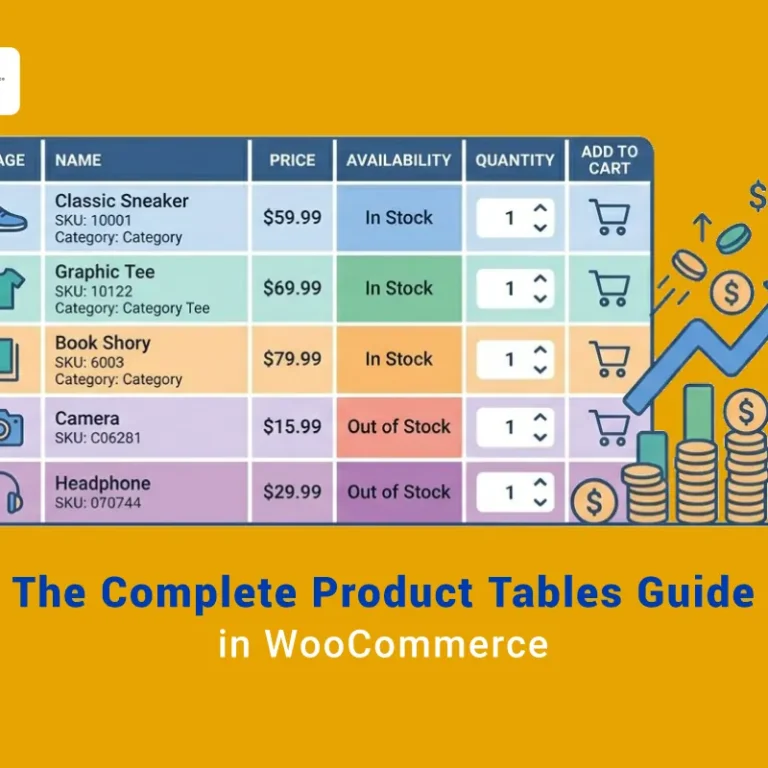
This plugin is designed with a responsive and flexible, as well as a simple user interface. It allows you to display a list of products in the table and show different categories and features such as price, colour, size, price range, in-stock quantity, and more in the table columns to the customers.
Now let’s see how easy is to create a product table with WooCommerce price filter slider in this plugin.
Step 1: Install the WooCommerce product table plugin
To use the WooCommerce product table pro plugin, first, you need to download and install it on your WordPress website.
Now, you can find iT Product Table in the WordPress dashboard with three options:
- All table
- Add new table
- Settings
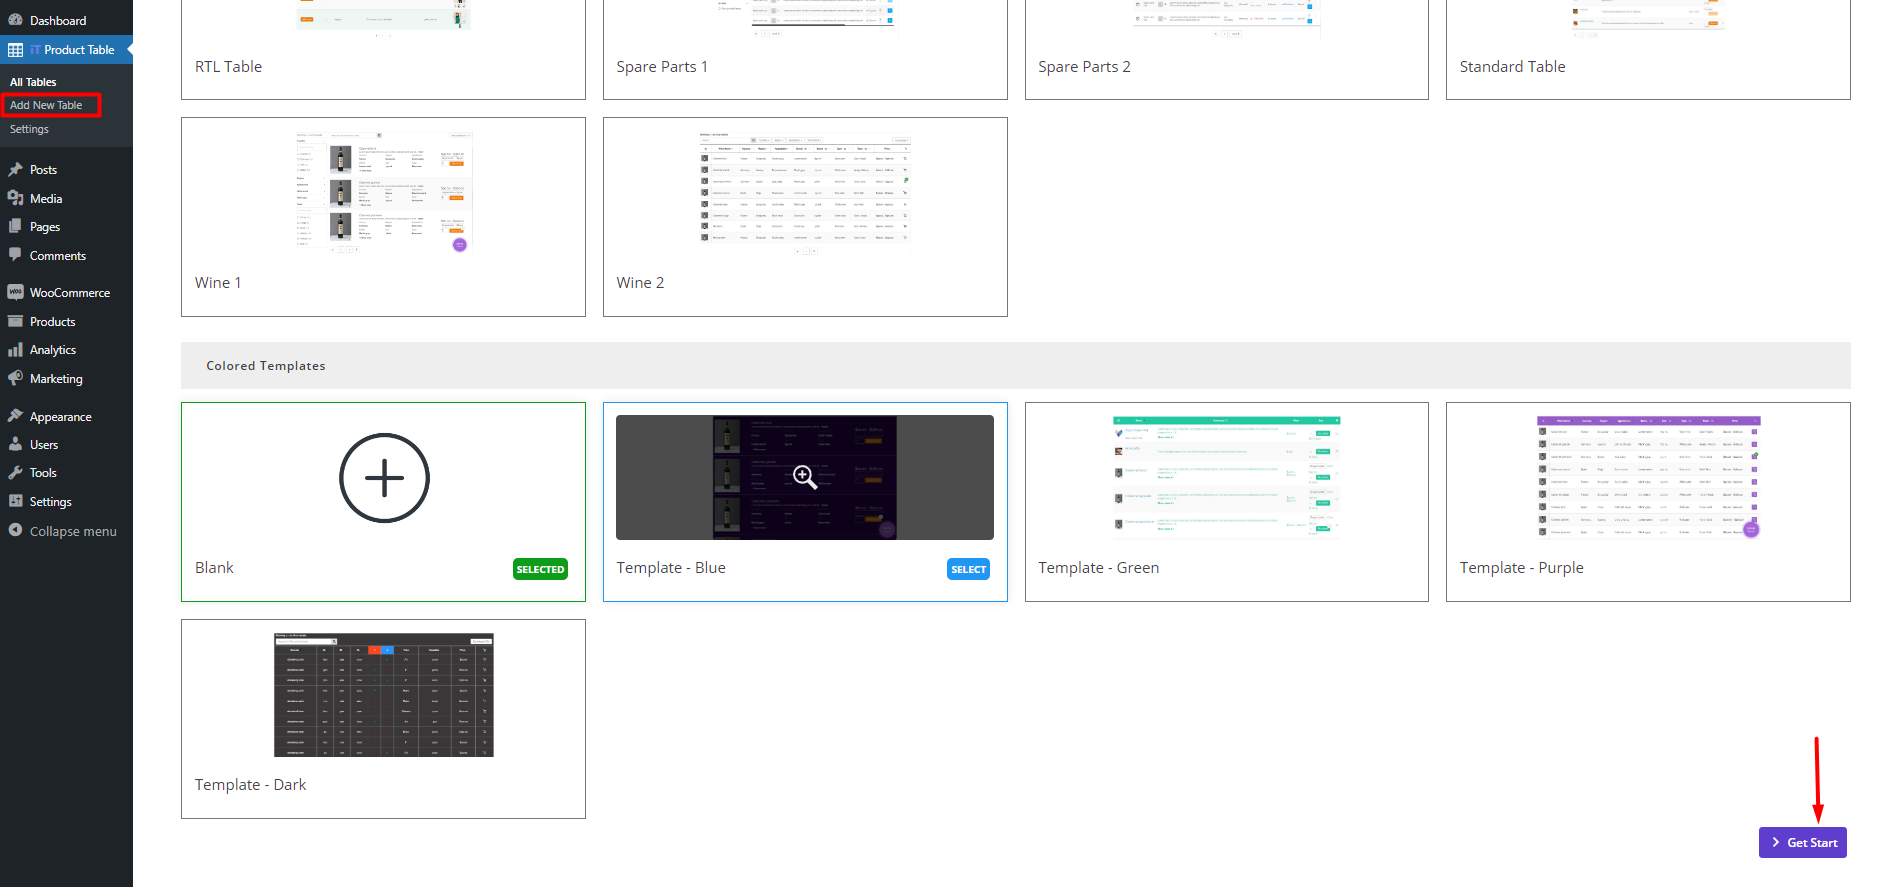
To create a product table with WooCommerce price filter slider, click on the Add new table option, then scroll the page and click on the Get start button.
You can also choose one of the preset templates to design your product table.
TABLEiT – Product Table for WooCommerce
The easy way to create an interactive product table with price range slider filter in WooCommerce

Step 2: Add columns to your product table
By creating a new table, our plugin inserts all of your WooCommerce products into the table, automatically. However, you can go to the Query tab and customize which products to be displayed in the table.
Let’s suppose that you make a query from your products and you want to add some columns to your table to show the product features to the customers. To make this happen, you need to follow the below steps:
- Open the Columns tab.
- Press the Add a Column button at the middle of the page to see the new column box with two sections: Heading and Cell content.
- You can customize each one by pressing the Add Elements option and choosing one of the elements displayed in the left panel
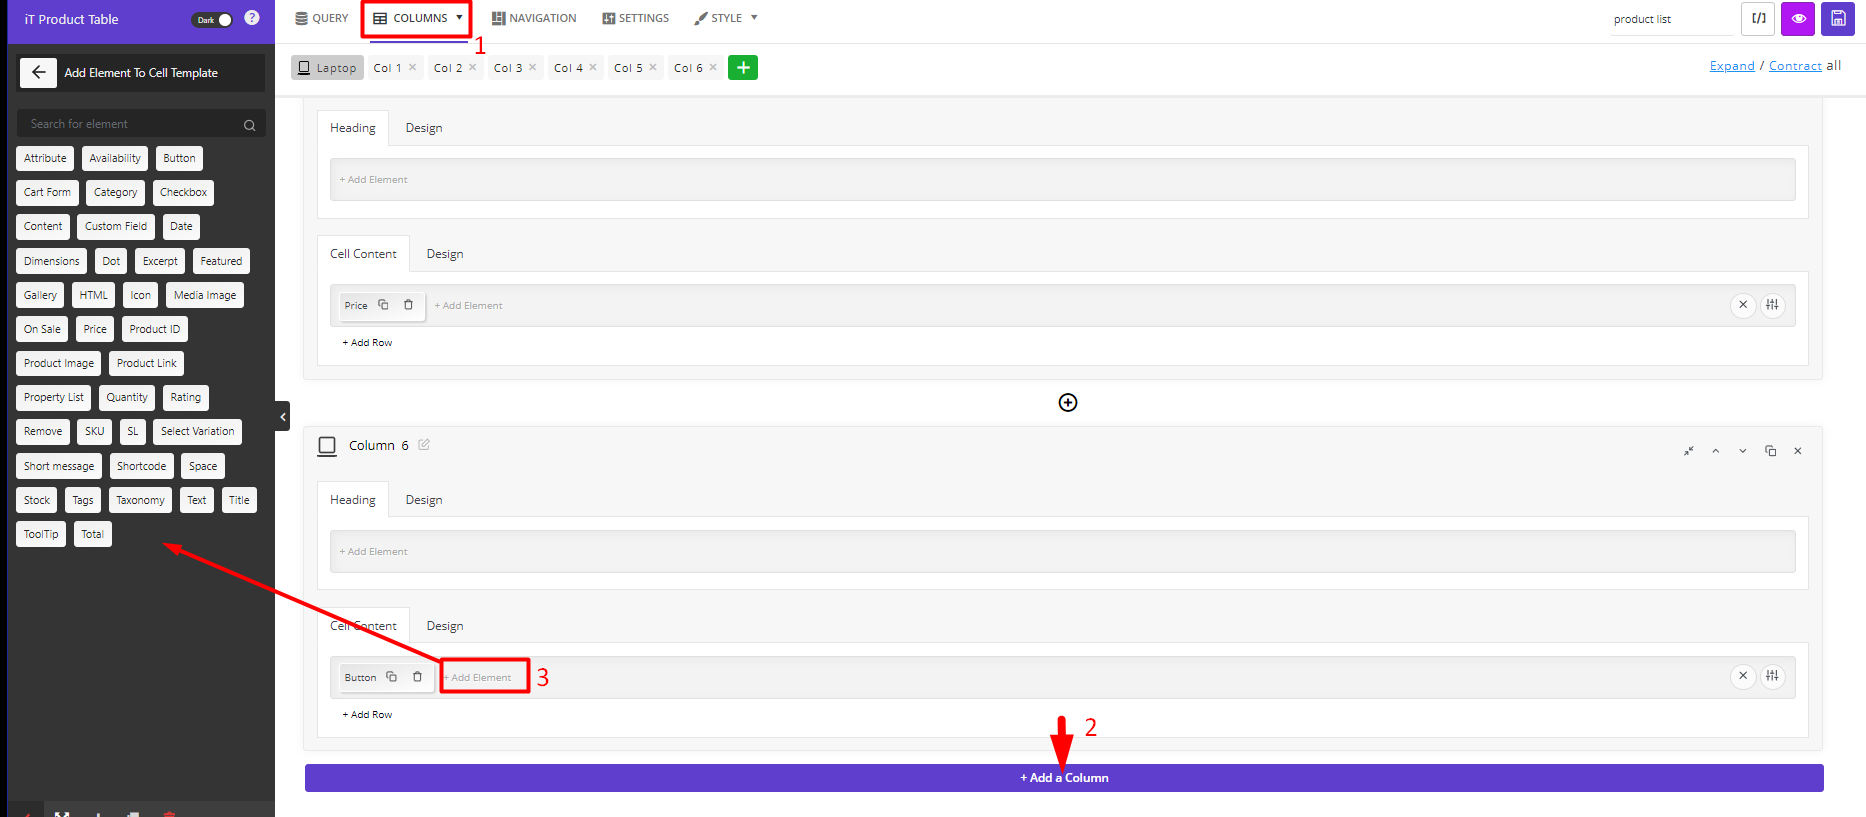
After choosing the elements you need, it is also possible to customize the content and appearance of the element by editing the options in the General and Style tabs of Elements Setting panel.
There are more features for personalizing the columns of your table. For example, you can add new rows to one column to show different elements in separate rows of one column.
By repeating the steps mentioned above, you can easily add as many columns as you want to the table. For example, we tried to create a WooCommerce product table with the following columns:
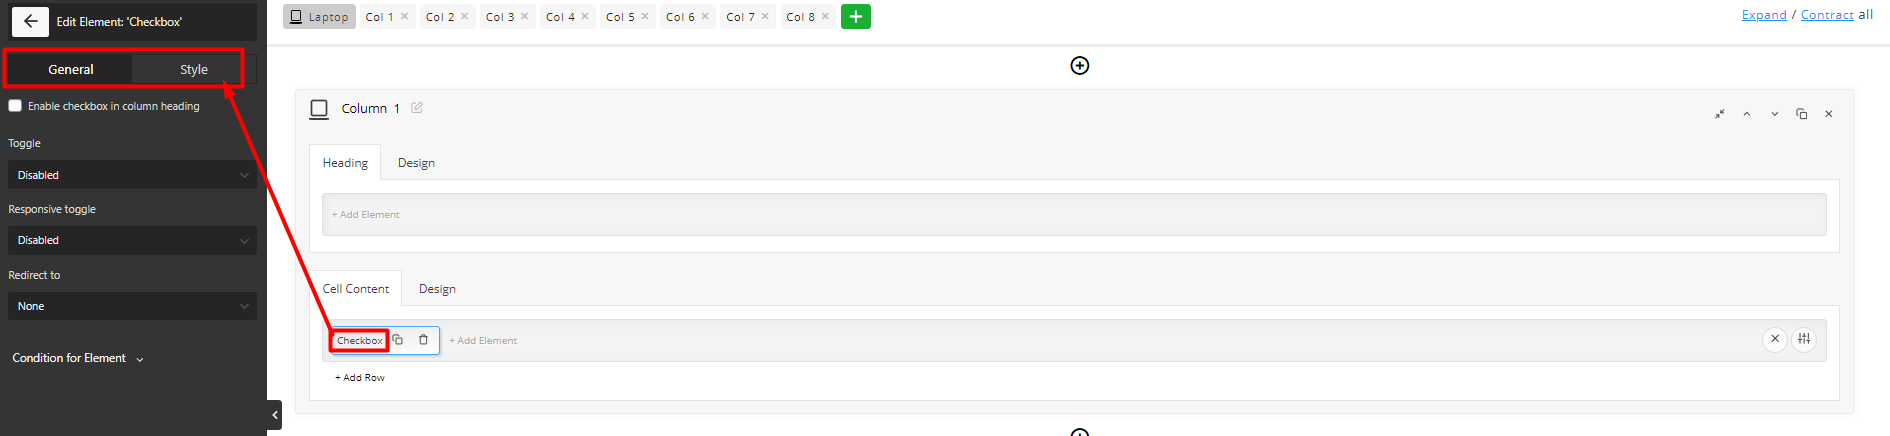
- Checkbox: Let customers mark as many products as they need a cart directly from the product table,
- Title: To show the product title to the customers.
- Image: To display the featured image of the product in the table column.
- Variation: to let customers compare different attributes of the products directly on the shopping page,
Note: For displaying variations using the WooCommerce product table pro plugin, you need to add Attribute element to the cell. Then, in the General tab, choose one of the attributes from the list and set other configurations.
So, if you want to show different variations like size, color, brand, and more, you have to add an Attribute element for them, individually. In this way, each attribute will be displayed in separate columns on the product table.
- Quantity: To enable customers to increase or decrease the product quantities and add them to their carts.
- Price: when you are creating a WooCommerce product table with a price filter slider, displaying this column is essential. By adding this column, customers can see the regular or sale prices of products that are in the filtered range.
After adding the columns, you can press on the Eye icon on the top of the table, to see a preview of your product table.

Step 3: Add price range slider filter to product table
The next step, which is the purpose of preparing this tutorial for you, is to add the price range slider using the WooCommerce product table pro plugin. The good news is that you can show customized filtering options in each navigation bar of your table, like the sidebar, header, or footer.
Following the below simple instruction allow you to easily show the price range slider filter to your customers in the product table:
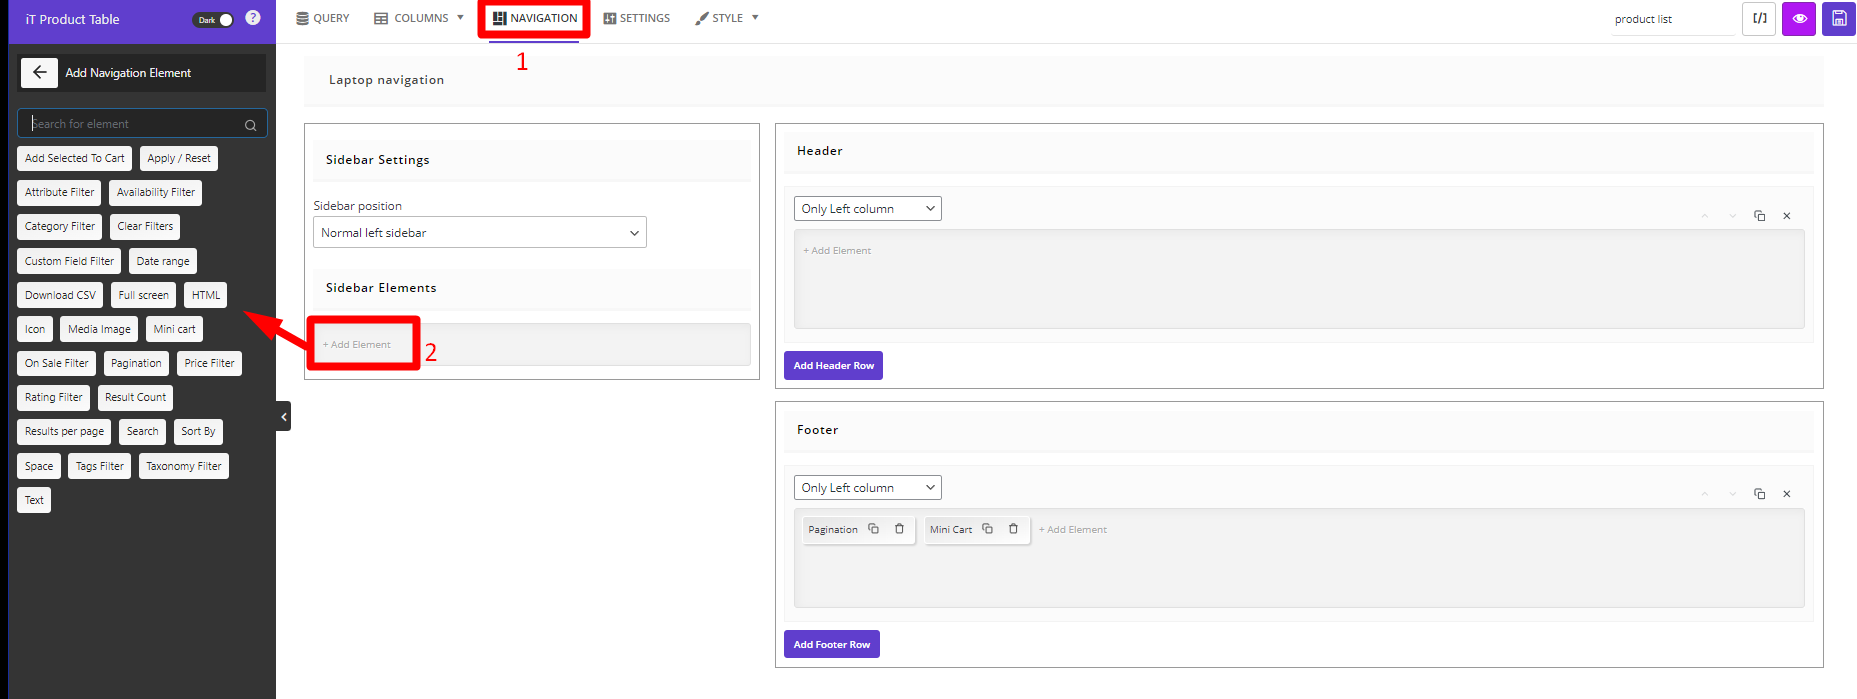
- Go to the Navigation tab.
- In one of the navigation bars – sidebar in this example, find the Add Element option and click on it to see the list of elements in the left panel. Now, review the elements and choose Price Filter among them.
Customize price range slider filter
As soon as you add a price filter to the sidebar, you have access to the General tab to customize the content displayed in this filtering option to the customers.
Let’s review the customizable items of Price Filter:
Heading
By editing this item, you can change the title of the price slider filter in the table. By default, the title is Price Range. However, you can change it by:
- Clicking on the Trash icon of the current text.
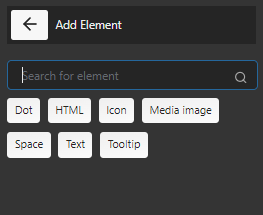
- Pressing Add Element.
- And choosing one of the below elements:
- Media image: To display an image instead of title.
- Space: To add a space between elements.
- Dot: To use “.” As a separator between two elements.
- Text: To show a customized message as the title.
- Tooltip: To show a tooltip as the filter title.
- HTML: To add an HTML code for customizing the filter title.
- Icon: To display an icon in the filter title.
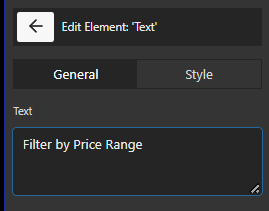
In this example, we selected Text Element and inserted Filter by Price Range in the textbox to be shown as the price slider filter title:
“Show any” option label
This item is designed to let you customize the label of Show any in the filter box. When customers choose this item, no filtering is applied to the products, and they can see all products in the table.
You can customize this label by following the instructions that we described for the heading field.
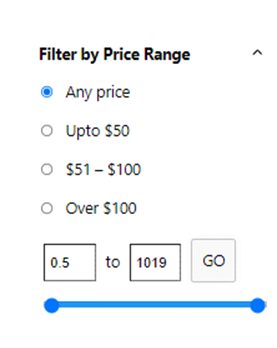
Filter Options
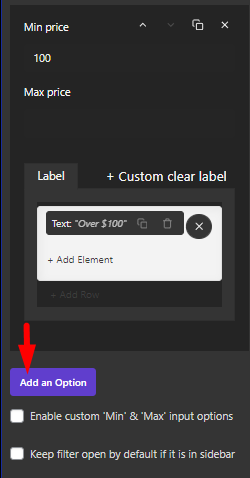
This is the most important part of the price filtering box in the table, allowing you to show different price ranges to customers.
By default, the price ranges are defined as below:
- $0-50
- $51-100
- Over $100
However, you can remove these defaults by pressing the Trash icon and try to add new ones based on your need.

To add a new price range, first, you need to click on the Add an option button to see the Min and Max prices box on the top. This box contains three parts:
- Min price: Insert the minimum price range here.
- Max price: Insert the maximum price range here.
- Label: Set a title for this price range – editing the price label is the same as editing the heading field we have described before.
By repeating these steps, you can add as many price ranges as you want to the Price range filter slider.
Other customizations
There are two more items for customizing the price range slider filters, which are:
- Enable custom Min & Max input options: If you mark this option, customers can specify the max and min prices by inserting numbers in related boxes.
- Keep filter open by default if it is in sidebar: if you mark this option, the price range filter slider will always be displayed to the customers as a radio box if you have added the Price Filter element to the sidebar.
This is how the default price range slider filter is shown in the product table:
Step 4: Show WooCommerce product table with price filter slider in shopping page using Shortcode
Finally, to replace the WooCommerce shopping page with this product table, you need to:
- Save the table after adding a name on the text box above the table.
- Click on the Shortcode icon to copy it.
- Open a new page in WordPress and paste the Shortcode in.
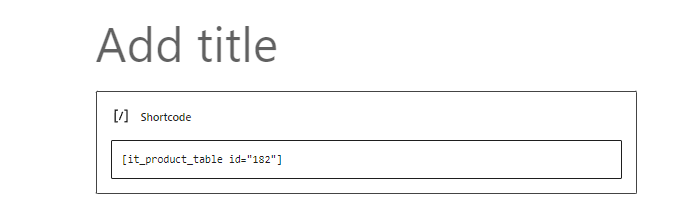
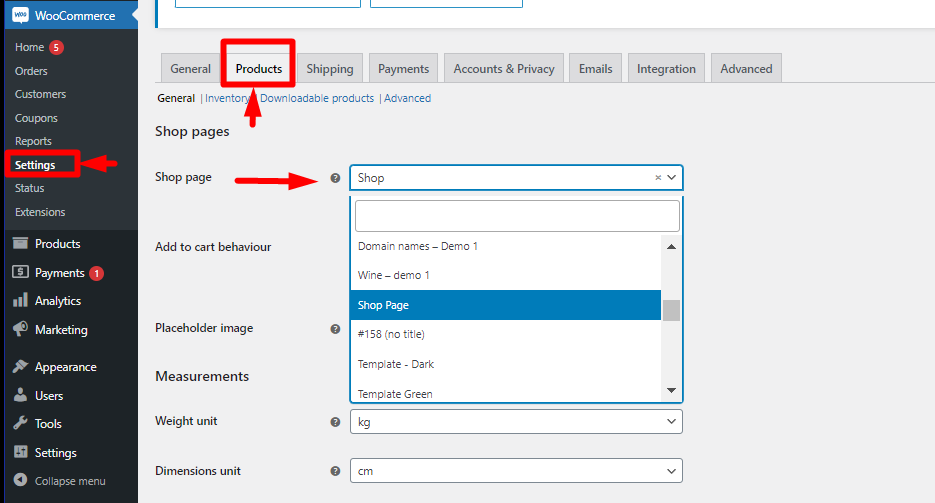
- Go to WooCommerce settings > Products and choose the new page from the list of Shop page field.
Now, if you open the shopping page of your website, you can see WooCommerce product table with price range filter slider as below:
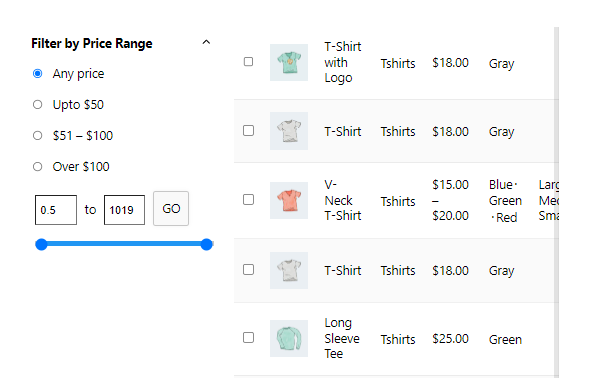
TABLEiT – Product Table for WooCommerce
The easy way to create an interactive product table with price range slider filter in WooCommerce
Conclusion
Adding a WooCommerce price range filter to your store is a simple way to improve product discovery and make shopping easier. Instead of forcing customers to scroll through every product, you can let them choose a price range and instantly narrow the product list to items they can afford.
The default WooCommerce price slider can be useful for basic filtering, especially on standard shop pages. But if you want more control over product display, table columns, filter placement, price range labels, and add-to-cart options, a product table gives you a more flexible shopping layout.
With TABLEiT – Product Table for WooCommerce, you can build a product table with price filters, custom columns, search, sorting, quantity fields, and add-to-cart buttons. This helps you create a more practical WooCommerce shopping page where customers can compare products, filter by price, and buy faster.
Price filtering should complement—not replace—other discovery tools. The WooCommerce product table filtering guide explains how to combine them naturally.
FAQ
1. What is a WooCommerce price slider?
A WooCommerce price slider is a filter that lets customers choose a minimum and maximum price range. After selecting the range, the shop page shows only products within that price limit.
2. How do I add a price range filter in WooCommerce?
You can add a price range filter using the default WooCommerce Filter by Price block, the WooCommerce price filter widget, or a product table layout with a price filter option.
3. Why should I use a price filter in WooCommerce?
A price filter helps customers find products that match their budget. This is useful for stores with many products, different price levels, or product catalogs where customers need to compare options quickly.
4. Can I add a price filter to a WooCommerce product table?
Yes. With TABLEiT, you can add a price filter to a product table and let customers filter products by predefined price ranges or custom min/max prices.
5. Is the default WooCommerce price filter enough?
The default WooCommerce price filter can be enough for simple stores. However, it may be limited if you need a table layout, custom columns, advanced filtering, or a more organized product browsing experience.
6. What columns should I show in a product table with price filter?
You can show product image, title, price, category, stock status, quantity, and add-to-cart button. The best columns depend on your store type and what customers need to compare before buying.
7. Can customers filter products by price and add them to cart from the same table?
Yes. A product table can show price filters and add-to-cart options in one layout. This helps customers filter products, compare prices, select quantities, and add items to cart without opening every product page.