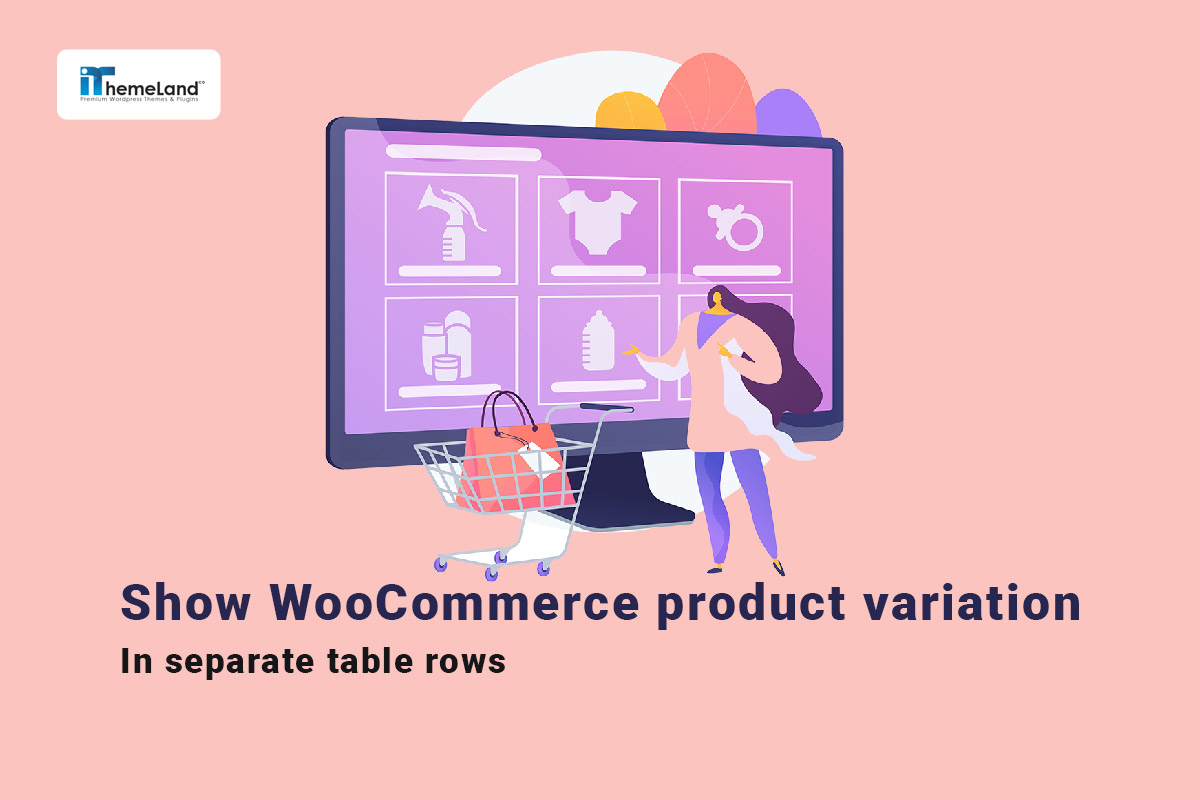

WooCommerce variable products allow store owners to offer multiple versions of the same product, such as different sizes, colors, materials, or configurations. These variations help customers choose the exact product they need, but the default WooCommerce interface does not always display them in the most convenient way.
By default, WooCommerce product variations appear as dropdown menus on the product page. While this approach works well for small stores with a limited number of products, it can become inefficient for larger online shops that offer many variations. Customers often have to open each product page individually just to view the available options.
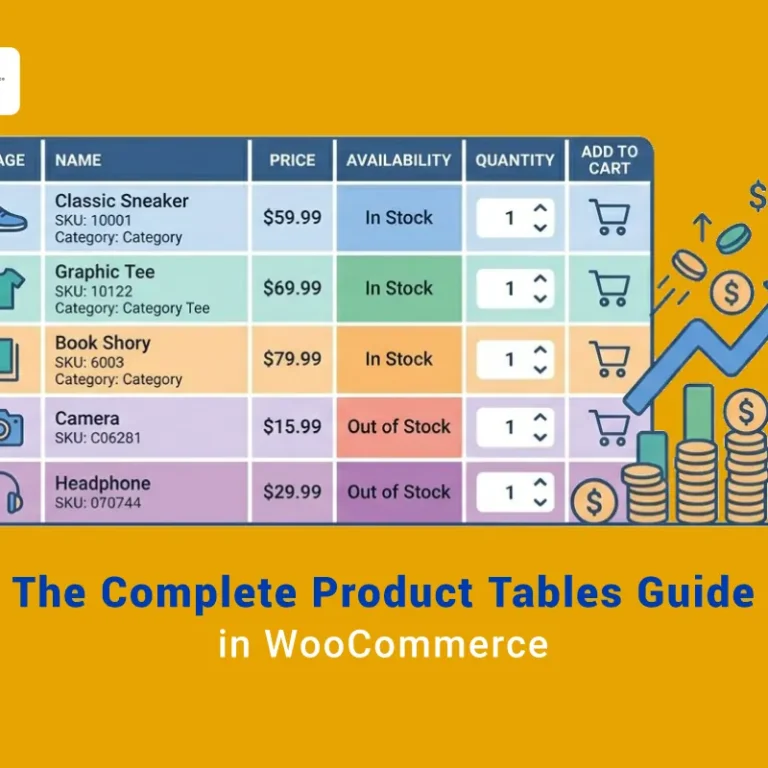
For stores with many variable products, a better solution is to display WooCommerce variations in a table layout. A WooCommerce variations table allows customers to see all product options at once, compare them quickly, and add variations directly to the cart without leaving the shop page.
Displaying WooCommerce product variations in separate table rows can significantly improve the shopping experience. Customers can easily view variation details such as price, attributes, and availability in a structured format. This method also helps reduce navigation time and makes the purchasing process much faster.In this guide, you will learn how to show WooCommerce product variations in separate table rows, display variations on the shop page, and create a WooCommerce variation table that helps customers browse and buy products more efficiently.
Quick Answer:
By default, WooCommerce displays product variations as dropdown options on the product page. This is acceptable for small stores, but it can slow down shopping when customers need to compare many sizes, colors, or configurations. A better solution is to display variations in a table layout where each variation can be viewed and purchased more easily.
Use TABLEiT – Product Table for WooCommerce to create this layout. After installing the plugin, go to WordPress Dashboard > iThemeland > TABLEiT, click Add New Table, and choose a template or press Get Started. In the table settings, include Variable products and configure the table columns for product title, attributes, price, availability, quantity, and add-to-cart actions.
To show variations as separate rows, enable the variation display option in TABLEiT so each variation appears as an individual row in the table. You can also display attributes in separate columns, switch the price based on the selected variation, and add product links if needed. After previewing the table, click Save, copy the Shortcode, and place it on the shop page or any custom page.
Why do you need to show variations in the WooCommerce shop?
WooCommerce show variations on the shop page allowing customers to choose their desired product directly from the shop page. In this way, they don’t need to visit each product page and can add multiple variations to the cart at once. In addition, WooCommerce displays product variations on the store page also has the following advantages:
Improve user experience
If you display WooCommerce product variations on the store page, you can make it easier and faster for customers to see the available options. Customers can quickly choose their desired variables and speed up the product selection and purchase process.
Improve brand value
Customers have a better understanding of stores that display products with multiple variations on the sales page. This perception can help you build brand value and attract a wide range of audiences.
Increase conversion rate
Since you will have more variations to show customers, there is a better chance for customers to find the product they are looking for. As a result, they are more likely to buy from your store and ultimately help increase conversion rates.
Reducing the probability of shopping cart abandonment
WooCommerce display variations as list minimizes the possibility of cart abandonment because customers can quickly find and purchase the product they want with their desired options.
How do you create variable products in WooCommerce?
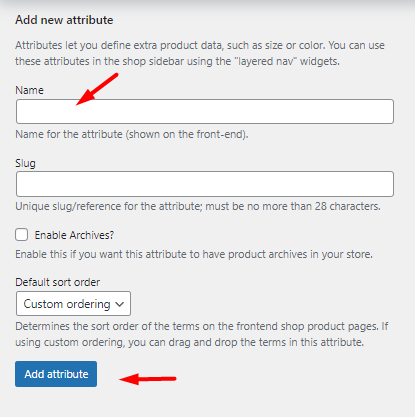
The first thing you need to do to create a variable product in WooCommerce is to add several attributes for the different products you have on your site. You can do this in your WordPress dashboard by going to the Products section and clicking Attributes.

By going to this section, you will have the ability to define some attributes for your products. For this, you must insert an attribute name in the Name field and then click on Add Attributes.
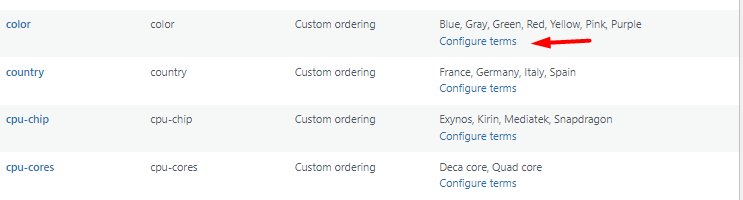
For example, we have created some Attributes like color, country, CPU chip, and CPU cores as illustrated below.
In the next step, you have to assign some items to the new created attribute. To make this happen, click on the Configure terms in the right panel in front of the created attribute:
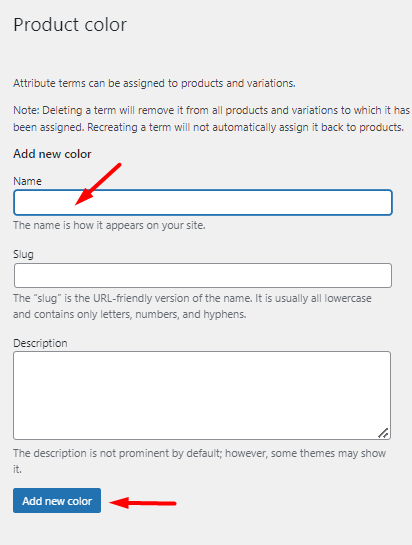
Now, you can add as many items as you need to that attribute again by inserting the Name and pressing Add New.
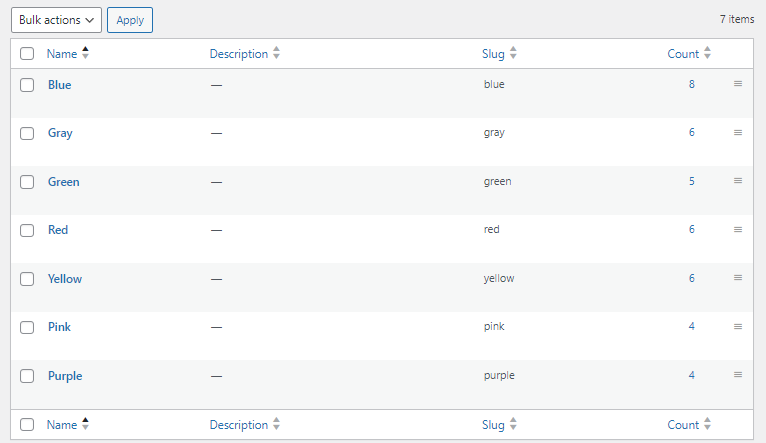
We tried to add some items like blue, gray, red, green, etc. For the color attribute:
You are now ready to create variable products by following the below instructions:
- Open a single product edit page.
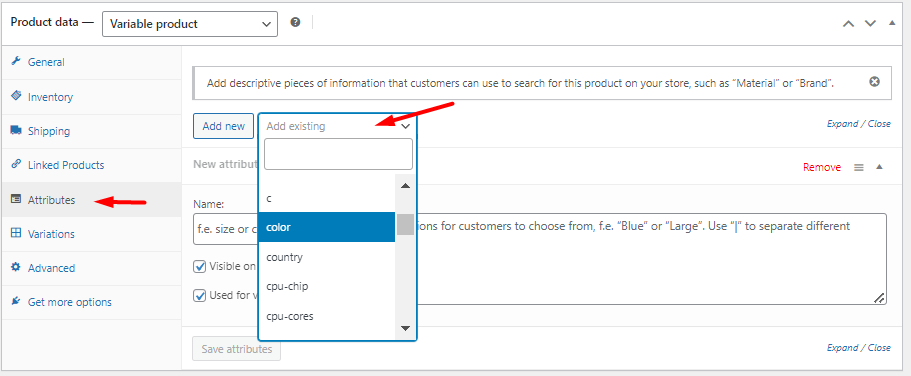
- Go to the Product Data section and press the Attributes tab.
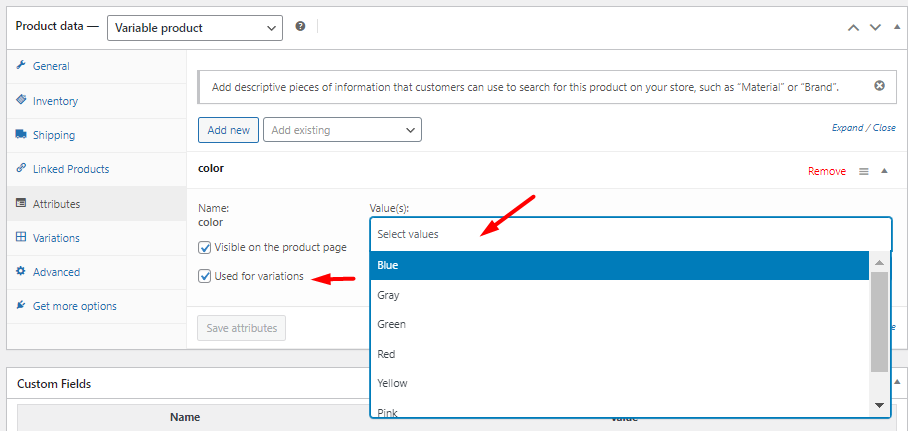
- Choose your preferred attribute from the list and press Add New – For example, we have selected Color in this example.
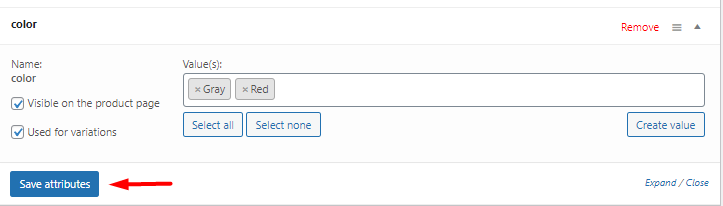
- Open the dropdown list of Values and select one or more items to be assigned to your product – For instance, we have chosen Grey and Red.
- Mark Used for Variations.
- Press the Save attributes button.
Note: If you want to assign other Attributes to create variable products, repeat the above steps and add other attributes and their items as well.
- Open the Variations tab and press Generate Variations .
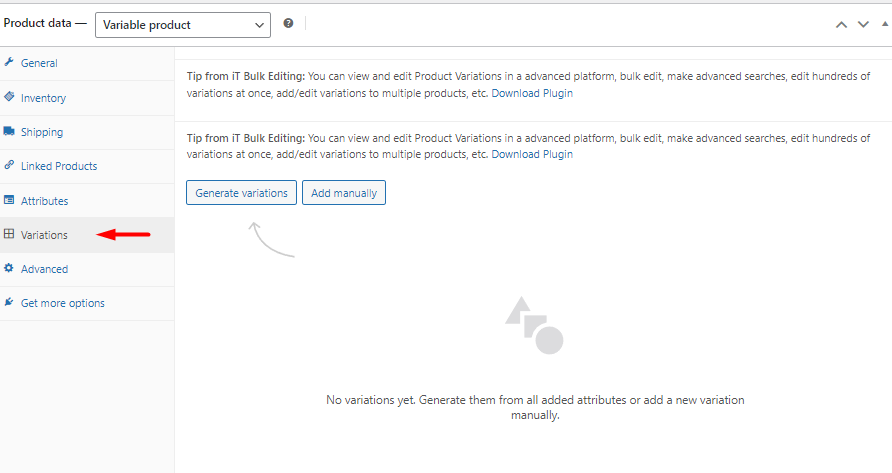
- WooCommerce will create all possible variations from your attributes.

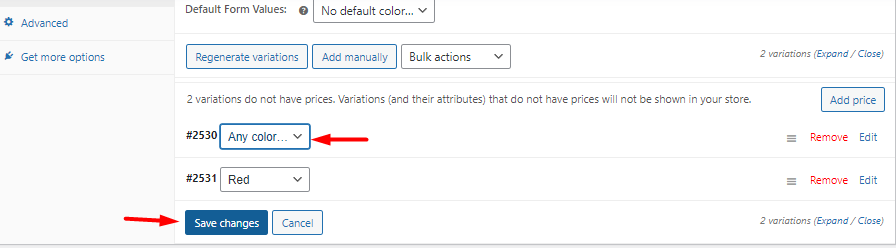
- You can choose the attributes from the dropdown list to customize WooCommerce variations details.
- Finally, press the Save Changes button, and your task is done.
How are WooCommerce product variations displayed in the table?
If you want to display product variations to customers on the product page of WooCommerce, you can choose one of the following methods:
Display variation table on the WooCommerce product page
In this method, when customers visit the product page, a table of variables is displayed to them. They can enter the number of products they need in each table cell and order it.

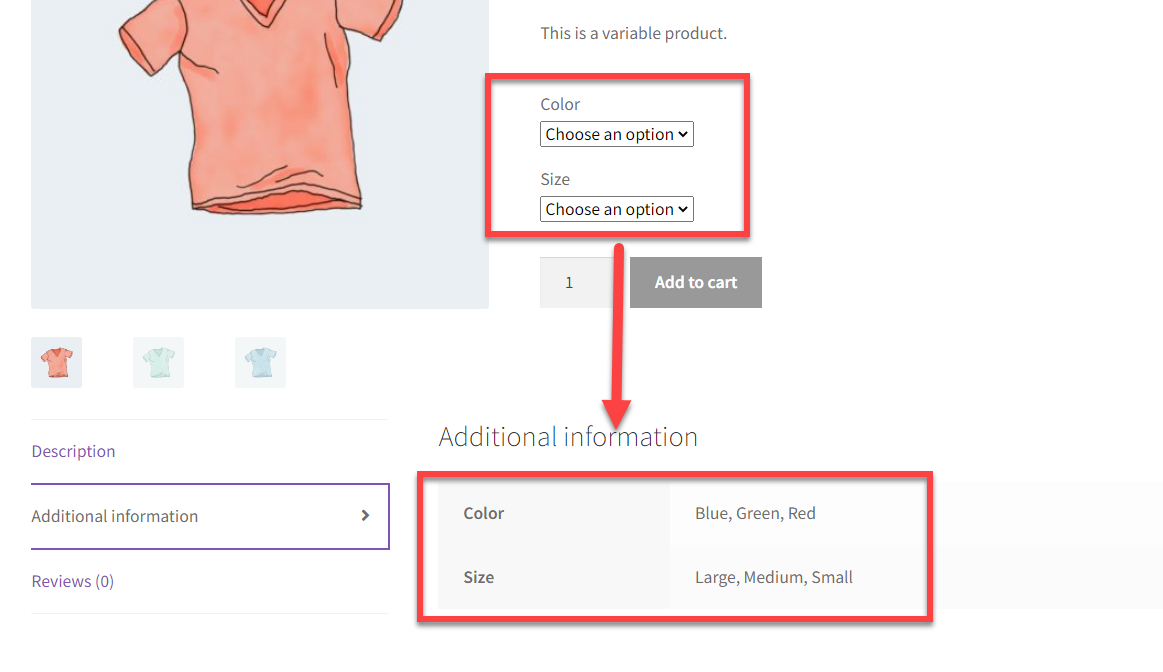
Show WooCommerce product variations in the combo box
In this method, the customer must still visit the product page to see the variations in a combo box. Customers can choose one of the variations by opening the dropdown list. Usually, each variable with its items is displayed in the description section to guide customers more.
As we mentioned, these methods are not suitable for stores that have a large number of products. By installing the WooCommerce product table plugin, these stores can display variable products to customers in one of the following ways to simplify shopping.
1- List WooCommerce product variations in separate table rows
The easiest way to display variable products to customers is to show WooCommerce product variation in separate table rows. This way, customers can easily see any variable product and its price in the table and purchase directly with one click.
2- List WooCommerce variations as dropdown in the table
The product table plugin allows you to display variations as a dropdown list. In this method, you can list the variations in different table columns and display their items as a dropdown list in each cell.

3- Let customers see product variations in the product detail page
Another way for informing customers about the variations is adding a link to the table and leading the customers to click on it and see the variations in the product page.
How to create a WooCommerce variable product table?
The WooCommerce product table plugin is one of the most powerful plugins for creating product tables in the WooCommerce store, providing store managers with diverse and flexible options for displaying variable products. In this plugin, a very simple user interface has been designed that allows you to add as many rows and columns as you need to display products, variations, categories, custom fields, prices, etc.
In this article, we will discuss one of the wonderful features of this plugin and describe how to show WooCommerce product variation in separate table rows in 4 simple steps.
Step 1: Install and activate the plugin
To use the amazing features of this plugin, first, try downloading it from the website and installing WooCommerce product table plugin in WordPress.
TABLEiT – Product Table for WooCommerce
The easy way to show WooCommerce product variations in separate table rows

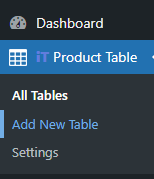
After activating the plugin, you can see the iT Product Table in the WordPress dashboard as illustrated below:
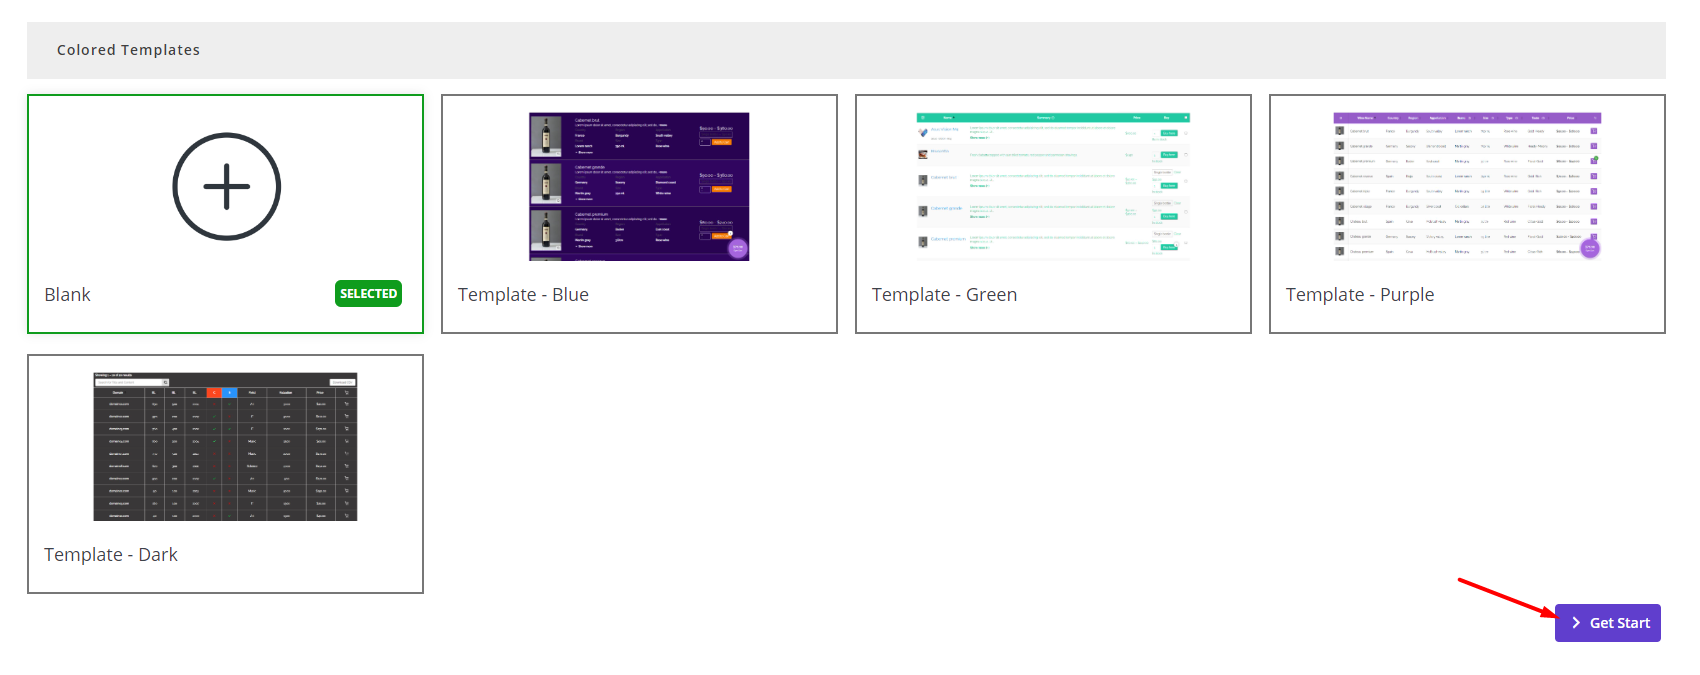
Then, you need to click on the Add New Table button. On the next page, you can choose one of the predesigned templates or press Get Started to create your product table.
Let’s consider that you added a new table and made your query from the variable products. Now, you want to customize your table’s columns to show product variations in a separate row.
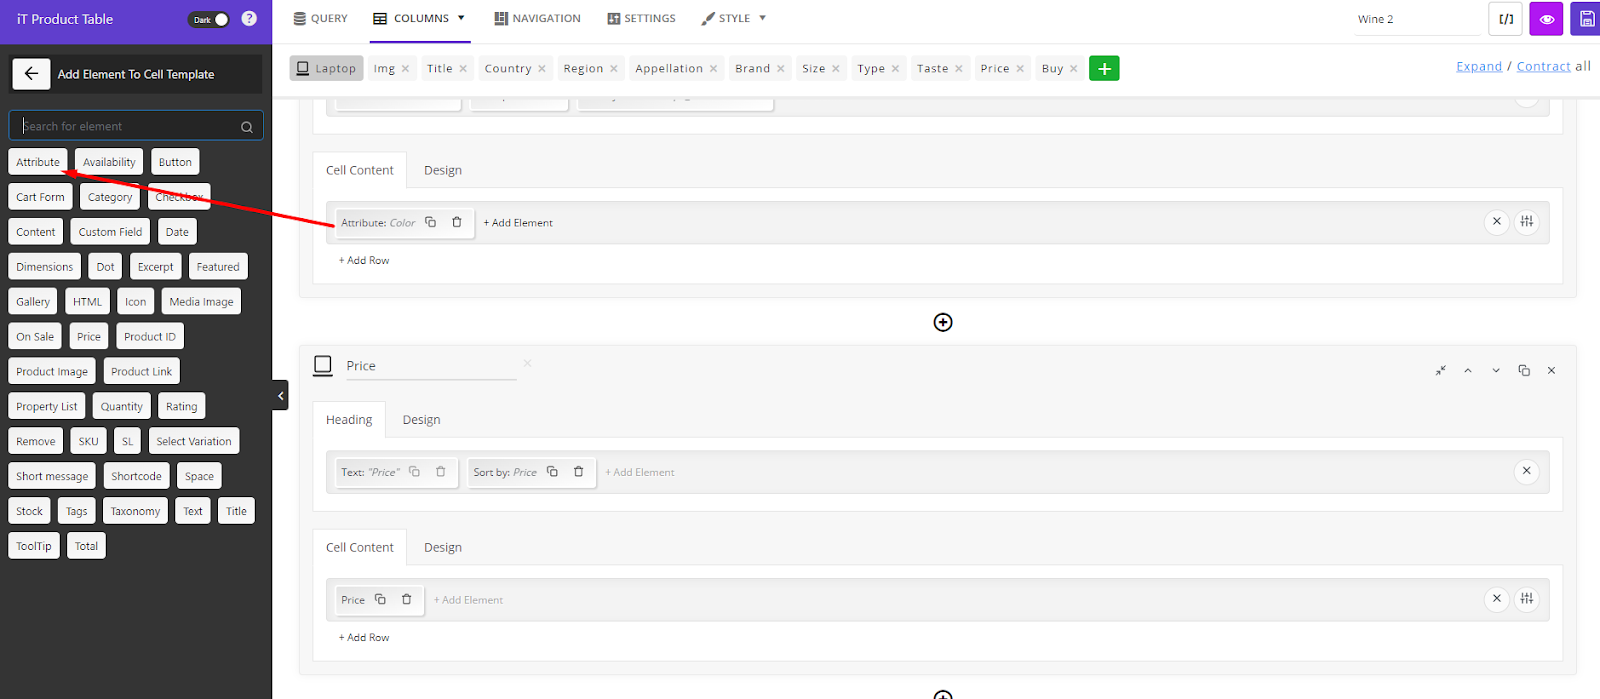
Step 2: Add columns to create a variable product table
As we mentioned above, the WooCommerce product table plugin comes with an easy interface allowing you to quickly add as many columns as you need just by following 3 simple steps:
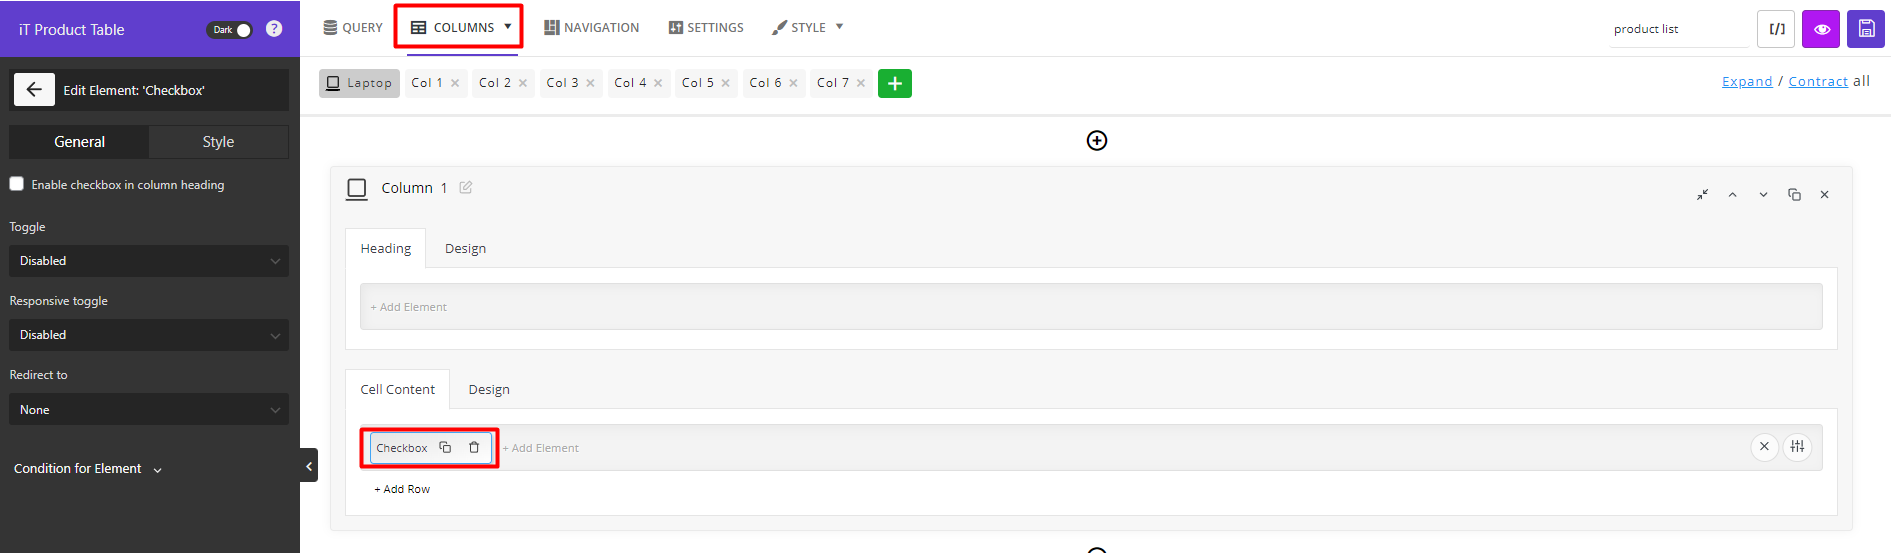
- Open the Columns tab and click on the Add a Column button.

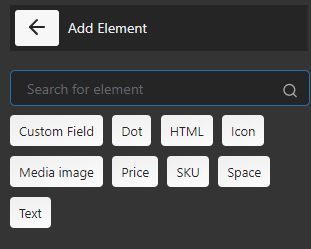
- The new column box has two sections: Heading and Cell Content. To edit the content of each section, click on the Add Element button and choose one of the Elements from the list that appears in the left panel.
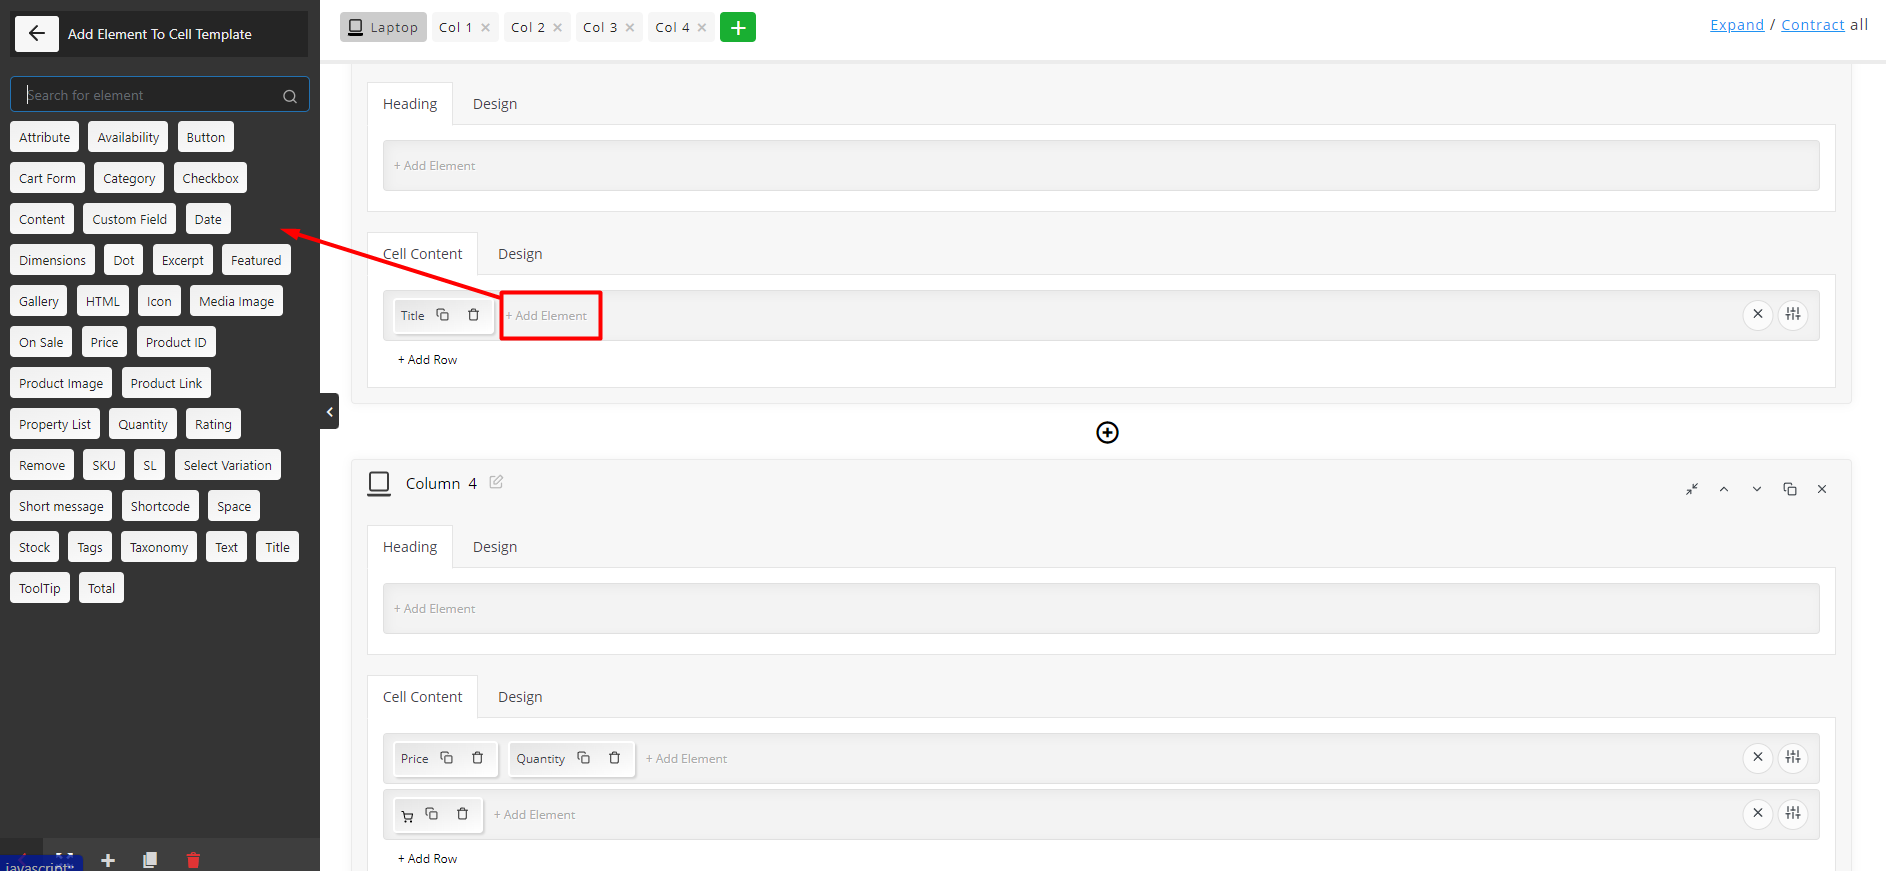
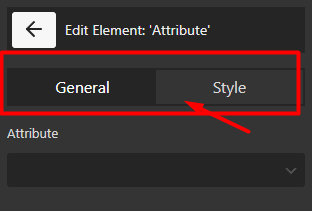
- Customize the element by tweaking the items in the General and Style tabs displayed to you in the Element setting panel.
By repeating these simple steps, you can add different columns and show any information to your customers in the table.
By repeating these simple steps, you can add different columns and show any information to your customers in the table.
To fulfill the purpose of this post, we added 5 columns in the table and assigned 5 below elements to their cell content by following the steps mentioned above five times:
- Check box: To let the customers select the product from the table.
- Product image: To show product featured images to the customers.
- Title: To display product title in the table.
- Price: To inform customers about the price of variable products.
- Add to cart button: to let the customers directly add the products to their carts.
Now, we are ready to instruct the plugin to show product variations in separate rows on the table. Let’s see how in the next step.
Step 3: show variation in the table
The WooCommerce product table plugin provides multiple solutions for displaying variations in the table. To help you find the most suitable one based on your needs, we describe three useful methods in the following.
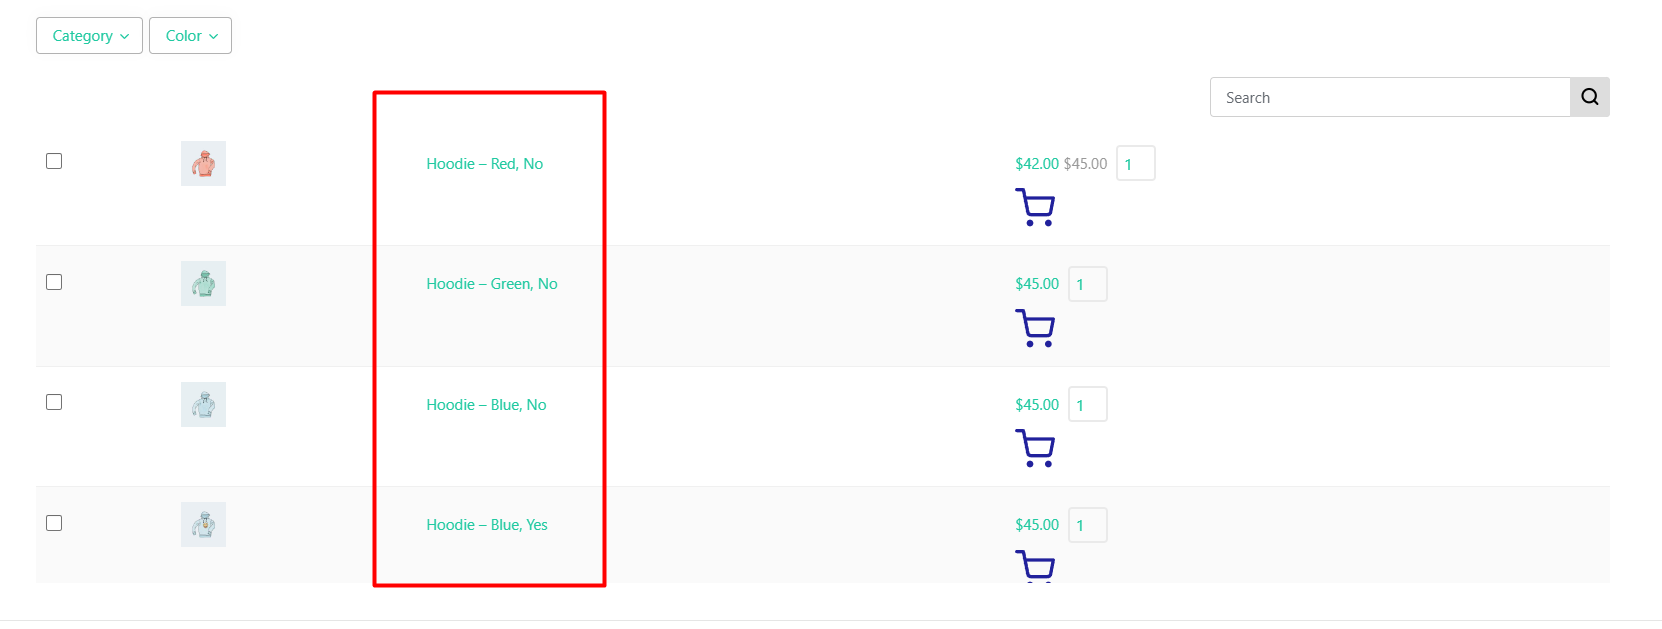
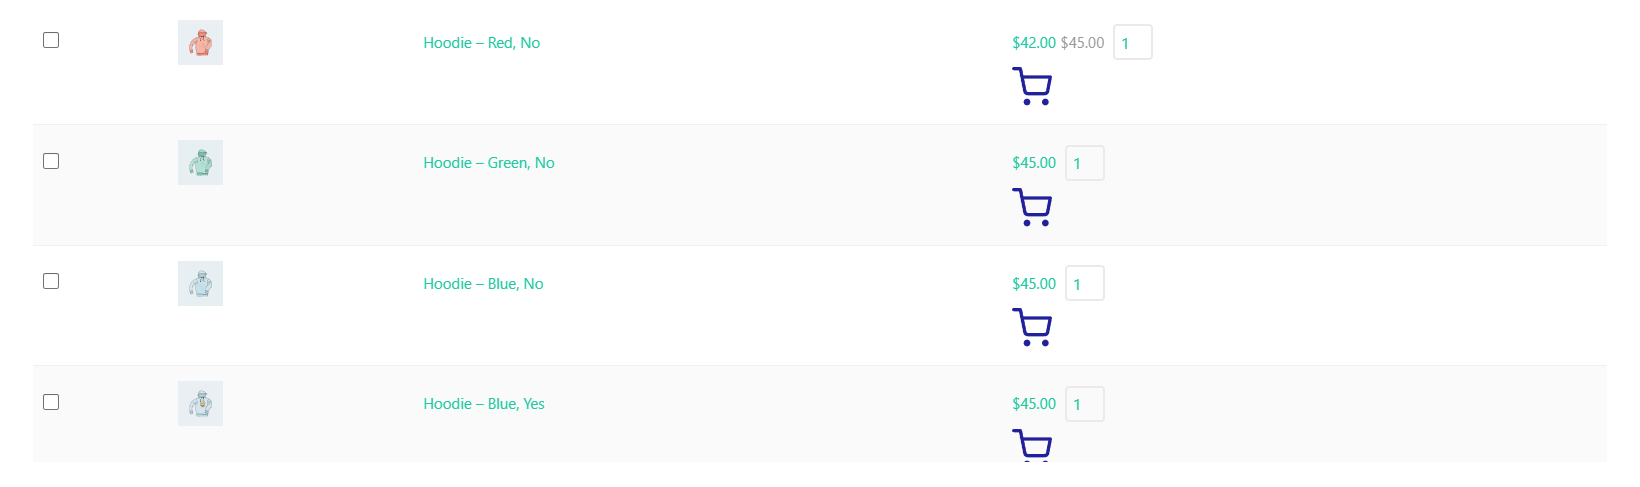
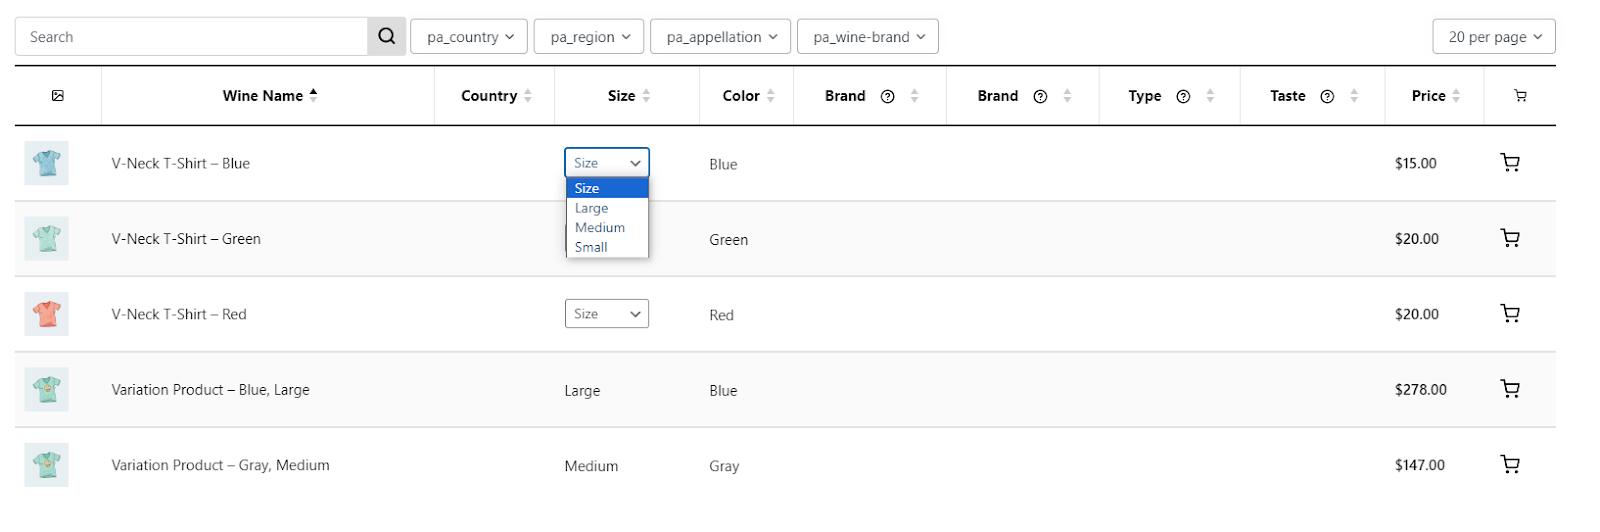
Method 1: Show WooCommerce product variations in separate table rows
This is the simplest solution to show WooCommerce product variations in separate rows. To instruct the plugin to display each variation in separate rows, you just need to open the Settings tab in the plugin and scroll down to find the “Show variation on one row” field.
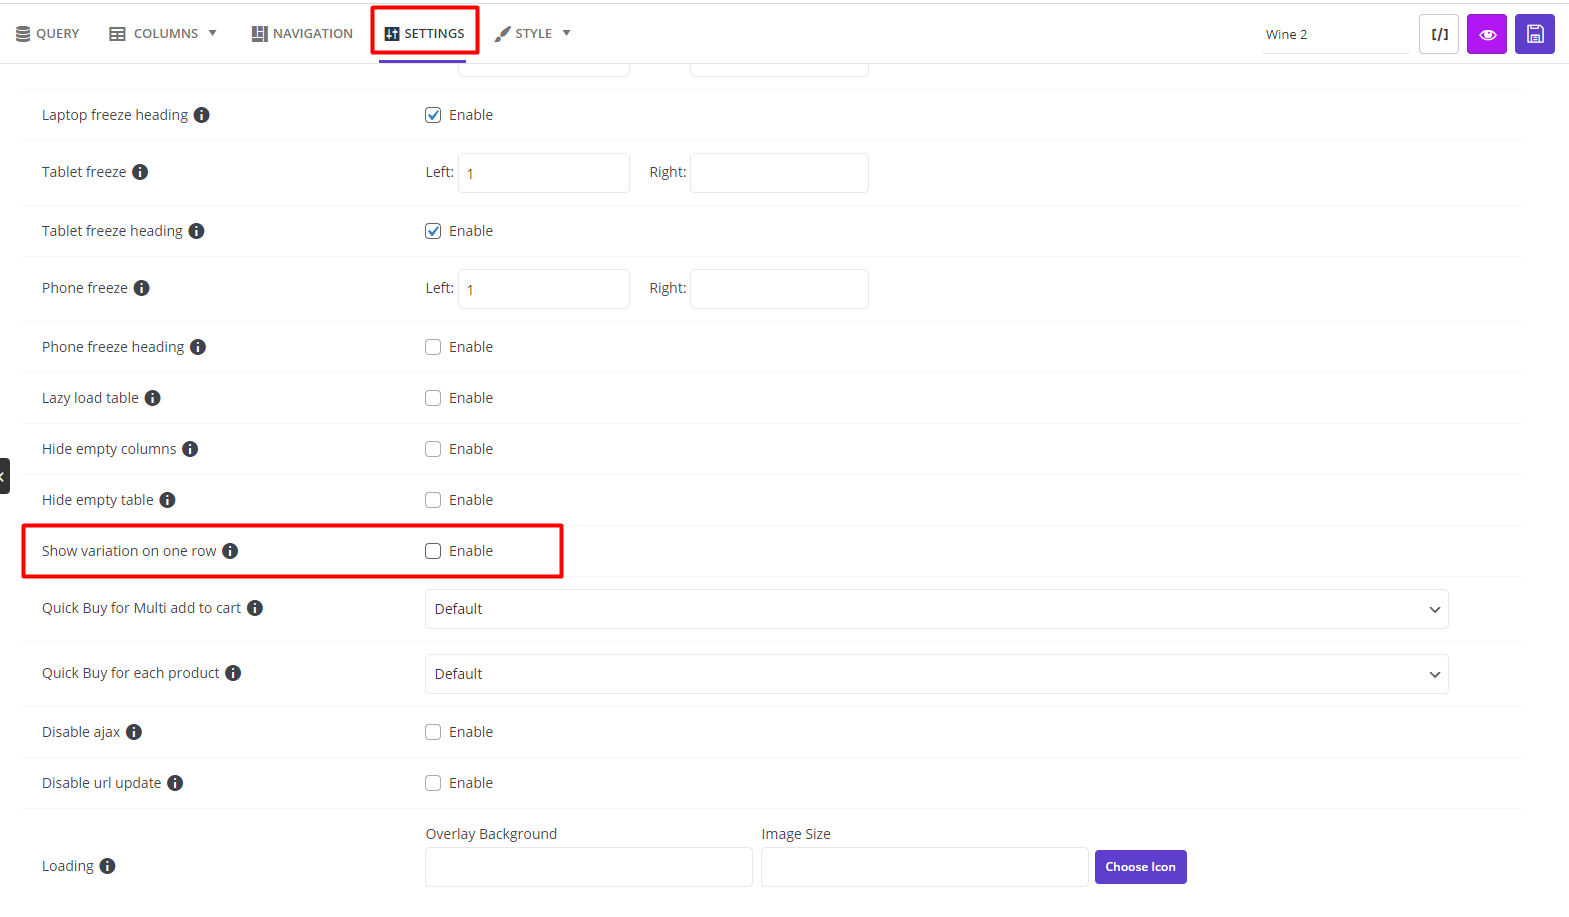
This option displays a list of all variable products in the table, and their variations are visible in separate rows. So, you can expect to display a product table like below to your customers and show color variations on WooCommerce shop page:
Method 2: WooCommerce product variation in separate table columns
In the WooCommerce product table plugin, it is also possible to display the variations in separate columns.
To do this, you just need to add a new column and select the Attributes element for the Cell content.
Then, in the Element setting panel, open the dropdown list of attributes and select the desired attribute to show in the table.
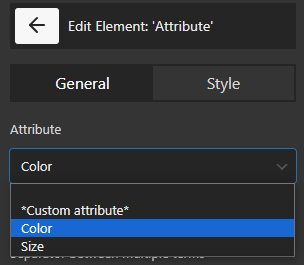
You can add several columns and assign different attributes to their content.
If you want to show the price of each variation in the table to your customers, after adding the price column, go to the Element settings panel and mark “Switch price based on selected variation”, as illustrated below:
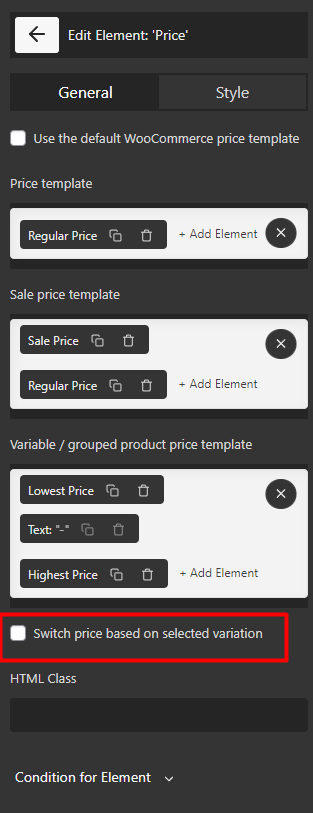
For example, we added Size and Colors in different columns of the table as you can see in the below image, all items related to each attribute are displayed as a dropdown list to the customers and they can add to cart variation WooCommerce. So, when customers choose one item from the list of Sizes and another one from the list of Colors, the price will be changed automatically based on that variation.
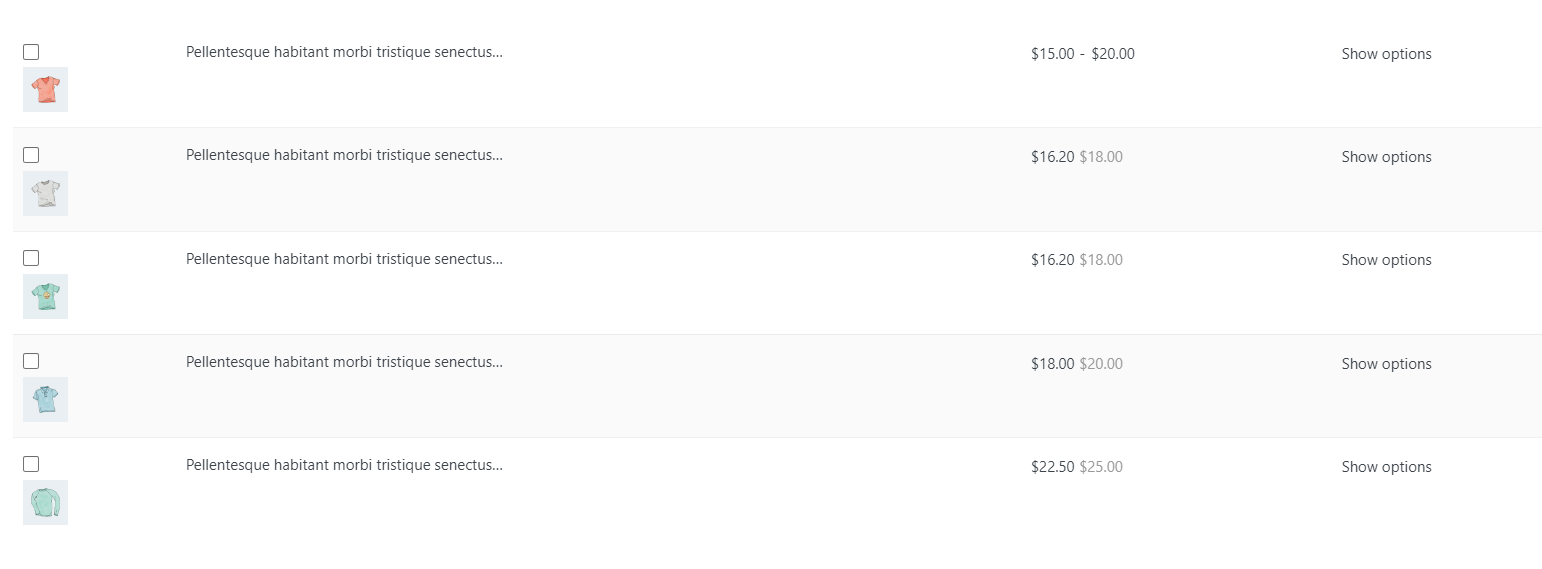
Method 3: Show single variations in the product page
To let the customers observe the variations in the product page, you can add the product page link to the table by following below steps:
- Add a new column and choose Product link element for its cell content.
- In the element setting panel, customize the product link label by clicking on the Add element and choosing Text from the list.
- Write any message in the combo box like show options to be displayed in the table.
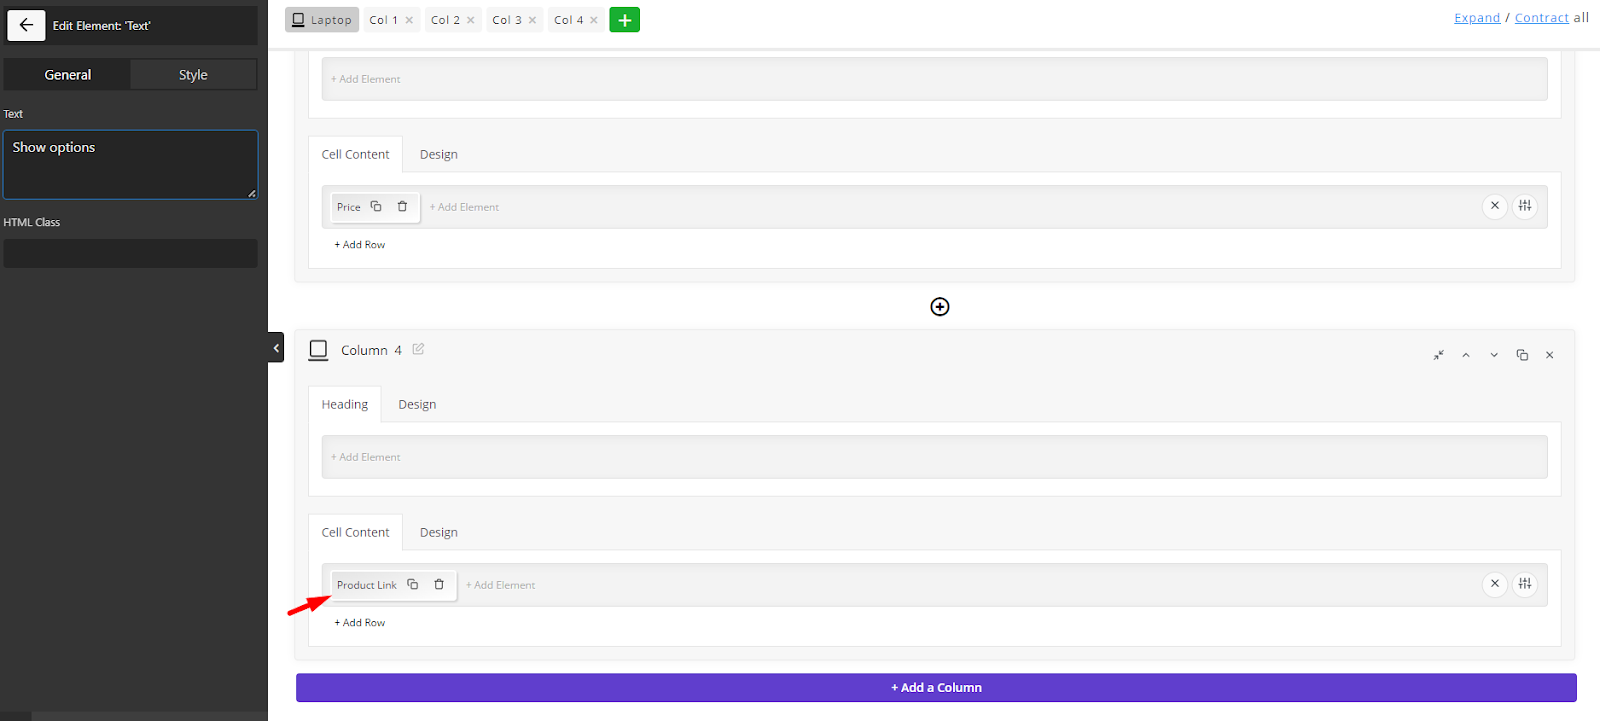
Now, the product link is successfully added to the table and customers can visit the product page by clicking on the show options label to see the variations as illustrated below:

Step 4: Show WooCommerce variations table to the customers
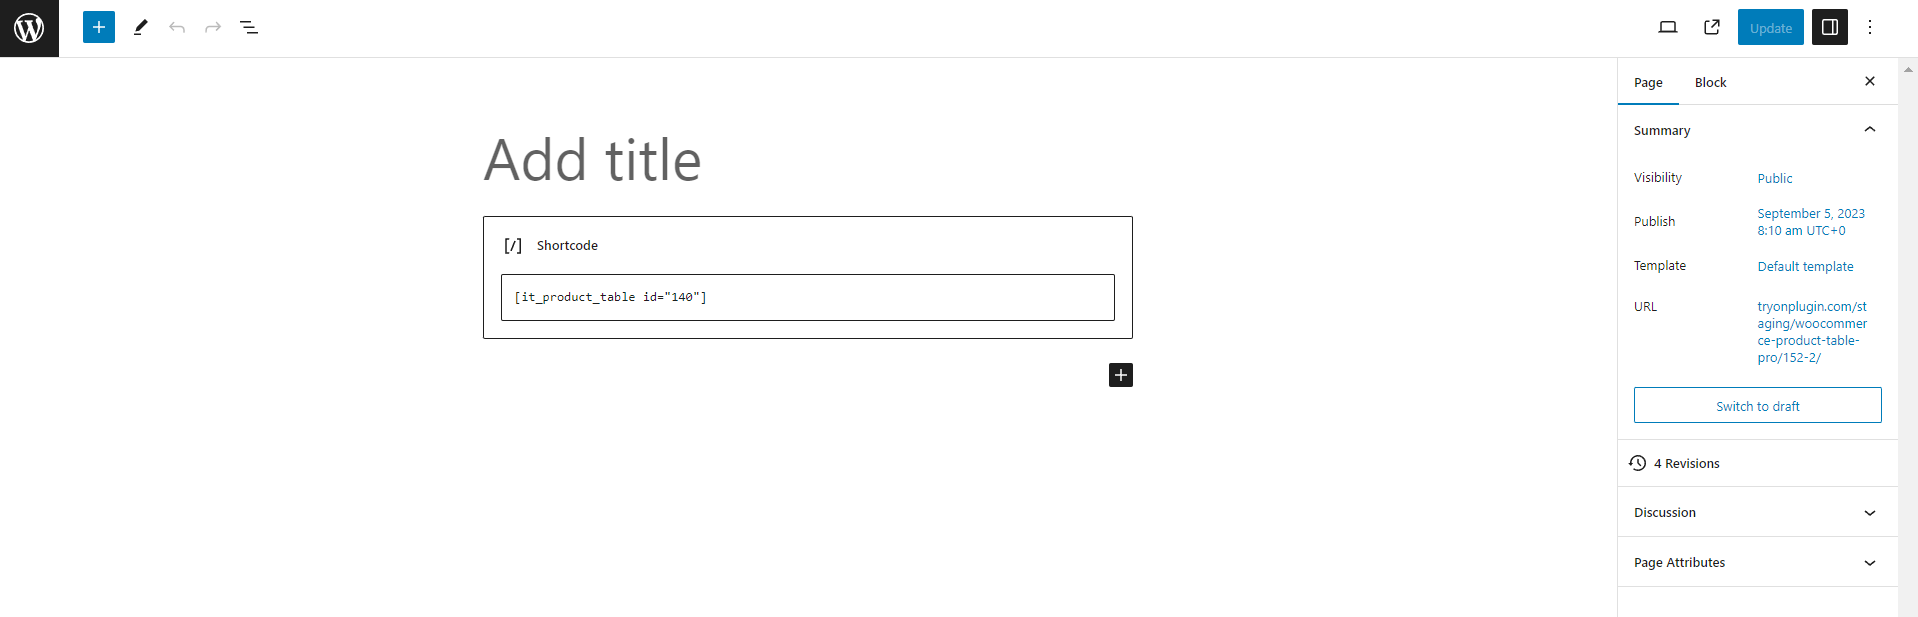
After creating WooCommerce product table variations with this plugin, you need to insert the table short code to a WordPress page and replace the shopping page of WooCommerce with this new page.
The Short code icon of the table is on the top right of the screen, as illustrated below:
When we inserted the short code of the above example into a new page of WordPress:
Then replace the shop page of WooCommerce with this new page as shown below:

The final result was like this:
Extra Features for making product table more customer friendly
The features you can add to your product table by WooCommerce product table plugin are not limited to what we described in this post. You have access to a lot of options to add to the table in order to facilitate the purchase process of customers.
One of the most useful options that makes the purchasing process more enjoyable for customers is the ability to search and filter the products based on their needs.
Let’s see how you can let them filter the products by variations they need in the product table.
Add variation filter in the WooCommerce shop page
Adding variations to table navigations is another method that you can add to your table with the WooCommerce product table plugin. In this way, customers can view the list of variations on the table’s header, footer, or sidebar and filter the desired products by selecting any of their items.
To add this feature to your product table, you can follow the below instruction in the WooCommerce product table plugin to let WooCommerce show variations when filtering:
- Go to the Navigation tab.
- Press Add Element in one of the navigation bars – header, footer, or sidebar.
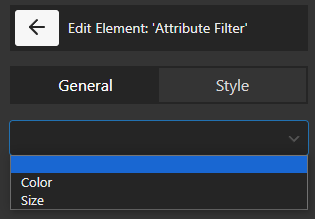
- Choose Attribute Filter from the list of elements.
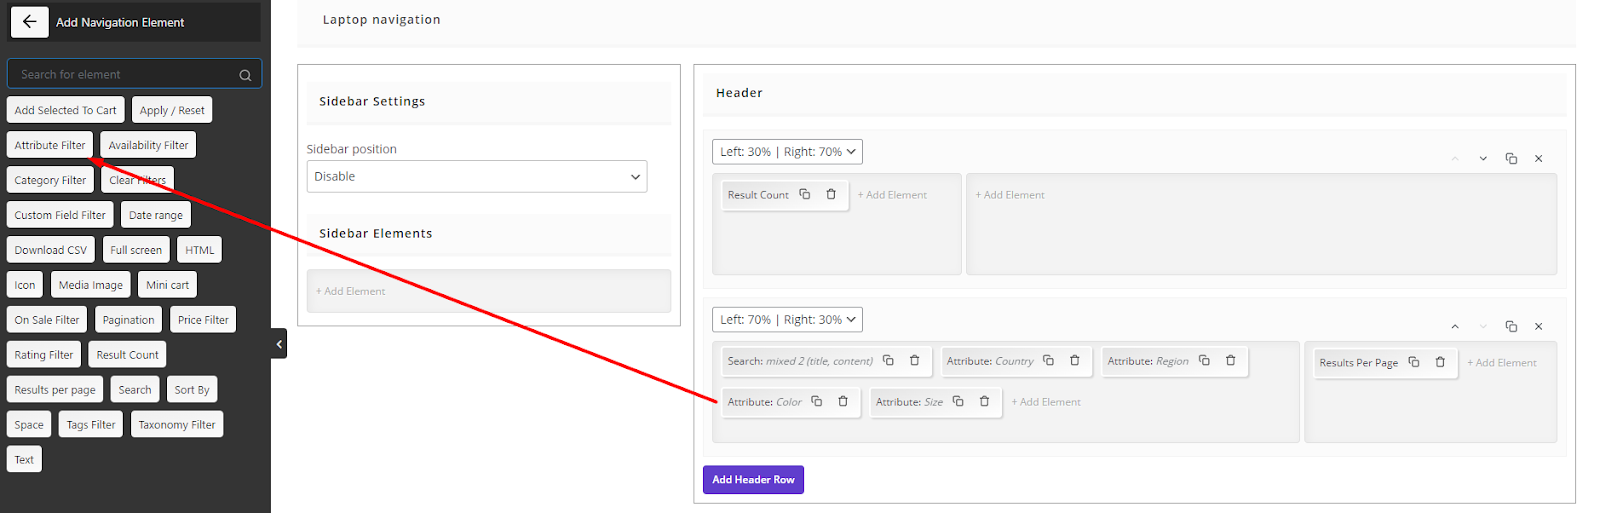
- Select one of the attributes from the list to let the plugin show its items on the site navigation and let customers filter the products by that attribute.
You can add as many attribute filters as you need in the site navigation.
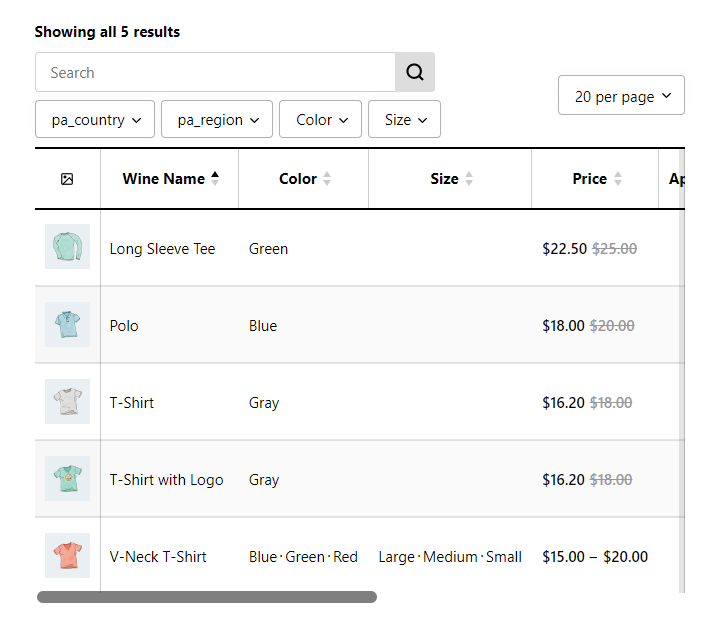
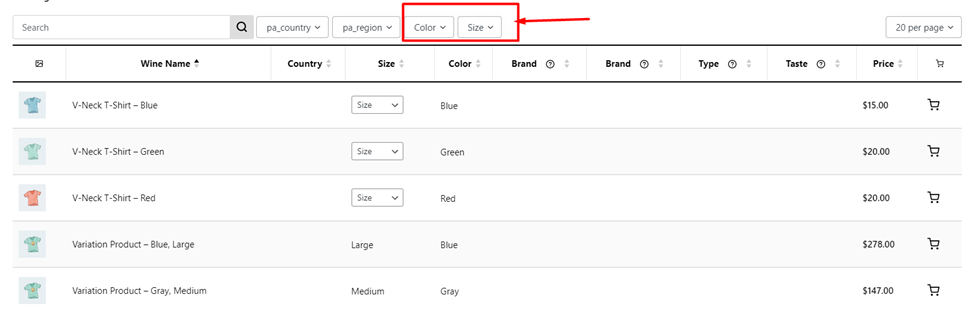
In the below example, we added Color and Size filters on the heading. So, when customers open the combo box of the color or size, they can choose one of the items to filter the products.
Show WooCommerce variations on shop page
In this guide, we have described how you can display different WooCommerce attributes on the product table. For example, you can easily add color to the Attribute element to show color variations on the shop page.
However, there is another option for WooCommerce to show all variations on the shop page in this plugin allowing customers to select them easily.
To add this element and show variations on the shop page, try to:
- Add a new column.
- Press the Add Element option.
- Choose Select Variation from the list of elements.
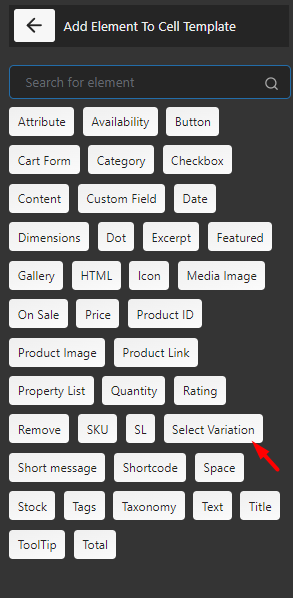
After adding this element, you can set different configurations in the General tab to show variations on shop page WooCommerce.

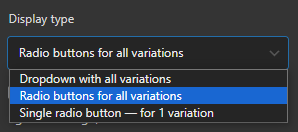
The most useful field is Display type, which can be set as one of the below items:
– Dropdown with all variations: To display product variations dropdown on shop page.
– Radio buttons for all variations: To WooCommerce show product variations on shop page as radio buttons and let customers select one of them.
– Single radio button: same as the previous option for one variation.
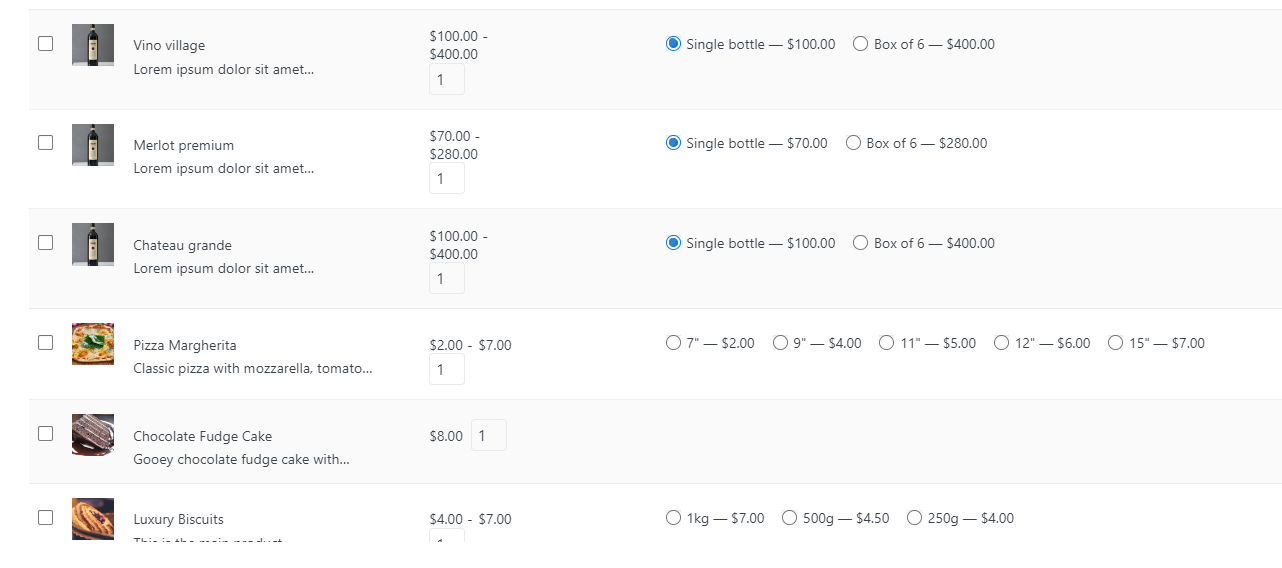
For example, when we chose the second option to WooCommerce show variations in the shop, the result was like below:
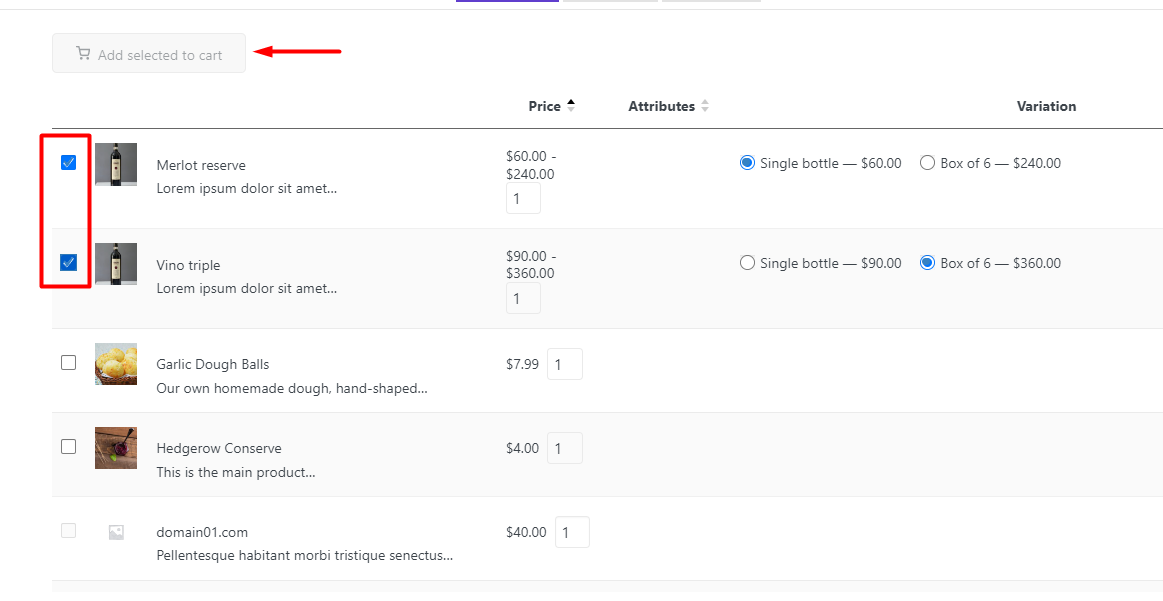
WooCommerce add multiple variations to cart
WooCommerce select multiple variations and add them to cart is a great way to improve customer experience. To enable customers to select multiple products and add to cart variation in the product table, you need to first add a Checkbox column to your table as illustrated below:
Go to the Navigation tab and follow the below steps:
– Press Add element in one of the navigation bars like Header.
– Choose Add selected to cart element from the list in the left panel.
– Customize add to cart variation WooCommerce in the General and Style tab.
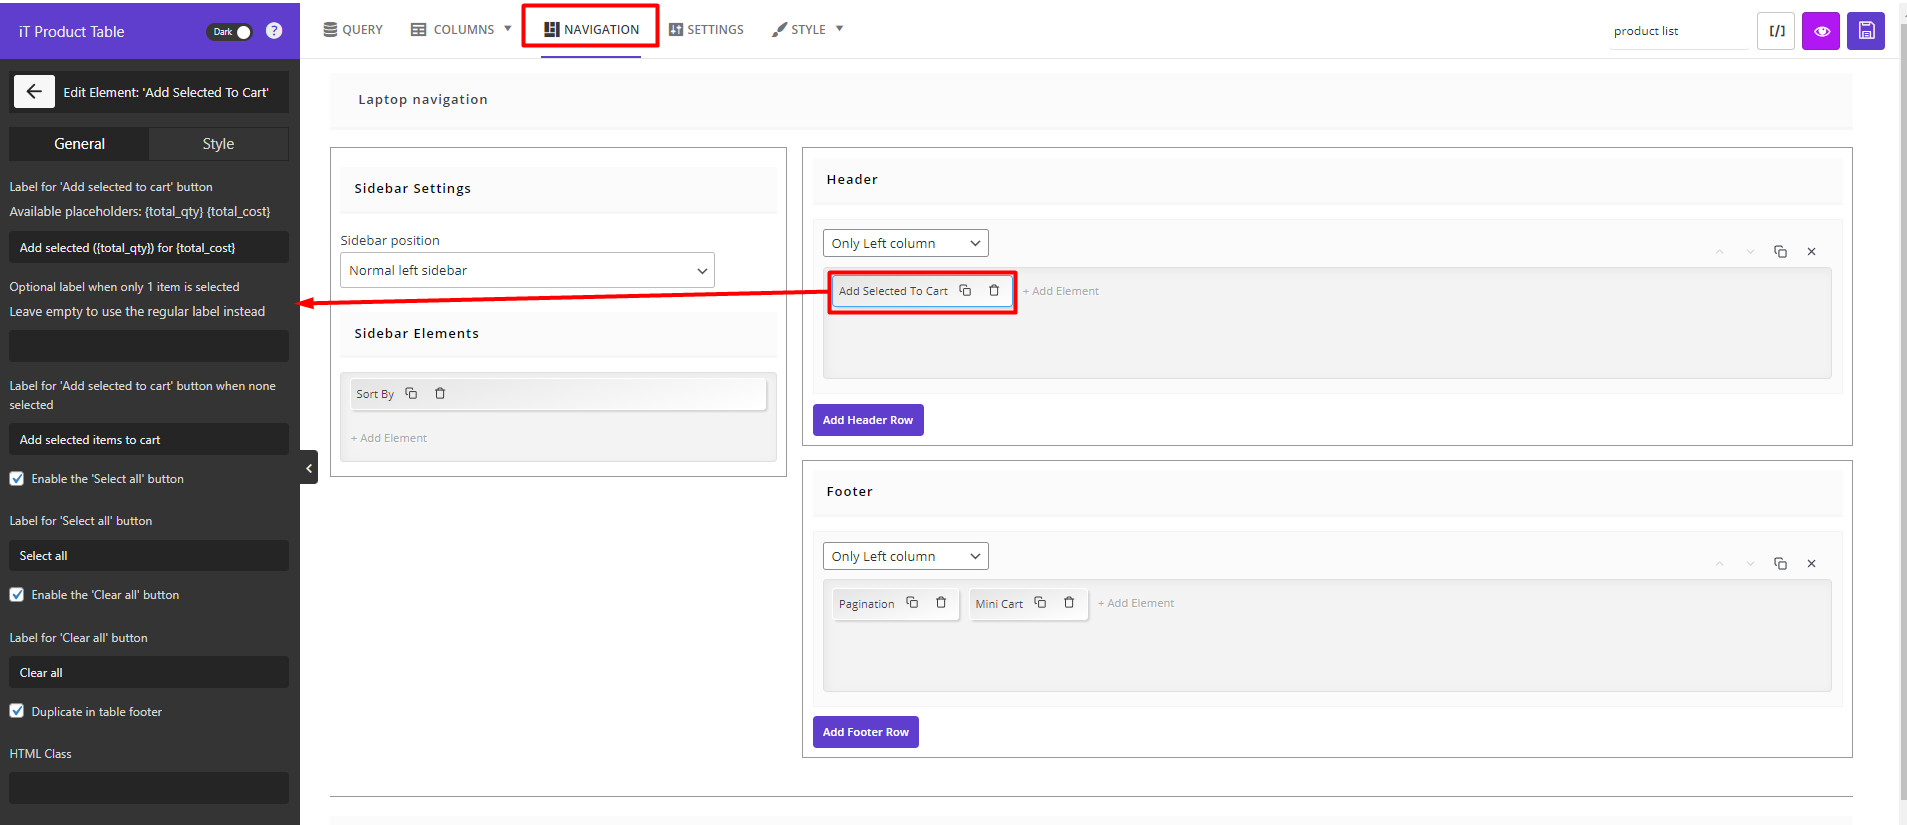
That’s it. You have successfully instructed the WooCommerce product table plugin to display variations on the shop page and let customers add multiple products to their cart with one click.
Show variations on the shop page WooCommerce by overriding
One of the most amazing features of the WooCommerce product table plugin is to override the WooCommerce shop page. This feature allows you to show the product table on the WooCommerce shop page with one click.
let’s review how you can override the WooCommerce shop page with our plugin:
- Navigate to WordPress Dashboard > iT Product Table > Settings.
- Open the archive override item in the General tab.
- Locate the Shop Override Table and choose the name of the created table from the list.
Note: It is important to save the product table with a name in the plugin to see it in the list.
- Press the Save Settings button.
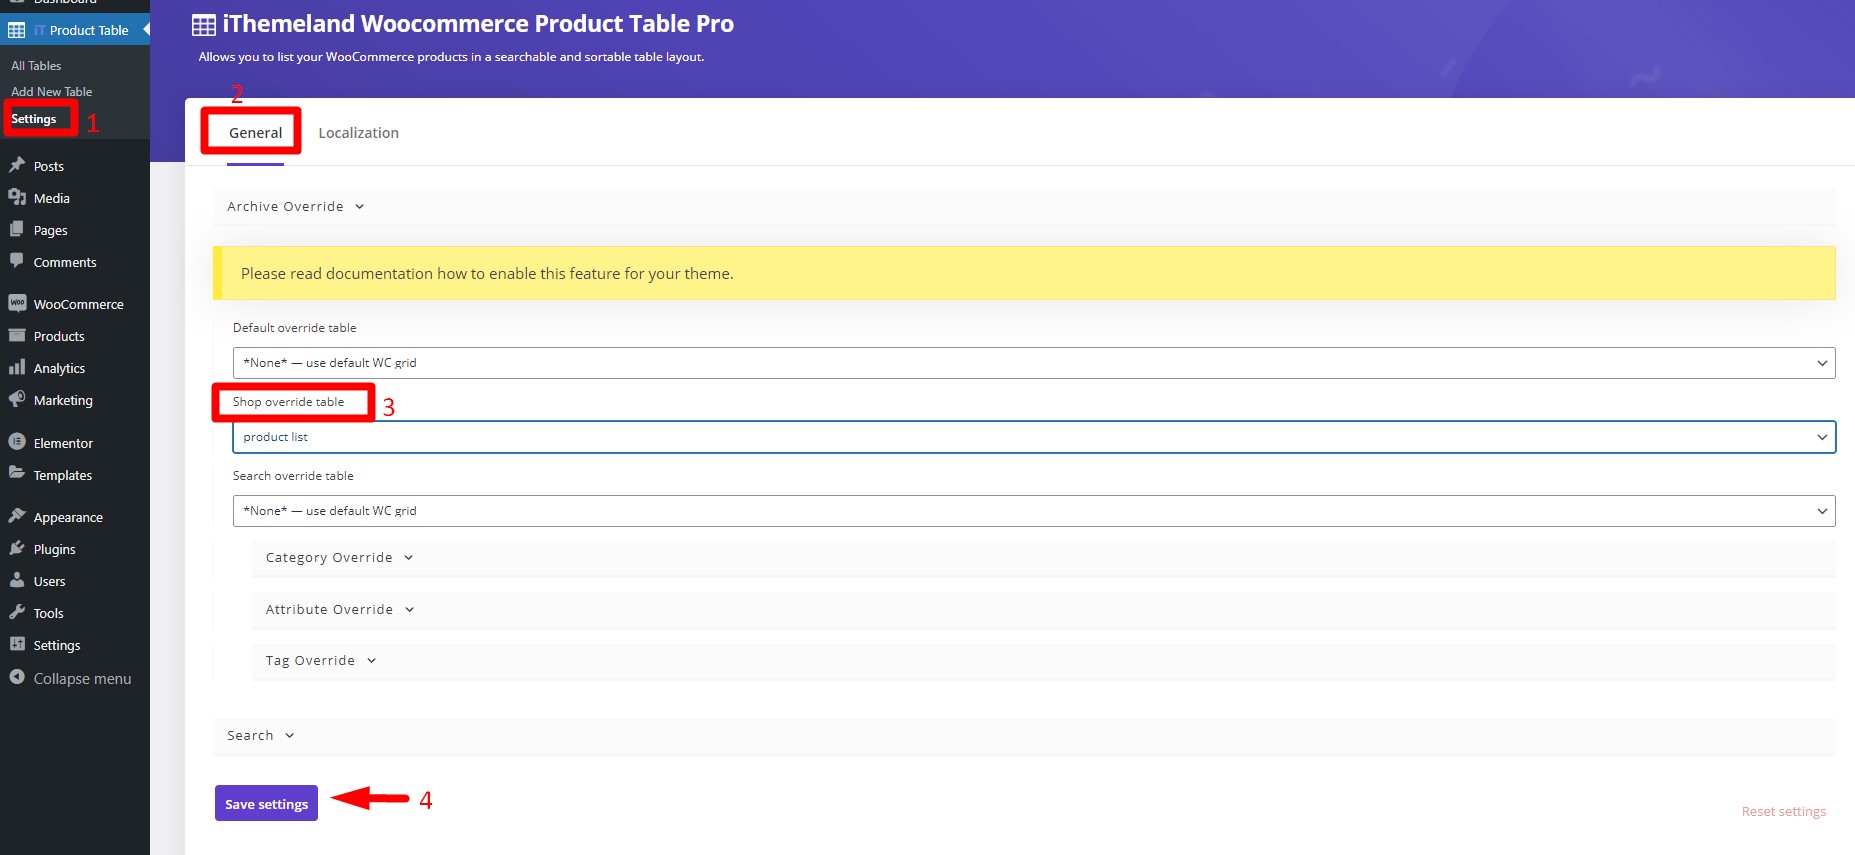
You can use this method to let WooCommerce show product variations on the shop page instead of the Shortcode method we have described in step 5.
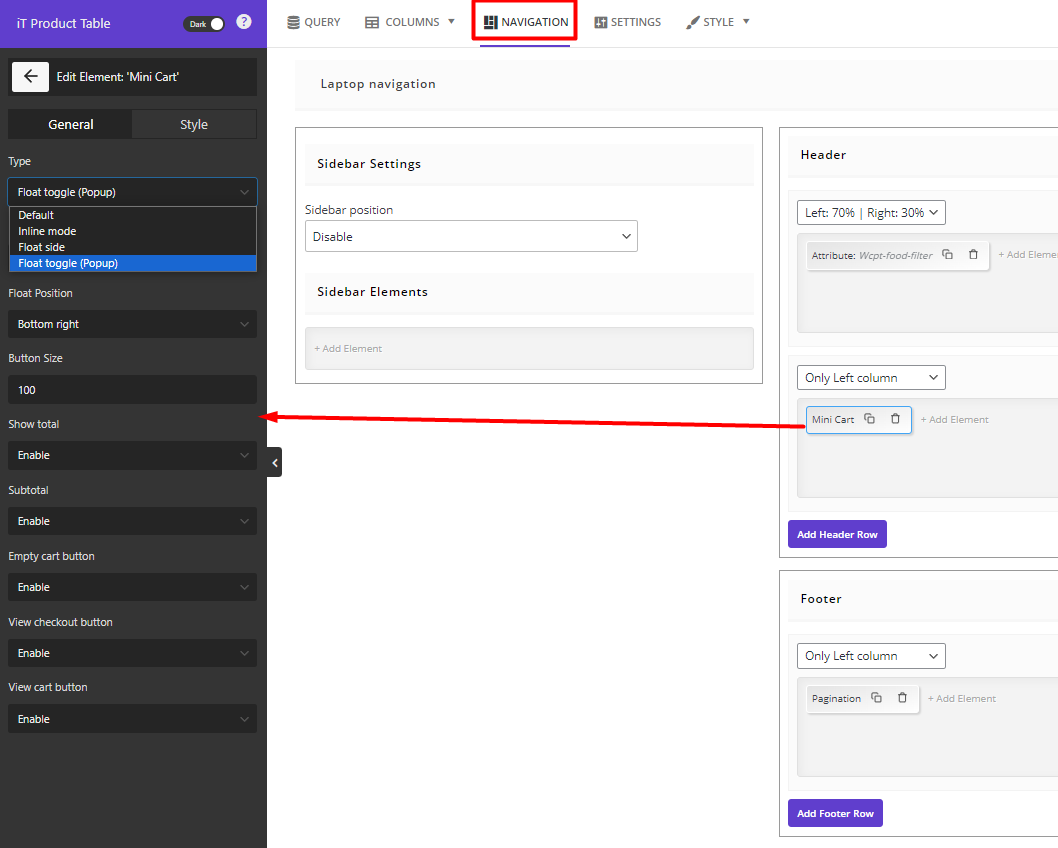
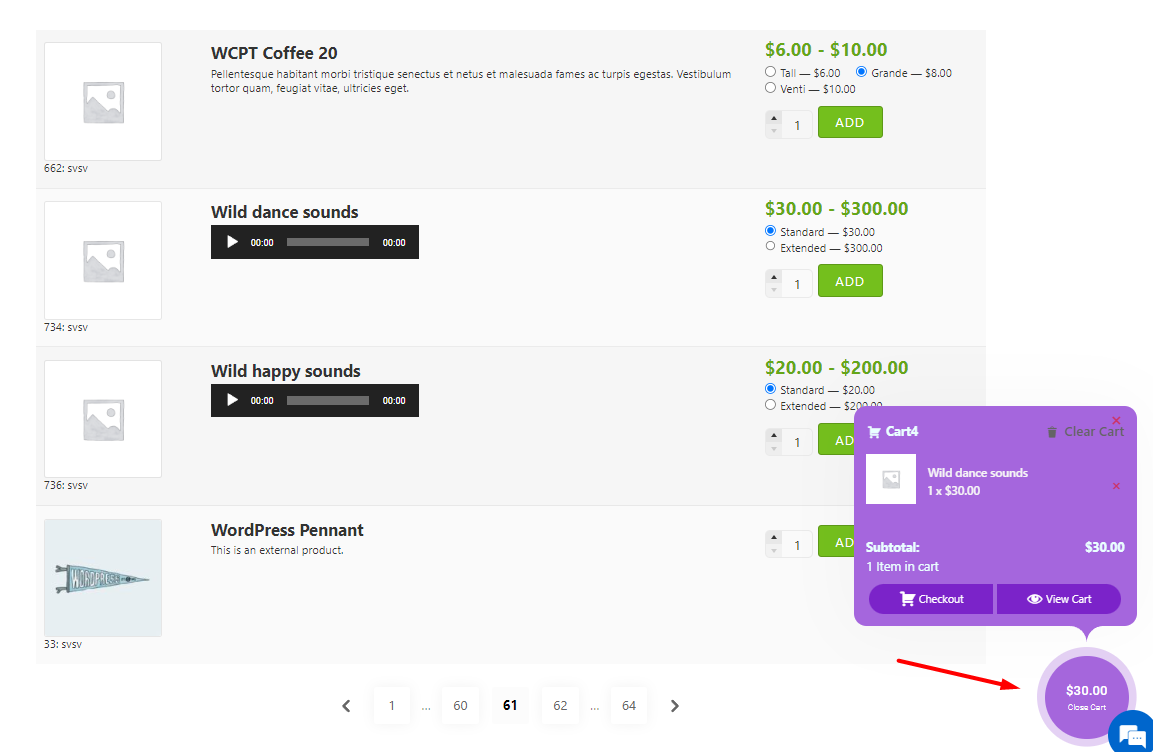
Display the mini cart on WooCommerce shop page
Displaying a mini card on your WooCommerce shop page can help increase your sales and conversion rates by creating a more user-friendly and efficient shopping experience for your customers. This advantage along with WooCommerce select multiple variations allows customers to view them in the mini card after adding several variable products to the shopping cart and also view other information such as the total amount and the number of items.
With the help of the WooCommerce product table plugin, you can add the mini card to any part of your site, such as the header, footer, sidebar, or even display it as a float cart button.
It is possible to display the mini card on the WooCommerce store page by following the steps below:
- Go to the Navigation tab.
- In one of the navigation areas including header, footer or sidebar click on the Add Elements.
- Choose mini cart from the list of Elements in the left panel.
- Customize the way you want to display the mini cart on the shop page by setting the configuration in the General tab and Style tab- For example, in the Type field you can choose to show the mini cart as Inline mode, Float side, or Float Toggle.
When you set your customizations, the final result is like below:
What are the advantages of displaying product variations in separate table rows?
The main advantage of displaying product variations in separate table rows is to improve the customer’s buying experience. With this method, customers can add each variable product to the shopping cart individually and see the price of each one separately.
This method of displaying variable products also saves customers time because they do not always need to open the product page to see the available variations. The faster the user’s buying experience, the higher the conversion.
On the other hand, customers can see all the variations of a product along with their prices at once and enter the required quantity. Then, click “Add to Cart” to order all the selected variations simultaneously.
Another advantage of displaying product variations as a list on separate rows is that customers can easily compare them. This can have a very positive effect on purchasing behavior and increase site sales.
TABLEiT – Product Table for WooCommerce
The easy way to show WooCommerce product variations in separate table rows
Conclusion
Displaying WooCommerce product variations in an organized and accessible way plays an important role in improving the shopping experience for customers. While the default WooCommerce dropdown method works for simple stores, it often becomes inefficient when dealing with a large number of products and variations.
Using TABLEiT plugin is a powerful solution that allows customers to view all available options in one place. When variations are displayed in separate table rows, customers can easily compare different options such as color, size, or configuration and quickly add them to the cart.
This approach not only improves usability but also helps reduce friction during the purchasing process. Customers spend less time navigating between pages and can make faster buying decisions.By displaying WooCommerce product variations on the shop page and organizing them in a structured table format, store owners can create a more user-friendly store interface, increase product visibility, and ultimately improve conversion rates.
FAQ
What is a WooCommerce variations table?
A WooCommerce variations table is a layout that displays product variations in a structured table format instead of dropdown menus. Each variation can appear as a separate row with details such as price, attributes, and add-to-cart options. This allows customers to compare variations easily and select the product they want much faster.
How can I show WooCommerce variations on the shop page?
To show WooCommerce variations on the shop page, you can use a product table plugin like TABLEiT that allows variable products to be displayed in table format. This method lets customers see available variations directly on the shop page and add them to the cart without visiting each product page.
Why should I display WooCommerce product variations in separate table rows?
Displaying product variations in separate rows makes it easier for customers to see all available options at once. Instead of navigating through dropdown menus or opening multiple product pages, users can compare variations such as color, size, or price in a single table and quickly add them to the cart.
Can WooCommerce show color variations on the shop page?
Yes, WooCommerce can display color variations on the shop page using variation tables or attribute display elements. By showing attributes like color or size directly in the product table, customers can quickly choose their preferred variation without leaving the shop page.
Is it possible to select multiple WooCommerce variations at once?
Yes, the TABLEIT plugin allows customers to select multiple variations and add them to the cart simultaneously. This feature is especially useful for wholesale stores or shops where customers often purchase multiple variations of the same product.