Design a mobile store is not a complicated task when you are using a professional plugin like WooCommerce product table.
In this tutorial, we are going to help you create an impressive and customer-friendly mobile store by product table in three simple steps.
Step 1: Import your products to the WooCommerce
To start designing an online mobile store, at first, you need to import some essential information about your products into the WooCommerce:
To turn the potential customers visiting your website into the real customers who decide to buy products from your online store, you have to pay attention to:
- What information you are providing for the customer?
- How do you display the information to the customer?
About the first concern, you have to add as many details as you can to your product page. It help to customers to find their requirements easier.
There are a lot of essential and important information related to the mobile phone such as:
- Brand
- Model
- Price
- SIM
- CPU
- GPU
- Body
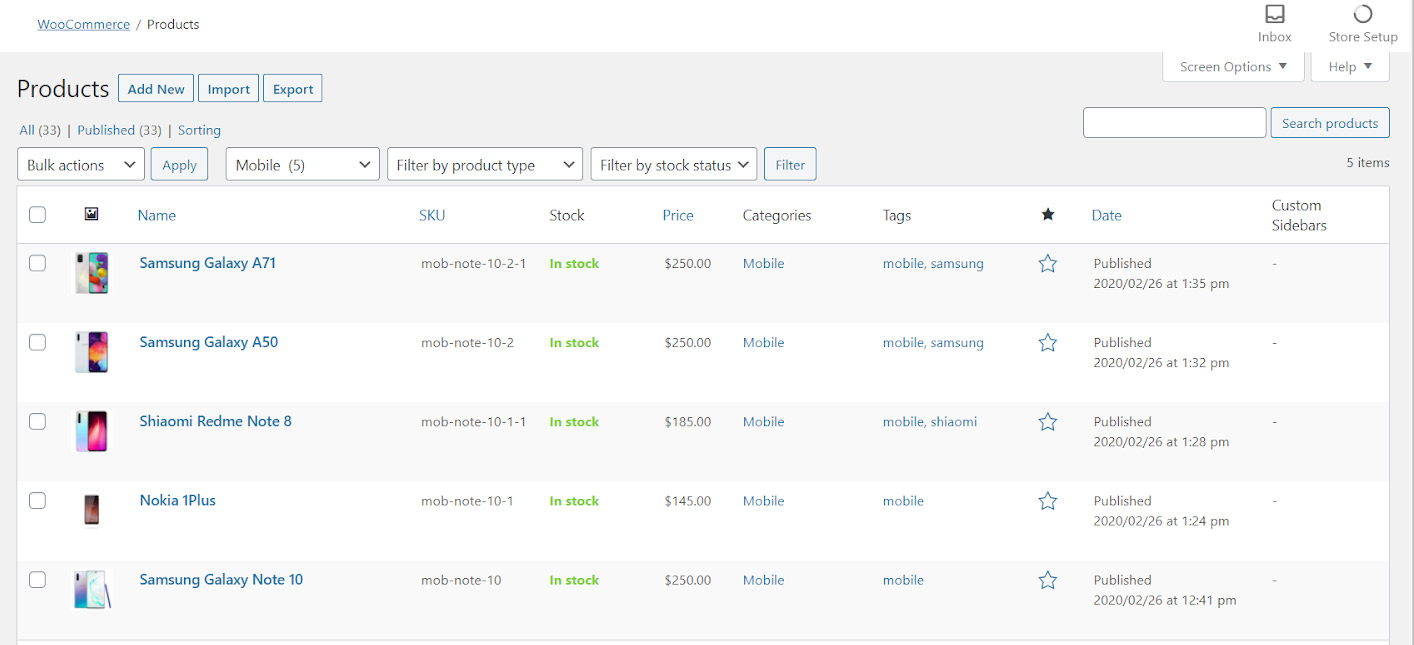
As you can see in the below picture, there are some limited default field in the WooCommerce product page:
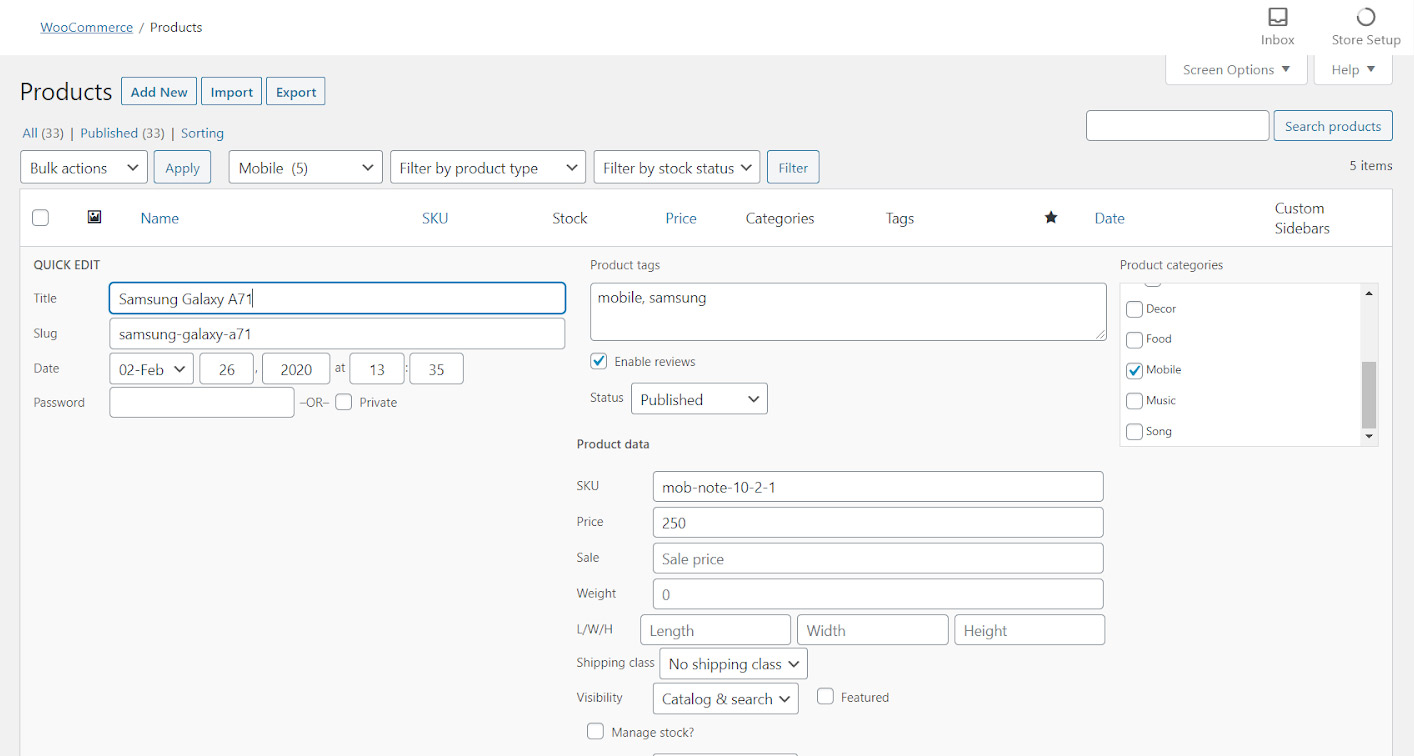
So, to complete the information of each product, you have to add some custom fields to show the characteristics of each mobile phone in the product page of WooCommerce as below:
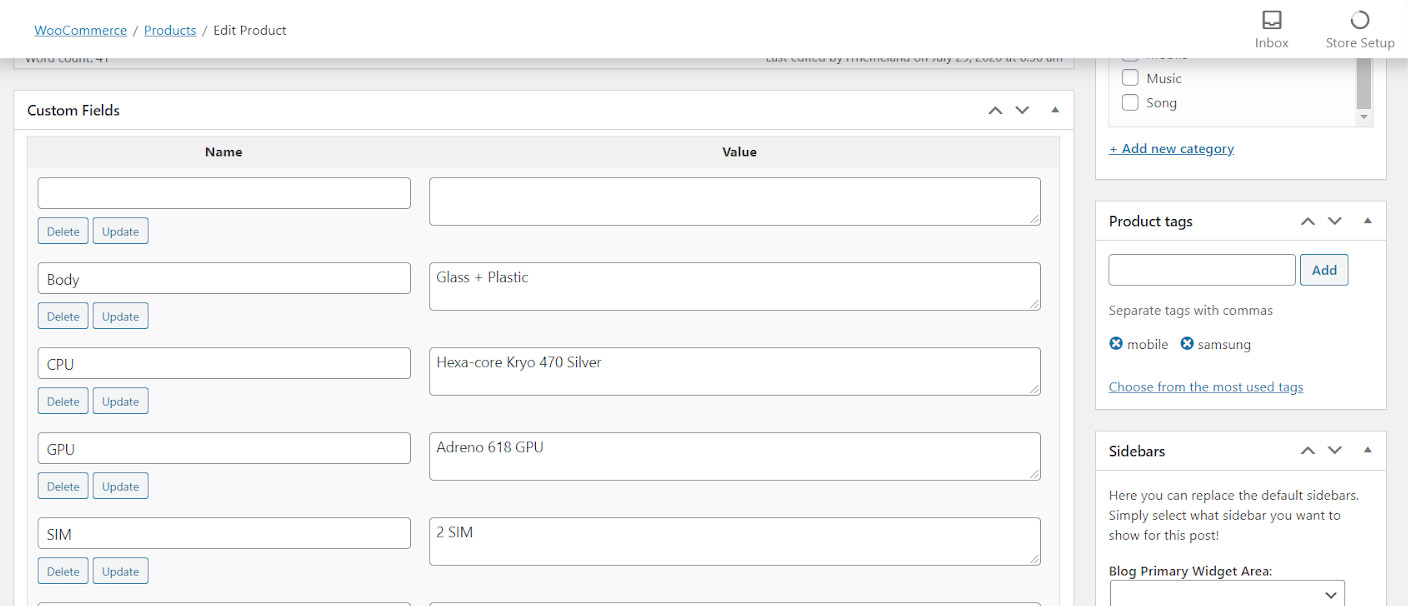
Note 1: You can use the name that assign to each field in the WooCommerce product table plugin as the extra columns.
Note2: You have access to as many fields as you add to this section of WooCommerce later in the Woo Product table plugin. So, don’t hesitate to create more fields, If you have more information about your products.
It seems that we solve the first problem and provide the most important information related to each product. So, it’s the time to pay attention to the second concern.
Follow the next steps to discover how to display this information to your customers in such a way that encourages them shopping from your online mobile store.
Step 2: Design a mobile store using product table
As you already knew, installing the WooCommerce product table plugin is the best way to design a product table for a mobile store.
After installing this plugin, you are completely free to design a mobile store exactly according to your requirements.
Let’s see what we are offering for improving the performance of your online store and transforming the appearance of it.
Create a new table
To start designing a mobile store with this plugin, you have to create a new table by going to:
WordPress Dashboard > Woo Product Table > Add New
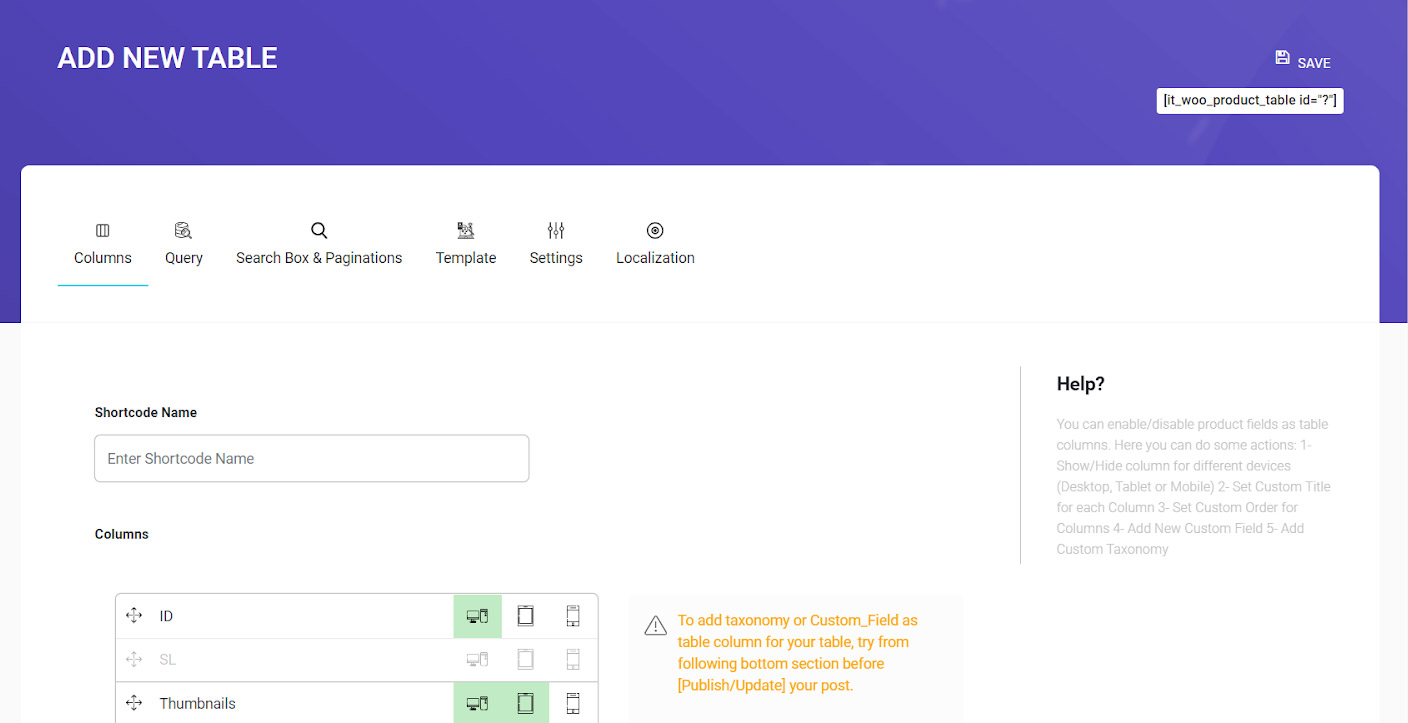
after creating a new table, you can see the “Columns” tab of our plugin.
In this page, we provided some default options to help you make your product table. However, as we mentioned before, you can add extra columns according to the custom fields you added before to your WooCommerce product page by using the form we have designed next to the columns list.
Table column settings
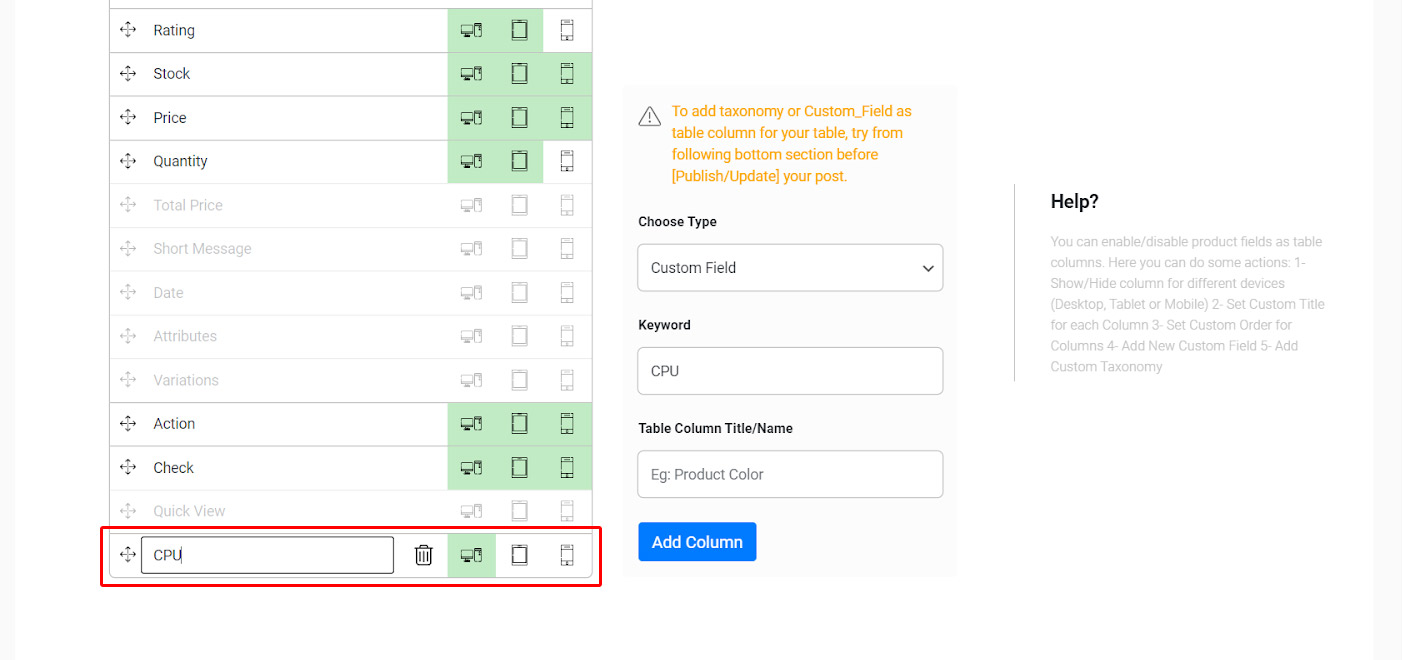
For example, we are going to add “CPU” column to our product table by following below steps:
- Choose “custom field” under the “Choose Type”
- Type the name of our preferred custom field which is “CPU” as we assigned it before in the WooCommerce product custom fields section.
- Type a name for this column that you want to show in the final product table on the “Table Columns Title/Name” field.
- Click on “Add Column” button
if you click on “Add Column“, a new column will be added to the list that you can change its name by typing in the text box, as below:
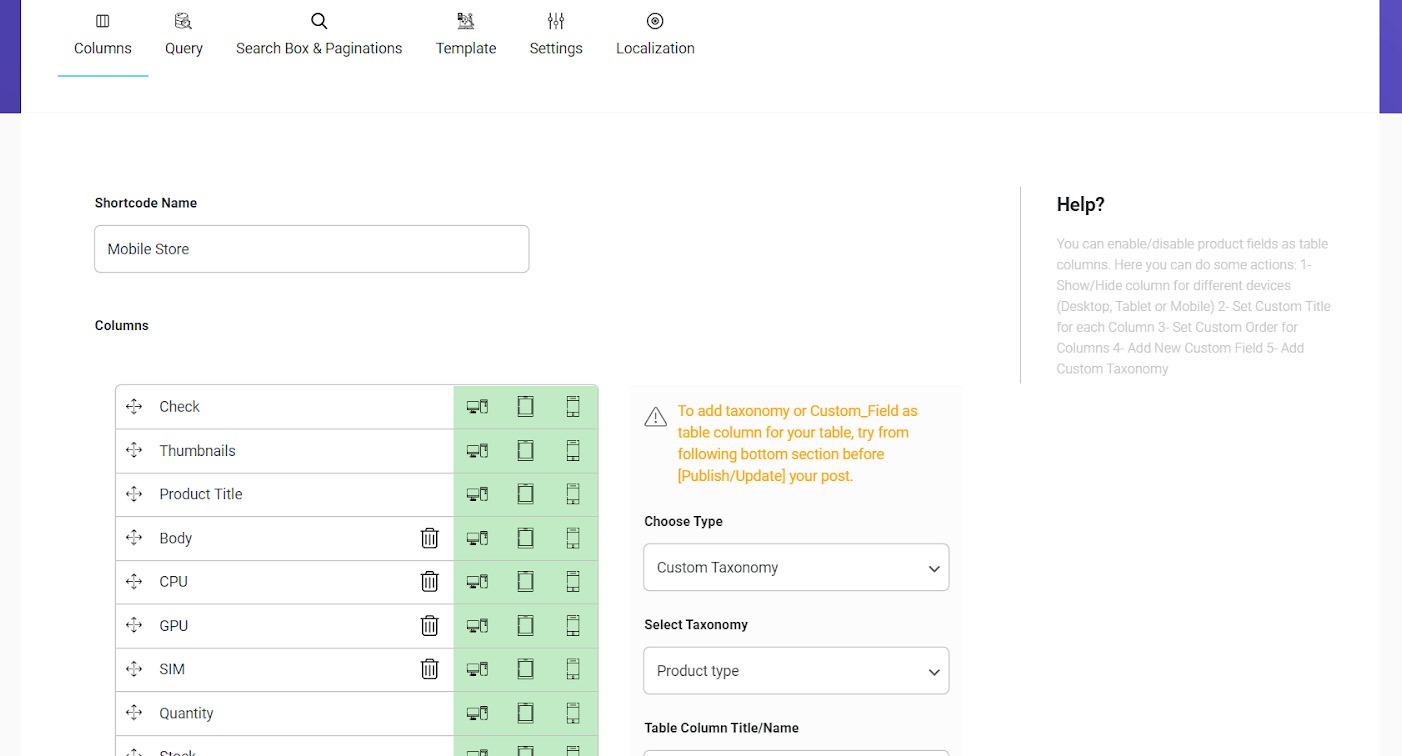
After adding all of the custom fields to our product table, you can also choose the other essential columns among the default fields.
As you can see in the below picture, we selected below columns from the default list:
- Check: A checkbox will be displayed next to each product to enable customers to select /unselect it.
- Thumbnail: You can seee the feature image(s) of products in the table.
- Product Title: You can see the name of products – Model in this example- in the product table.
- Quantity: This field enables customers to specify the number of products they want to purchase.
- Price: You can see the price of products in this column.
- Action: “Add to cart” options are available in this column.
and added the new columns including:
- GPU
- CPU
- SIM
- Body
Create custom query to design a mobile store
To complete the design of a mobile store, you have to choose the right products to be shown in website.
It is easily available in the “Query” tab of the WooCommerce product table plugin.
In this tab, you can filter the products to be displayed in the product table.
As we are going to design a mobile store, we filtered product in the Mobile category, as below:
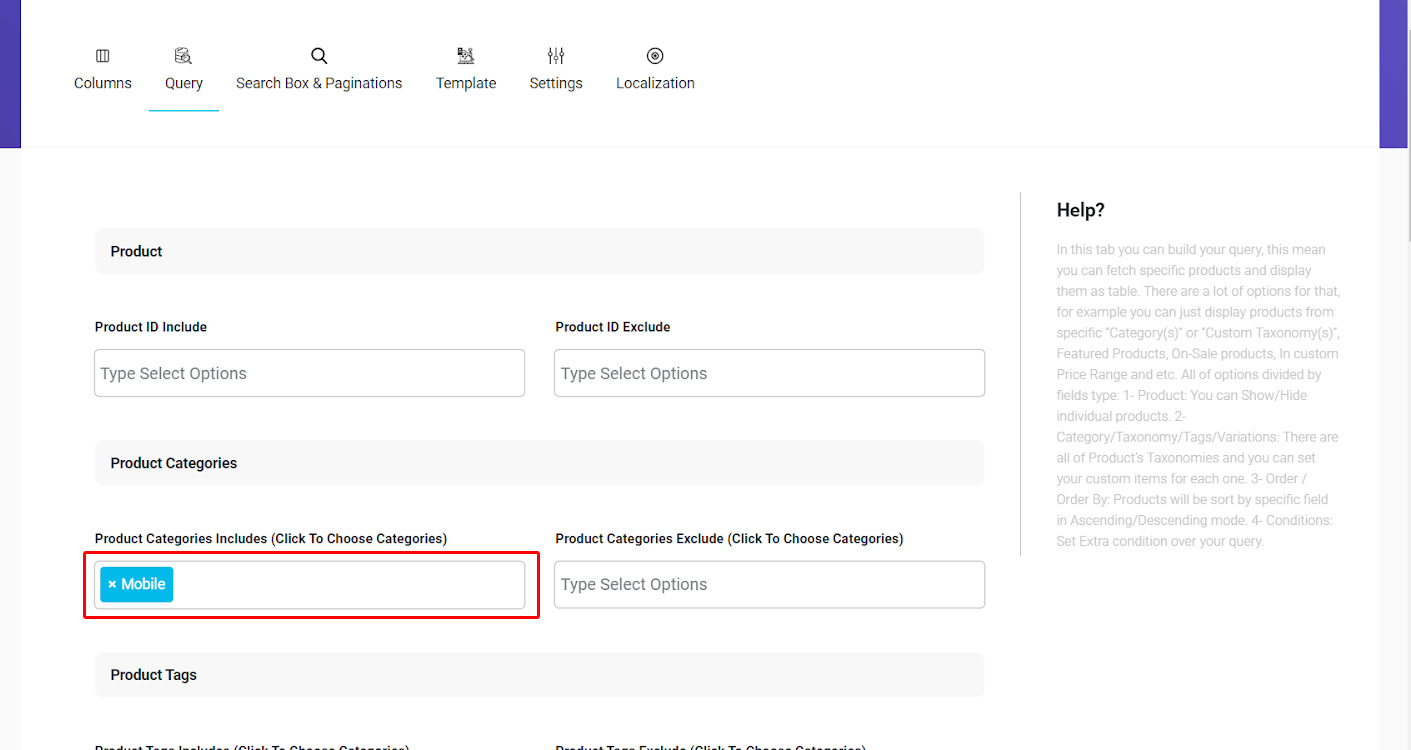
More information is available on “How to create a product table with custom query?” about filtering the products in the “Query” tab.
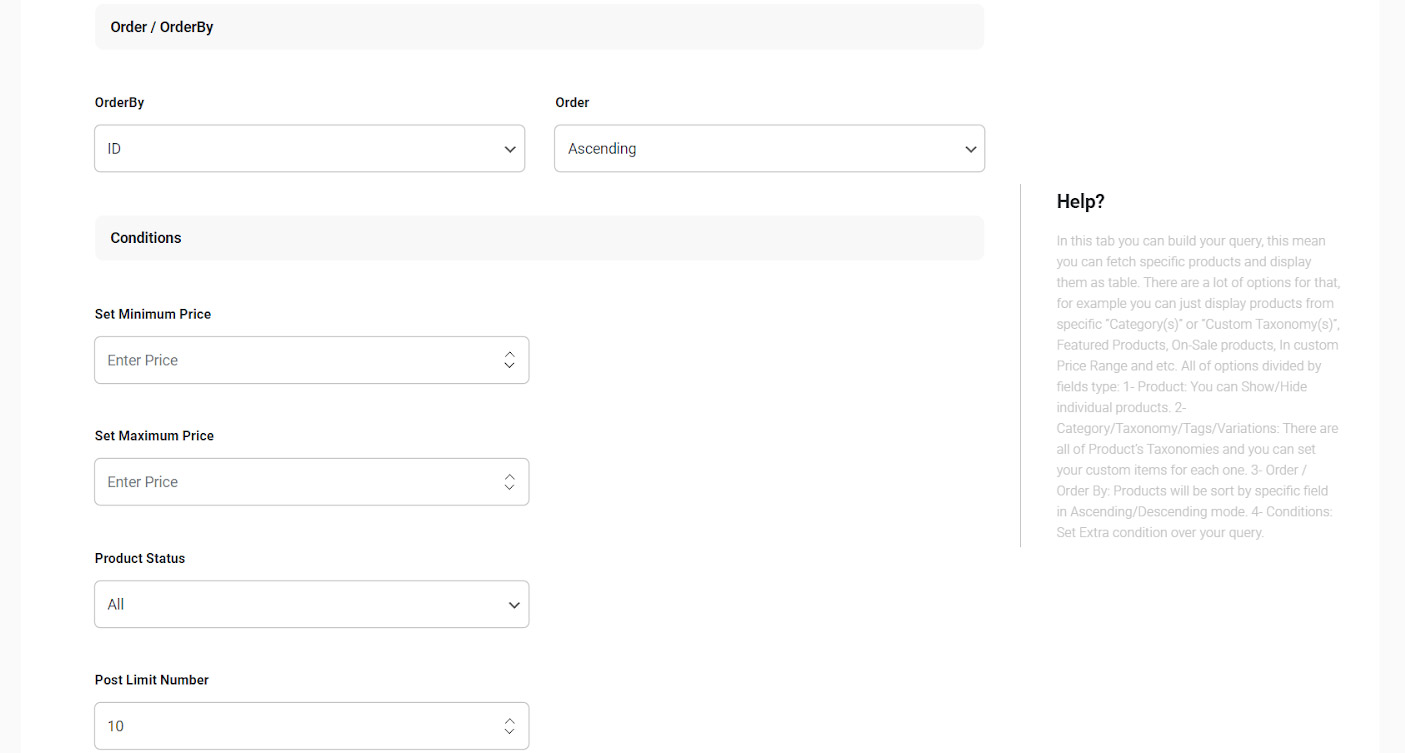
We also set some conditions for our product table in the “Query” tab such as:
- Product Status: All products including “In stock”, “Featured” or “On Sale” to be shown in the table
- Post Limit Number: Number of products to be displayed in each page.
Add search box to mobile box for our mobile store
Search box is another essential part for designing a mobile store, as it can help your customers to find their suitable products, easily and quickly.
To add search box to your product table, you can simply go to the “Search Box and Pagination” tab in the plugin and mark the enable under “Search Enable/Disable” field, as below:
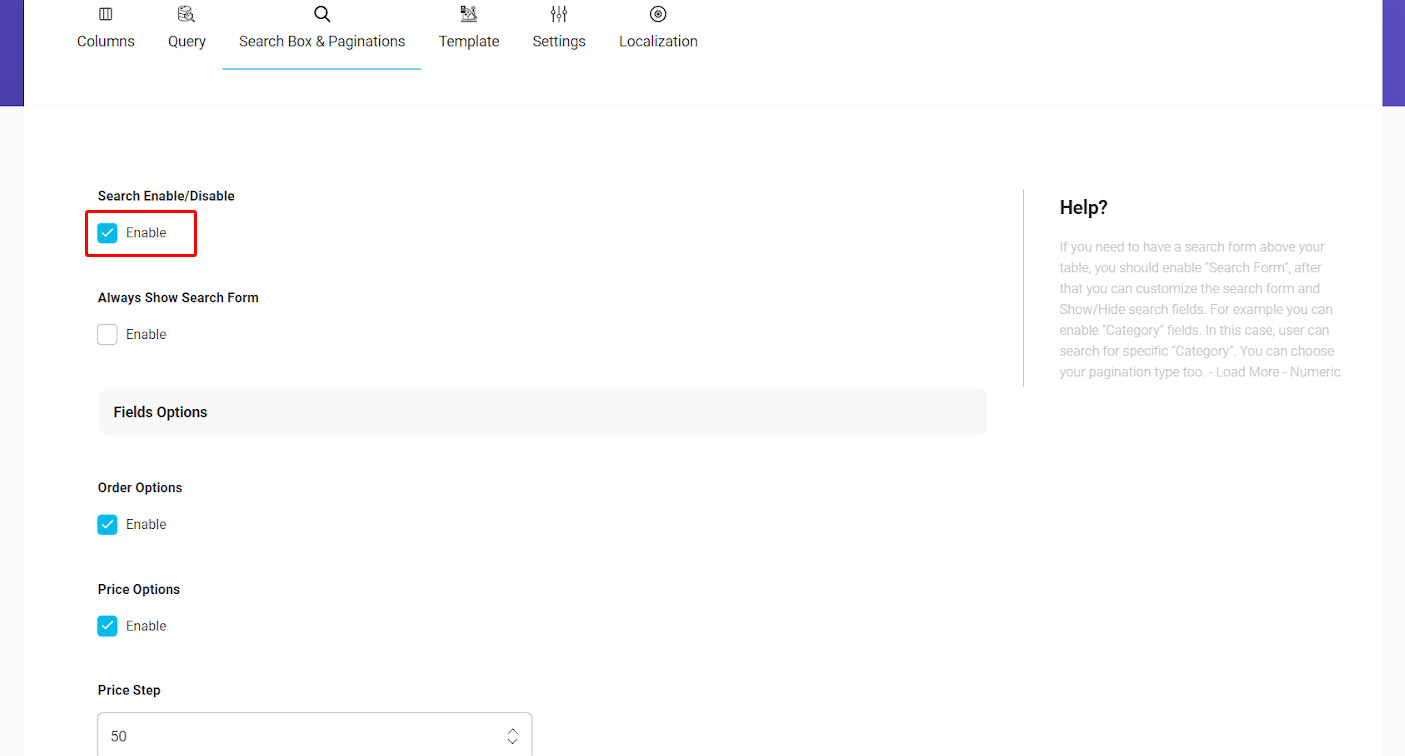
By enabling the search box, you have access to so many other options which help you to improve customer experience when shopping from your online store.
As we described all items of this field in “How to create a search form for the products in WooCommerce product table Plugin”, we just skip this step and jump to the next step.
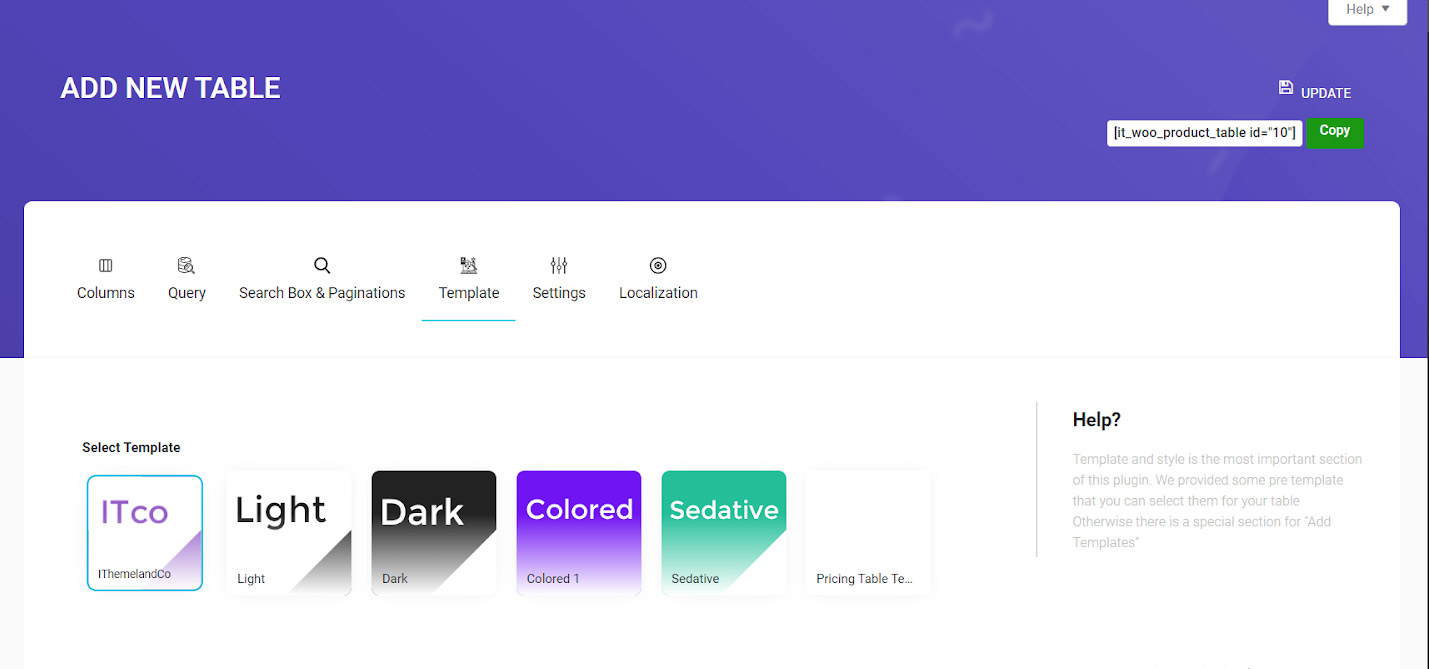
Choose a template for mobile store
Appearance of a product table plays an important role in attracting customers, so you have to pay attention to choosing a suitable template when designing a mobile store.
To make it easy for you, we have added some templates as default in our plugin; however, you can create a new template according to your taste by clicking on “Add New Template”.
If you need more help, please refer to “How to create a product table with a custom template?”.
In this tutorial, we selected “IThemelandco” template for our product table:
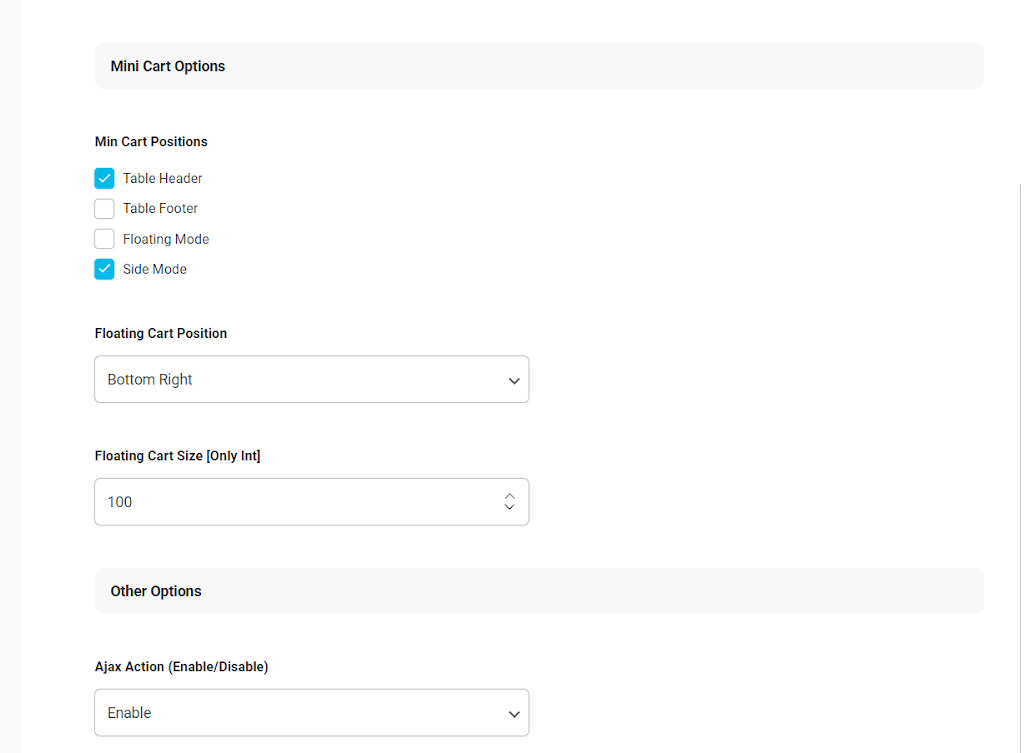
Change settings
This is the final step in designing a mobile store by WooCommerce product table plugin.
By going to “Settings” tab, you have full access to product options, “Mini Cart” options and other options to edit your product table.
Let’s try some of them.
Under “Mini Cart” options, we enabled:
Table Header
A box will be appeared above the table to enable customers to see the products added to the cart with their price. This box includes some other options including:
- Cart Clear button.
- Check out button.
- View Cart button.
Side mode
A column will be added to the table displaying the total price and customers can directly access their cart by clicking on this box.
Note: You can also change the floating mode options such as size or position, if you have already enabled this option.
Step 3: Publishing the product table
As we designed our mobile store perfectly, now it’s the time to impress our customers by publishing it.
As we described in “How to insert product table shortcode in wordpress?”, you have to use shortcode to publish the product table as one of the pages in WordPress:
By adding shortcode and publishing the product table page, our product table was displayed as below:
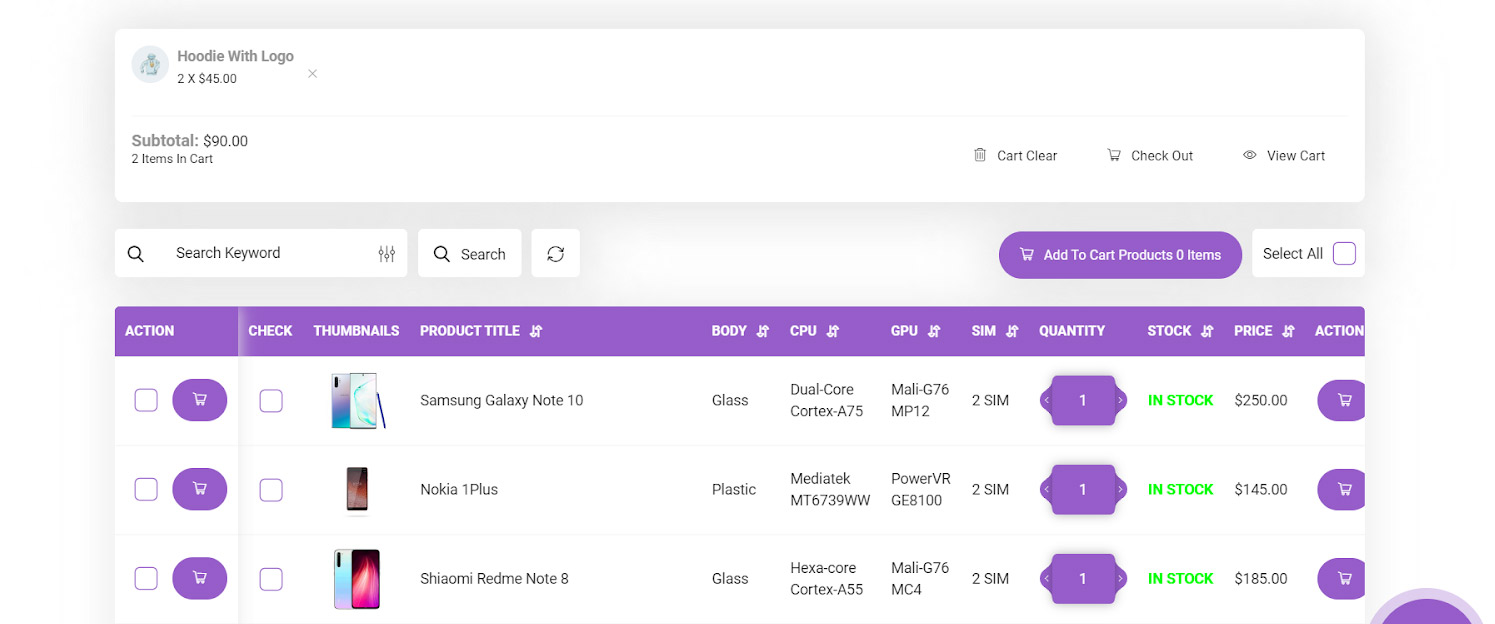
As you can see, all of the information we added to the custom fields of our product page such as CPU or SIM, are displayed in the related columns.
There is also a search box as we have chosen. And the Mini cart is displayed as a header and a sidebar.
As we described in another tutorial, you can also replace the Shop Page and Archive Page of WooCommerce by your product table page to be displayed for your customers in the online mobile store.
Comments