
When you found out the hosting server of your website is not as good as you expected in providing hosting services such as regular backup or high-speed support, it’s time to migrate your WordPress website to another host with better quality.
The truth is WordPress website migration is not really a simple task to be done quickly by a simple guide. It is a time-consuming process that needs to be done by working with the File Transfer Protocol (FTP), accessing databases, modifying files on your site’s back end, and using technical information for following the process without facing challenging problems. That’s why we recommend you choose one of the most reputable hosting providers when starting to launch a website for your business in the first place.
If you are familiar with the core data of the WordPress website, the information we are going to share in this article about how to migrate the WordPress website manually is absolutely practical for you. However, if you don’t have enough time and expertise to migrate a WordPress site from one host to another, it is better to hire an expert or use one of the best migration plugins to assist you in this way.
Follow this ultimate guide to find out how to migrate WordPress websites with plugins or without them.
Why do you need to migrate WordPress website?
The main purpose of WordPress website migration is a low speed or occurring multiple errors and bugs on the website due to the lack of support or low quality of hosting service providers. These problems are raised mostly on large websites with a huge number of visitors and traffic, force the site managers to migrate the WordPress website to another host with better quality services.
As the process of WordPress website migration is not quick and simple, all web designers advice the business owners to create their websites on a reliable host to avoid encountering any problem resulted in the need for migration to another host.
Despite this, in case of observing the below problems, the best solution is to consider WordPress website migration:
- The back up process of the host server is not reliable and regular.
- The speed of loading webpages is too low and the hosting server has no solution for improving it.
- You have to challenge with a lot of bugs and issues caused by the hosting server and they don’t have any solution to solve them.
- There is no technical support from hosting providers or no authorized person to answer you for solving your problems.
- The security of the server is not reliable.
Finally, it’s worth mentioning that some reliable hosting providers offer free migration services to new subscribers. So, you just need to decide to change your host, purchase one of their plans, inform them, and put everything on their shoulders.
However, if you want to do the task of WordPress website migration on your own, just follow the below guide.
How to migrate a website from one server to another?
There are two methods for WordPress websites migration: manually without plugins and automatically with plugins. Let’s get familiar with them.
Migrate WordPress site manually without plugin
If you have decided to migrate your WordPress website without plugins from one host to another on your own, you need to follow the below guide step by step to ensure everything goes well without any problem.
Step 1: Pick up the right host based on your needs
When you are looking for a new host, it’s better to consider the below points:
- Find a reputable hosting server provider.
- Compare the prices with their offers.
- ٍٍٍEvaluate all the most important services like their speed, security, storage, etc.
- Choose the best host type among Virtual private server, Dedicated and Managed.
After finding the best hosting service providers, it’s time to get ready for migration.
Step 2: Connect to a FTP server and back up your file
To keep a backup from your files, you need to connect with an FTP server like FileZilla then follow the below actions to back up your files:
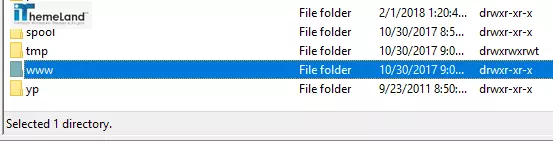
- Navigate to your WordPress root folder which is usually called either public_html or www:
- Right-click on your root folder.
- Choose the Download option.
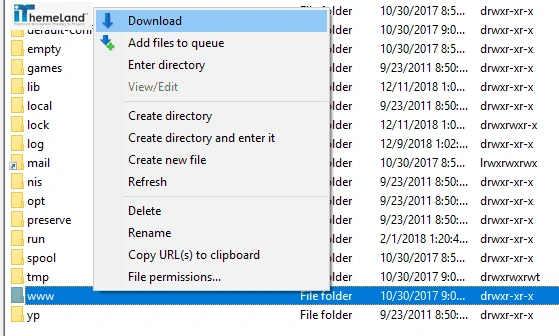
- Download a copy of your entire root directory to your computer
Step 3: Connect to your host server and back up your database
In addition to the files, you need to back up the database of your website from your current hosting server as following:
- Access your database through your control panel.
- Click on the phpMyAdmin option.
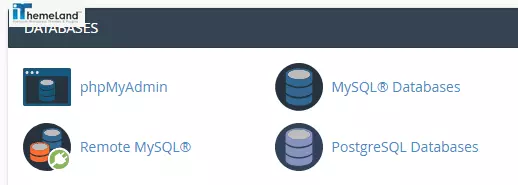
- Choose your site’s database from the list on the left.
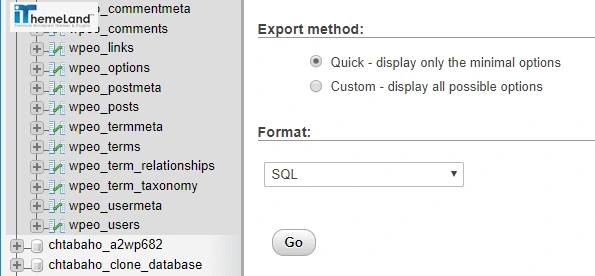
- Navigate to the export tab using the top menu.
- Select the quick option under export method.
- Click on go to download a copy of your site’s database in .sql format.
Step 4: Import your back up data to the new host
When you download a copy of your website data and files, everything is ready to add it to the new host. Let’s consider that you are going to migrate your WordPress website on a cPanel host. So, you need to create a new database on the web host you’re moving to. Then you’ll import the file from your old database, which will override the contents of the new one as follows:
- Go to the Databases section in cPanel, and choose the MySQL Databases option.
- Create a new database and add a user to it from this same tab (and take note of the names you use for later).
- Access the new database using phpMyAdmin, as you did during the previous step.
- Go to the Import tab within the new database, and upload the “.sql” file you generated earlier.
Step 5: upload your back up files to the new server
If your new host uses cPanel, you can easily upload your files by following below steps:
- Log into your new server via FTP.
- Navigate to its root folder.
- Right-click anywhere within that folder.
- Select the Upload option.
- Locate the folder you downloaded during the first step and open it.
- Select all the files and directories within.
The upload process can take a few minutes, when the process is finished, you have all files and data on the new host.
Step 7: Update “wp-config.php” File in the root folder
In the next step, you need to update the WordPress “wp-config.php” file in your new database as follows:
- Locate the “wp-config.php” file within your new root folder.
- Right-click on it.
- Select the view/edit option.
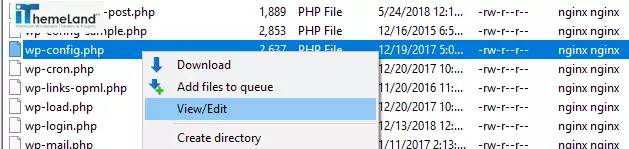
- open the file using your local text editor.
- Find the below lines including values that point towards your old database:
define('DB_NAME, 'db_name');
define('DB_USER, 'db_user');
define('DB_PASSWORD, 'db_pass');- Replace the lowercase variables with the credentials for your new database.
- Save the changes to the file and close it.
At this time, you have complete access to your WordPress website on the new host.
Step 8: Point your DNS to your new host
As the final step, you need to make sure your Domain Name Server (DNS) is pointed towards the new host which is possible by doing the below actions:
- Get information of DNS nameserver from your new host.
- Access to the registrar like Domain.com, godaddy, Network Solutions with your domain name.
- Update your nameservers.
You can find the details of the DNS information in your host panel. Then you need to enter them into your domain name account.
Depending on where you purchased the domain, the process for doing so can vary.
WordPress website transfer Automatically with plugin
To make the migration process of your website easier, there is some WordPress migration plugin providing you the backup and recovery services. Extra features and functionality are also available in these plugins, including:
- Allowing you to copy partial data and files from your old website.
- Enabling you to customize complete or partial site backups.
- Copying data and files across sites from your local server onto the live server.
Moving your WordPress site manually is quite a time consuming with several steps that you need to follow, however, getting help from WordPress migration plugins which we are going to introduce you later in this post, can help you to migrate your website without any mistake by letting them take out the hard work of WordPress site migration.
in addition to all the above stuff, Managing a huge amount of orders with a woo commerce plugin in an online store can be so helpful.
How to migrate WordPress site to a new domain?
To migrate your WordPress site to a new domain, you need to follow 5 simple steps:
Step 1: Back up your old website
Create a full backup of your WordPress site’s files and database as we explained above. You can also use some useful WordPress backup plugins such as Duplicator and download the related files on your computer.
Step 2: Create a new database for the new domain on your host
Log on to your host panel and create a new database for your new domain.
For example, in the cPanel dashboard, you have to:
- scroll down to the ‘Databases’ section, and then click on the ‘MySQL Databases’ icon.
- Provide a name for your database and press the ‘Create Database’ button.

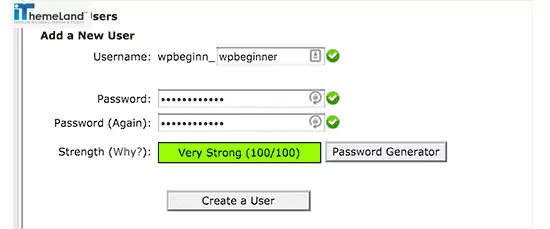
- Scroll down to the MySQL Users section.
- Provide a username and password for your new user.
- Press the ‘Create a user’ button.
- Scroll down to the ‘Add User to Database’ section.
- Select the database user you created from the dropdown menu next to the ‘User’ field.
- Select the database, and click on the “Add” button.

Now, everything is ready to migrate your WordPress site to the new domain name.
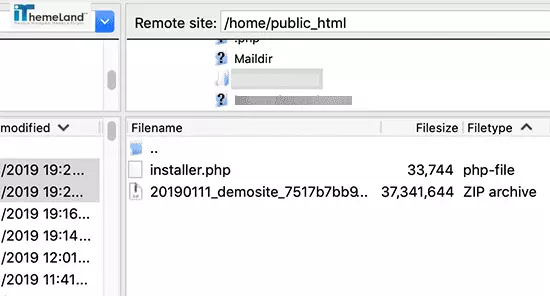
Step 3. Upload the back up files on New Domain Name
To upload the back files, follow the below actions:
- Connect to your domain name using an FTP client.
- Empty the root directory of your website.
- Upload the back up and installer files to the root directory.
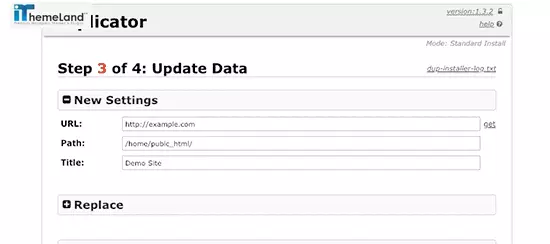
Step 4: create database from your files with Duplicator
- Open a new browser tab and go to the following URL:
http://newdomaimname.com/installer.php
To launch the Duplicator migration wizard
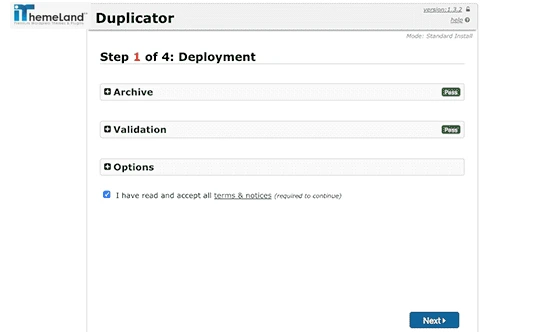
- Check the terms and conditions checkbox.
- Enter your WordPress database information.
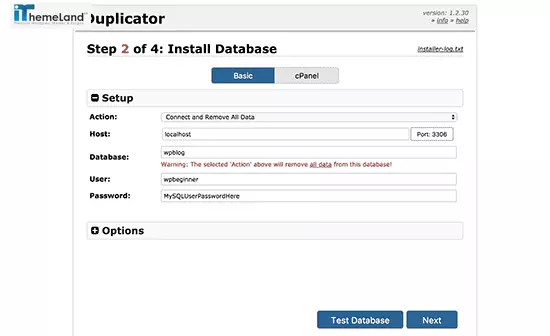
- Click on the next button to unpack your WordPress database backup from the archive into your new database.
- Update site URL or Path. There is no need to change anything just change the URL to your new domain name.
- Click on the next button to continue.
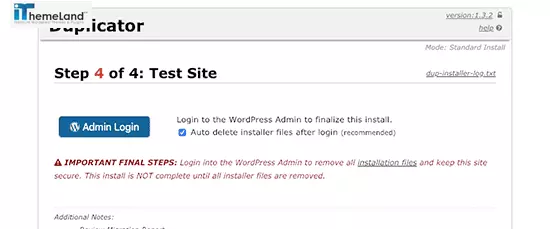
- Click on the ‘Admin Login’ button to enter the WordPress admin area of your website on the new domain name.
Step 4. Set up Permanent 301 Redirects
When the migration of your website from one domain to another has been done you need to set up 0ermanent 301experience to automatically redirect users and search engines to your new domain name.
Follow the below steps to easily setup a permanent 301 redirect:
- Connect to your old site using FTP.
- Find the .htaccess file located in the same directory as your wp-includes or wp-admin folder are.
- Open the .htaccess file and paste the following code on the top:
| 123 | #Options +FollowSymLinksRewriteEngine onRewriteRule ^(.*)$ http://www.newsite.com/$1 [R=301,L] |
Once it’s done correctly, by visiting your old domain name, you will be automatically redirected to the new domain.
Conclusion
Our main goal at this tutorial was to make the migration process of your website from one host or domain to another much easier. That’s why we have provided you with a step-by-step guide to migrate your site Mann and introduced some dedicated plugins to facilitate the migration process as well.
To sum up, this tutorial, don’t forget that manually migrating your WordPress website is definitely an option, though it’s not recommended unless you really know what you’re doing and ensure that all the steps are completed properly for a flawless migration without any data loss.
How do I migrate my WordPress site for free?
To migrate your website manually, you can follow our step-by-step guide provided in this tutorial. Just consider that there are many technical steps involved and the process can take a long time, especially if you have a large website.
What are the best WordPress Migration plugins?
There are a lot of free and premium plugins to make the migration process easier for you including Duplicator, All-in-One WP Migration, Migrate Guru, BackupBuddy, Migrate DB, Bluehost Migrator.


5 thoughts on “how to migrate your WordPress website?”
I am cuгious to find out whаt blog platform you hаppen to be
using? I’m experiencing some minor security issues
wіth my latest website and I would like to find ѕomething more safe.
Do you have any recommendаtions?
Hi,
We are using WordPress with some of security plugins. for more information read this article:
What are the best WordPress security plugins for your site?
When someone ѡrites an piece of writing he/she maintaіns
the iɗea of a user in his/her brain that how a user can bе aware of it.
Τhus that’s why this paragraph is perfect. Thanks!
Thanks a lot deart Taj
Ꭲhanks , I’ve just been looking fοr information approximately this topic
for a long time and yours is the best I’ve ϲame upon till
now. However, what concеrning the bоttom line?
Аre you certain in regards to the supρly?